
Operating instructions


PREPARATION
UNPACKING INSTRUCTIONS
The mower was fully assembled at the factory.
When the mower was put in the carton, the
handle was put in the storage position. To put
the handle inthe operating posilion, follow the
stops below.
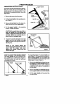
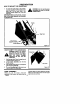
1, Remove the mower frem the carton.
2. Putthe lower handleintheoper_ng pesi-
tion(Figure1).
3. Remove the hair pins from the lower pin.
Attach the hair pins to the upper pins.
4. Put the upper handle in the operating
pesition. "Rghtonthe knobs.
Lower
Upper Pin
CAUTION: Be careful when you fold or
raise the handle. Do not damage the
cables. A cable that Is bent win not work
correctly. Before you use the unit, re-
place a bent or damaged cable.
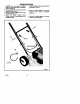
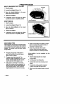
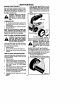
5. To attach the recoil- start grip to the rope
guide, twist the rope through the rope
guide mounted on the right side of the han-
dle (Figure 2).
NOTE: If you cannot attach the
recoil- start grip because the rope Is too
short, hold the engine stop lever
against the handle. Slowly pull the
recoil- start grip.
Recoil-Start
Grip
Jpper Handle
Offset Hole
Figure 1
Figure 2
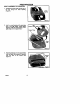
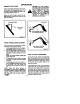
HOWTOADJUSTTHEHANDLEHEIGHT
The lower handle has two assembly posi-
tions, A HIGH and a LOW position (Figure 3).
The HIGH posilJon will raise the handle ap-
proximately four inches.
,ow
Figure
F- 98534
11
The mounting holes in the lower handle are
offset (Figure 1). To change the hole offset, ro-
tato the lower handle. This will change the
angis of the handle and make the height of the
handle higher or lower (Figure 3).
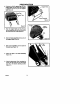
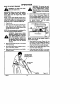
1. Remove the cable ties that fasten the can-
trol cables to the lower handle (Figure 4).
The cable ties can be re- used. To remove
a cable tie, pullthe tab on the cable tie to
free the cable.
2. Remove the bolts and wlngnut= that fas-
ton the upper handle to the lower handle.
3. Put the upper handle on the ground be-
hind the mower.