Muratec MFX-2500 Operating Instructions General Reference
Welcome …
Trademarks Muratec, the Muratec logo and all Muratec fax product names contained herein are trademarks of Murata machinery, Ltd. and Muratec UK, Ltd. ENERGY STAR is a registered mark of the United States Environmental Protection Agency. Copyright Copyright © 2000 by Murata/Muratec; all rights reserved. Statement The MFX-2500 carries the CE mark.
Safety information Laser Safety For the United States This is a digital machine which operates by means of a laser. There is no possibility of danger from the laser, provided the machine is operated according to the instructions in this manual. Since radiation emitted by the laser is completely confined within protective housing, the laser beam cannot escape from the machine during any phase of user operation. This machine is certified as a Class 1 laser product.
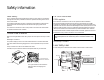
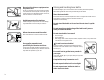
Before using your Muratec machine Where to set up your machine Clean Dust buildup can damage your machine. Periodically clean your machine as described in the operating instructions. Do not use a dust cover, which can cause damaging overheating. Follow these guidelines when setting up your machine: Away from direct sunlight To avoid overheating, set up your machine away from direct sunlight or a heater. Near a phone jack Your machine uses a standard (modular) telephone jack, also known as an LJU.
Power requirements Plug in the power cord Never disassemble your machine! Plug the power cord carefully and completely into a wall outlet. Do not leave any portion of the electrical cord’s metal plugs exposed. Doing so could cause a fire and poses a risk of electrical shock. Disassembling your machine can cause serious injury to you and damage to your machine. If service is required, call your authorised Muratec dealer.
Do not put furniture or equipment on the power cord Do not put anything on or over the electrical power cord, and do not route the power cord under rugs or carpets. Doing so can damage the power cord or fax, and can cause fire or electrical shock. Avoid temperature fluctuations Sudden changes in temperature can cause damaging condensation to form inside your machine.
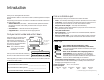
Introduction Thank you for choosing Muratec MFX-2500. The Muratec MFX-2500 is a multi-function machine, combining facsimile and copier features. The operating instructions for this machine is divided into three books. Please read the instructions you need. • “General Reference” (This book) — Describes the basic operations and basic caring of your machine. Covers what you have to know to use your machine immediately. • “Fax Reference” — Describes the various faxing features.
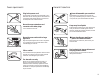
Symbol and terms (Operating tips) About In this manual, the following symbols and terms are used, and make sure you know what they mean. and symbol indicates the direction of your document or recording paper. When the document or paper has a width longer than its length, we use symbol CAUTION Important: . This instruction describes conditions or incorrect operations that could cause damage to your machine. A note describes helpful hints, restrictions, or how to avoid difficulties.
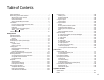
Table of Contents Safety information . . . . . . . . . . . . . . . . . . . . . . . . . . . . . . . . . . . . . . . . . . . . . . .i Before using your Muratec machine . . . . . . . . . . . . . . . . . . . . . . . . . . . . . . . . .ii Where to set up your machine . . . . . . . . . . . . . . . . . . . . . . . . . . . . . . . . . . .ii Power requirements . . . . . . . . . . . . . . . . . . . . . . . . . . . . . . . . . . . . . . . . . . .iii General Precautions . . . . . . . . . . . . . . . . . . . . . . . . .
Getting started Packaging contents . . . . . . . . . . . . . . . . . . . . . . . . . . . . . . . . . . . . . . . . . . . . . . . . . . . 1.1 Parts of the machine . . . . . . . . . . . . . . . . . . . . . . . . . . . . . . . . . . . . . . . . . . . . . . . . . . 1.1 Control panel . . . . . . . . . . . . . . . . . . . . . . . . . . . . . . . . . . . . . . . . . . . . . . . . . . . . . . . 1.4 Panel display (Liquid Crystal Display) . . . . . . . . . . . . . . . . . . . . . . . . . . . . . . . . . . . 1.
Getting started Packaging contents Parts of the machine Note: Any terms used here that are unclear to you right now will be explained in detail in the coming pages. 14 13 12 11 10 9 1 Main unit (Scanner unit) Main unit (Printer unit) 2nd paper cassette Toner bottle 8 7 Drum cartridge Telephone line cord Line cable adapter 6 2 AC power cord 3 1 1 2 2 3 3 4 4 5 5 5 Paper size / Cassette No.
Getting started 1.2 5 6 7 8 9 10 11 12 13 14 15 16 17 18 Side cover — Open this to fix printout jams in the cassette. 19 20 LAN-FAX ETHERNET Printer cover release — Pull up this to open the printer cover. 26 Printer cover — Open this to fix printout jams or change the drum cartridge. Fuser cover — Open this to fix printout jams in the fuser. 16 Original document exit — Where the original document comes out. Document tray — Holds original documents.
Getting started Options 1 2 3 4 5 6 7 8 9 10 4 Paper cassette (3rd, 4th, 5th) — Each cassette capacity is 500 sheets. Large capacity cassette — Its capacity is 2,500 sheets. 5 Bypass tray — Where you put the recording paper for copying. Holds only one sheet. Handset — Used for voice communication. Shift tray — Shifts and sorts printed papers in sort copy. 6 7 2-Bin tray — Sorts copied papers and received fax messages. 3 Duplex unit — Used for duplex copy or booklet copy.
Getting started Control panel 3 4 23 22 21 5 6 7 8 9 1011 12 2 1 1 2 CONTRAST 20 — In Fax mode: RESOLUTION Press to toggle among the three resolution modes and 256-level grayscale. RESOLUTION 3 REDUCE/ENLARGE 4 5 6 7 Liquid crystal display (LCD) — Shows the machine’s status and lets you see what you’re programming into the machine. — Press this key to choose one of several preset reduction/enlargement rates for copy or enlarge transmission. (See page 1.8 in “Copy Reference” or page 2.
Getting started 13 14 One-touch keys — The keys labeled 01-78 offer one-touch dialling convenience. You also can use the keys labeled 79-84 for programmable functions: this lets you teach your machine an advanced multi-step function just once, then recall the function at any time by pressing one of these keys. Soft Keys — Shortcut keys. Any function that can be turned on or off can be programmed into these four keys.
Getting started Panel display (Liquid Crystal Display) Changing Fax/Copy mode Fax standby display When you use your machine as a copier, for making copies or setting copy functions, press COPY. As a facsimile, for fax transmission or setting fax functions, press FAX. The LCD shows the machine’s status, error messages and function menu. Copy standby display A4 A4 1.6 1 2 3 Operational status or messages, paper size currently selected and reduce/enlarge ratio.
Getting started Power On Your machine has the AC power switch and ENERGY SAVING key as the power switch. ENERGY SAVING key AC power switch Sleep mode When you use your machine for the first time, turn on the AC power switch. It should be always On. Only when your machine will be not used for a long time or will be moved, turn it off. When pressing ENERGY SAVING, it will put out lights of the LCD display and all lamps and the printer will be stopped (in the Sleep mode).
Getting started Loading paper Recording paper size and capacity Cassette Multi purpose cassette 2nd - 5th*2 paper cassette Large capacity cassette*3 Paper size A3 , B4 , A4 , B5 , A5 , A6 , F4 , Letter , Legal , Ledger , Half-letter , Postcard , 1 Custom-sized* , DL , COM10 , Monarch , Executive A3 , B4 , A4 , B5 , F4 , Executive Letter , Legal , Ledger A4 , B5 , Letter Loading paper Capacity 250 sheets Your machine’s multi purpose cassette can hold up to 250 sheets and the 2nd cassette can hold up to
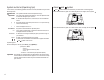
Getting started Loading the large capacity cassette (Option) Changing the paper size 1 2 Pull the cassette toward you. You should tell the paper size to the machine, when you change the paper size. Set the paper size after loading new papers in the cassette. Push down the bottom plate inside the cassette so it clicks and the plate and the bottom of the cassette are even.
Getting started When using the special sized paper: (1) Press [Other]. (2) Select “Custom” using the cursor key. (3) Press [Enter]. (4) Enter the horizontal and vertical size of the paper using the numeric keypad. Note: You can also enter the paper size using and of the cursor key. Note: To change Horizontal / Vertical, use and of the cursor key. (5) Press [Enter]. 2 The machine returns to standby mode. When you set the “Custom” paper, press RESET for standby mode.
Getting started Installing / Changing the printing supplies Your machine prints incoming faxes and copies with a laser print engine. The engine requires two types of printing supplies (sometimes also called consumables): • The drum cartridge — It yields 67,000 normal A4-sized printouts (see “Specifications,” page AI.1). By “normal,” we’re referring to the amount of text and/or graphics on each page. This is based on an industry-standard test document.
Getting started Installing the toner bottle 3 4 5 6 1.12 Shake the new drum cartridge horizontally. Note: Use ONLY the specified toner for this machine. Using any other toner could result in trouble. Note: Be careful not to drop the toner bottle from 1 m or more height. It may cause damage to the toner bottle. 1 Open the toner bottle cover. 2 Gently pull out the used bottle. Note: If the toner bottle cover is opened while the bottle is turning, the bottle may be locked in place.
Getting started 4 Shake the new toner bottle well and turn it over lengthwise five times. Note: Make sure to carry out the procedure above to agitate the toner well before installing the toner bottle in case the toner has settled. 5 With the seal on the toner bottle facing up, slowly peel off the seal as shown at right: Note: Be careful, some toner may puff out from the bottle. 6 With the “UP” marking on top, insert and push the bottle up to the black line on it. 7 Close the toner bottle cover.
Getting started Entering characters Some settings give you a chance to enter characters; for TTI, remote fax’s name or others. To enter letters or other characters, use one-touch keys, numeric keypad or code keys. Using CODE to enter characters You can enter characters with the one-touch key, and also with the CODE. To use the CODE to enter characters: Using one-touch keys to enter characters To type an upper-case letter, press [Chara.
Getting started 3 4 To enter each character, press the key combination listed on the chart. Important: Remember, there are three ways to enter characters: Enter Using Numbers Numeric keypad Letters/characters One-touch keys Letters/characters/numbers CODE chart for key combinations Note: If you want to erase characters, press [Clear] to erase to the left. To change just one character in the name, move the cursor by cursor key. Press [Clear] to erase the character. Then re-enter the character correctly.
Getting started EasyStart EasyStart software is already installed on your Muratec machine. It guides you through the process of entering your machine’s settings. Remember that the settings you make here can always be changed later. Getting started Determine the following before you go any further: The name and fax number you want to appear on your faxes — Every fax page you send arrives at the receiving machine with a single line of text at the very top of the page.
Getting started 8 The LCD now shows the type of dialling for the machine. 9 Press [Enter] to save the setting and continue. 10 The LCD now asks you to enter the name you want to appear at the top of faxes you send. The name may be up to 22 characters in length. 17 Press [Enter] to save the setting. Your machine will return to standby mode. EasyStart is complete! Select TTI 1, 2 or 3 using the cursor key. Then press [Enter].
Getting started How to set the document Acceptable document size The acceptable dimensions as follows: Automatic document feeder (ADF) (width × length) SINGLE-SHEET MULTIPLE-SHEET Maximum: 300 × 900 mm (Tx) 297 × 420 mm 300 × 450 mm (Copy) Minimum: 120 × 100 mm 148 × 105 mm Weight: 30.2 – 104.7 g/m2 52.3 – 104.7 g/m2 You can set up to about 50 sheets of A4, 40 sheets of B4 or 30 sheets of A3 sized document in the ADF at a time.
Getting started Using as a Fax The following is a basic fax features. If you want to use one-touch keys or any other advanced features, See “Fax Reference”. Review Commands Sending a fax The Review Commands function gives you the power to check on each job (or command) in your machine’s memory. It also lets you cancel a command if you decide not to send the document. To cancel a command: 1 2 3 Press FAX to change to the Fax mode, if it is in Copy mode. 4 5 6 Adjust memory transmission, if necessary.
Getting started Using as a Copier The following is a basic copy features. If you want to use advanced features, see “Copy Reference”. Making copies 1 2 3 4 5 6 Make sure the machine is in the Copy mode. To change to the Copy mode, press COPY. 7 Press START to begin the copying process. Press RESET to clear the previous setting, if necessary. Set your document. (See page 1.18.) Set any settings you want. If you want to make only one copy of each page of the document, skip to step 7.
Getting started Using as a Phone Your machine can also be used as a phone, if you have an optional handset installed. The following is a brief look at the machine’s telephone features. Hold Redial You can put a call on hold during a conversation by pressing [Hold]. At this point, you can either hang up the handset or leave it off the hook. To return to your conversation: • If you hung up the handset, pick it up. • If you did not hang up the handset, press [Hold] again.
Getting started Machine setting A. Confirm the Counter for total printed pages C. Copy protect You can confirm the total number of pages you have printed. You can set your machine not to use the copy functions. When you set the copy protect to ON, the machine will not to change to the copy mode even if you press COPY. Note: It can be different from the number on the optional page counter. Note: If it is set to ON, the Fax & Copy feature (see page 2.
Getting started E. Sleep mode F. Auto power off mode Your machine is initially set to be in the Sleep mode automatically when 15 minutes has passed after you pressed any key last. If you want to change the time or to set the Sleep mode to OFF, you can set it here. Your machine is initially set to be in the Auto power off mode automatically when the machine keeps to be in the Sleep mode for 60 minutes. If you want to change the time or to set the Auto power off mode to OFF, you can set it here.
Getting started G. Paper jam alarm I. 2-Bin tray (Option) You can set your machine not to sound an alarm when the paper jam occurs. When you have the optional 2-Bin tray, you can set where to exit a copied paper, a received fax message and a list, on the upper tray or the lower tray. Note: The alarm light will glow and the LCD will show the error message, regardless of this setting. 1 2 Press MENU, [Mach Set]. 3 Select “ON” or “OFF” using the cursor key. Then press [Enter].
Getting started This page intentionally blank. 1.
Just in case … Clearing paper jams . . . . . . . . . . . . . . . . . . . . . . . . . . . . . . . . . . . . . . . . . . . . . . . . . . 2.1 Print quality problems . . . . . . . . . . . . . . . . . . . . . . . . . . . . . . . . . . . . . . . . . . . . . . . . 2.6 Caring for your machine . . . . . . . . . . . . . . . . . . . . . . . . . . . . . . . . . . . . . . . . . . . . . . 2.8 In the event of a power failure . . . . . . . . . . . . . . . . . . . . . . . . . . . . . . . . . . . . . . . . . 2.
Just in case … Clearing paper jams If an original document jams 1 If an original document jams, the LCD will show: Important: If you wait more than 60 seconds without pressing any key, the machine will delete from memory all pages stored during this operation and the machine will return to the standby mode. Note: If this document is a non-sorting ADF job (either copying or faxing), the machine will abort the operation anyway; instead, you’ll have to perform the job again from scratch.
Just in case … If a printout jams When using the optional Large capacity cassette: Turn the green dial as the arrow indicates and remove the jammed paper. If a printout jam occurred during printing, an alarm sounds and the part the paper jammed will blink on the LCD. Please remove the jammed paper carefully as below. CAUTION: The fuser unit becomes very hot. Do not touch the fuser unit when you are removing a paper jam.
Just in case … Printer cover / Fuser cover When the printer cover or the fuser cover part is blinking on LCD: 1 3 Open the fuser cover. CAUTION: The fuser unit becomes very hot. Do not touch the fuser unit when you are removing a paper jam. 4 Pull the paper jam clear lever toward you and remove the jammed paper. 5 6 Push the paper jam clear lever back into its normal position and close the fuser cover. Open the printer cover by holding the printer cover release.
Just in case … The optional Bypass tray 1 The optional duplex unit Open the printer cover by holding the printer cover release. 1 Open the duplex unit cover. Important: Never touch the electrical contacts inside the printer cover and under the drum cartridge, as an electrostatic discharge may damage the machine. 2 Remove the jammed paper. 3 Close the duplex unit cover. Electrical Contacts 2.4 2 Remove the jammed paper. 3 Close the printer cover.
Just in case … The optional 2-Bin tray or the optional shift tray 1 Open the printer cover by holding the printer cover release. Important: Never touch the electrical contacts inside the printer cover and under the drum cartridge, as an electrostatic discharge may damage the machine. 3 Open the 2-Bin tray cover or the shift tray cover. 4 Remove the jammed paper. 5 6 Close the 2-Bin tray or the shift tray. Electrical Contacts 2 Open the fuser cover. CAUTION: The fuser unit becomes very hot.
Just in case … Print quality problems If your machine’s printouts develop quality problems, try to find the example below that matches your printout problem. When you find one which is like yours, try the suggested solutions. If they don’t work, contact your authorised Muratec dealer. Printouts are too dark Pages are blank • The drum cartridge or toner cartridge may not be installed correctly. Install each cartridge correctly. • The toner cartridge may be out of toner, or the toner may be very low.
Just in case … Printouts have irregularities ABCDE ABCDE ABCDE ABCDE ABCDE • The paper you’re using may have absorbed moisture, perhaps due either to high humidity or water having been spilled on the paper supply. Toner will not adhere well to wet paper. Replace the paper with dry paper and try printing again. Printouts have toner smudges ABCDE ABCDE ABCDE ABCDE ABCDE Printouts have white and/or black lines ABCDE ABCDE ABCDE ABCDE ABCDE • The toner cartridge or drum cartridge may be defective.
Just in case … Caring for your machine With proper installation and a little maintenance, your machine should give you dependable service for years to come. Although it requires little day-to-day care, you can take these simple precautions to keep it in top form: • Always make sure your machine is installed according to our specifications, including using an electrical surge suppressor. (If necessary, review “Pick an installation spot,” page vi in Introduction.) • Always use good, copier-quality paper.
Just in case … 5 Open the inner cover. 6 Use the cloth with the rollers cleaner to clean the face of the rollers. Rotate the rollers by hand to allow cleaning of the entire roller surface. 7 8 Close the inner cover. 9 10 11 Important: You must hold the cover open. It won’t stay open by itself. If you have unsatisfactory printout quality Your machine automatically cleans its charger and transport roller, two items which are very important to printout quality.
Just in case … In the event of a power failure Power failure during the machine is working Memory back up During telephone call: The image data stored in memory will be kept for the following time, even when the power failure occurs or your machine is turned off. You can continue to speak with the handset. During fax transmission: The transmission will be cut off. When the power comes back, your machine starts to transmit again automatically if it was the memory transmission.
Just in case … This page intentionally blank. 2.
Appendix and index
Appendix and index Specifications Main unit General Type: Photo conductor: Copying system: Developing system: Fusing system: Scanning system: Document size : ADF capacity: Document thickness: Printing paper size: Console OPC Electrostatic Dry Powdered Image Transfer to Plain Paper Micro-Toning High-Grade System Lamp-Heated Roller CCD (width × length) ADF; single sheet: Maximum 300 mm × 900 mm (Tx), 300 mm × 450 mm (Copy), Minimum 120 mm × 100 mm ADF; two or more sheets : Maximum 297 mm × 420 mm, Minimum
Appendix and index Paper exit system: Printing margin: Smoothing print: Receiving paper tray capacity: Face down exit system Upper: 4 mm, Lower: 4 mm, Right: 4 mm, Left: 4 mm Yes 250 sheets Fax communication Compatibility: Modem speed: Transmission speed: Phone system: Coding method: Scanning resolution: One-touch dial: Speed Dial: Error Correction Mode: Polling/Broadcasting: Scanning width: Scanning speed: ITU-T Super Group 3, Group3 33,600, 31,200, 28,800, 26,400, 24,000, 21,600, 19,200, 16,800, 14,4
Appendix and index Option Shift Tray Paper Feed Unit (3rd, 4th, 5th paper cassette) Shift home position: Shift position: Paper capacity: Printing paper size: Paper capacity: Power source: Power consumption: Weight: Dimensions : Fax: Copy: A3 , B4 , A4 , B5 A3 , B4 , A4 , B5 F4 , Executive Letter , Legal , Ledger 2 Plain Paper(60-90 g/m ) : 500 sheets Supplied from Main unit 10W or less 6.9 Kg Width 535 × Depth 544.7 × Height 127.
Appendix and index Index A P Alarm light . . . . . . . . . . . . . . . . . . . . . . . . . . . . . . . . . . . . . . . . . . . . . . . . . . . . . . . . . . . . . . . . . 1.4 AC power switch . . . . . . . . . . . . . . . . . . . . . . . . . . . . . . . . . . . . . . . . . . . . . . . . . . . . . . . . . . 1.2, 1.7 ADF cover . . . . . . . . . . . . . . . . . . . . . . . . . . . . . . . . . . . . . . . . . . . . . . . . . . . . . . . . . . . . . . . . . . 1.2 Auto Power Off mode . . . . . . . . . . . . . .
Muratec (UK) Ltd No.1 Stoke Road Guildford, Surrey GU1 4HW Tel (01483) 302100 Fax (01483) 301900 http://www.muratec.co.uk Copyright© 2000 by Murata/Muratec; all rights reserved. Printed in Japan.