
Operating Instructions Plain-paper Digital Fax F-320


Plug in and power up
1
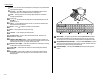
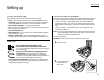
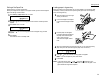
Plug one end of the telephone line cord into the
LINE
jack on the machine’s
rear side and the other end into a standard telephone wall jack.
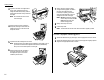
2
Plug the non-pronged end of the
AC
power cord into the
AC
power cord jack on
the right rear side of the machine and the pronged end into a 120 V electrical
outlet (preferably on a surge suppressor, as mentioned on page 1.5).
3
Use the
AC
power switch to turn on your machine.The markings are interna-
tional standards: I means on, O means off.
It will take a few seconds for the machine to warm up. The
LCD
shows:
When the machine is ready to use (standby mode), you will see:
Adjust the monitor speaker’s volume
You can set the volume of the monitor speaker.
1
Press
MONITOR
/
CALL
on the control panel.You now should hear a dial tone.
And press or .The
LCD
indicates the volume:
2
To turn the volume up, press .
To turn the volume down, press .
3
Press
MONITOR
/
CALL
again to hang up.
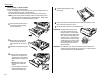
Loading paper
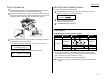
Acceptable paper size and cassette capacity
Paper source Paper type Paper size Capacity
Paper cassette Plain paper*
1
Letter , Legal , Half-letter 500 sheets
Letter , Legal , Half-letter ,
Plain paper*
1,
*
2
A4 ,A5 ,A6 , F4 , 50 sheets
Bypass Tray Executive , Custom-sized*
3
Envelopes*
2
DL , CM10 , Monarch 1 sheet
Postcard*
2
3.9″ × 5.8″ (100 × 148mm) 20 sheets
Transparency*
4
Letter 20 sheets
*
1
Paper weight: 60 – 90 g/m
2
*
2
A4,A5,A6, F4, Executive, DL, CM10, Monarch, Postcard, Custom-sized paper
and Transparency can be used only if the optional Printer Controller is attached.
*
3
(3.8 – 8.5) inches × (5.5 – 14.0) inches (Width × Length)
*
4
We recommend: 3M PP2500 for laser printers or equivalent
Note: Do not use any paper which has been creased, wrinkled or has absorbed any
moisture.
** Tel Mode **
Volume:
■■■■
■■■■
■■■■
Fax Ready
Jan 1 2001 12:00am
** Warming Up **
1.7
Getting started