
User manual


Table Of Contents
- Preface
- Emergency first aid
- Manufacturer
- Contents
- Notes, cautions and warnings
- About this guide
- Introduction
- Getting started
- Paper recommendations
- Loading paper
- User authentication and access control
- Operation
- Copying
- Scanning
- Scan to e-mail
- Scan to network PC
- Scan to USB memory
- Scan to local PC
- Scan to remote PC
- Managing profiles
- Managing the address book
- Setting sender and reply to e-mail addresses (from/reply to)
- Creating e-mail templates
- Adding an e-mail address entry to the address book
- Deleting an e-mail address entry from the address book
- Modifying an e-mail address entry from the address book
- Adding a group entry to the address book
- Deleting a group address entry from the address book
- Modifying a group address entry from the address book
- Printing
- Faxing
- Functions common to copy, fax and scan operations
- Maintenance
- Installing upgrades
- Troubleshooting
- Specifications
- Appendix A - menu system
- Index
- Muratec contact details
Loading paper > 32
M
ULTI
PURPOSE
TRAY
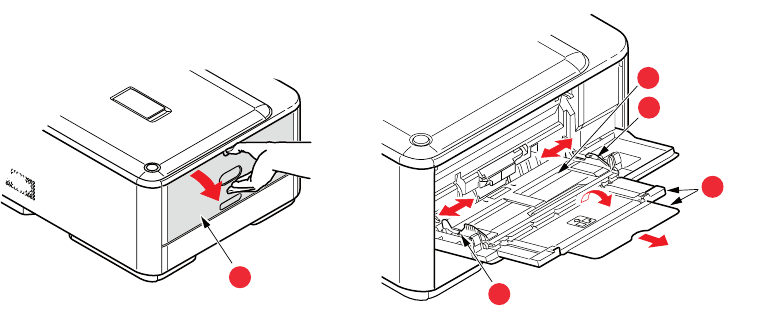
1. Open the multi purpose tray (a).
2. Fold out the paper supports (b).
3. Press gently down on the paper platform (c) to ensure it is latched down.
4. Load the paper and adjust the paper guides (d) to the size of paper being used.
> For single-sided printing on headed paper load the paper into the multi purpose
tray with pre-printed side up and top edge into the printer.
> For two-sided (duplex) printing on headed paper load the paper with pre-printed
side down and top edge away from the printer.
> Envelopes should be loaded face up with top edge to the left and short edge into
the printer. Do not select duplex printing on envelopes.
> Do not exceed the paper capacity of about 100 sheets or 10 envelopes. Maximum
stacking depth is 10mm.
5. Press the tray latch button inwards to release the paper platform, so that the paper
is lifted and gripped in place.
6. Set the correct paper size. Refer to “Configuring the tray settings” on page 32 and
“Registering custom sizes” on page 33.
C
ONFIGURING
THE
TRAY
SETTINGS
After you load paper in tray 1, tray 2 (optional), or the MP tray, you need to register the
loaded paper on your machine.
1. Press the SETTING button on the control panel.
2. Using the Down arrow key, scroll to Paper Setup and press OK.
3. Using the arrow keys, scroll to the required paper tray and press OK.
4. Press OK to select Paper Size.
5. Using the arrow keys, scroll to the loaded paper size and press OK.
6. Using the Down arrow key, scroll to Media Type and press OK.
7. Using the arrow keys, scroll to the type of media loaded and press OK.
8. Using the Down arrow key, scroll to Media Weight and press OK.
9. Using the arrow keys, scroll to the weight of the loaded paper and press OK.
10. Press the Left arrow key to exit the menu.
b
d
d
c
a