User manual
Table Of Contents
- Preface
- Emergency first aid
- Manufacturer
- Contents
- Notes, cautions and warnings
- About this guide
- Introduction
- Getting started
- Paper recommendations
- Loading paper
- User authentication and access control
- Operation
- Copying
- Scanning
- Scan to e-mail
- Scan to network PC
- Scan to USB memory
- Scan to local PC
- Scan to remote PC
- Managing profiles
- Managing the address book
- Setting sender and reply to e-mail addresses (from/reply to)
- Creating e-mail templates
- Adding an e-mail address entry to the address book
- Deleting an e-mail address entry from the address book
- Modifying an e-mail address entry from the address book
- Adding a group entry to the address book
- Deleting a group address entry from the address book
- Modifying a group address entry from the address book
- Printing
- Faxing
- Functions common to copy, fax and scan operations
- Maintenance
- Installing upgrades
- Troubleshooting
- Specifications
- Appendix A - menu system
- Index
- Muratec contact details

Maintenance > 100
5. Clean the top of the ID unit with a clean, lint free cloth.
6. Remove the new cartridge from its box but leave its wrapping material in place for
the moment.
7. Gently shake the new cartridge from end to end several times to loosen and
distribute the toner evenly inside the cartridge.
8. Remove the wrapping material.
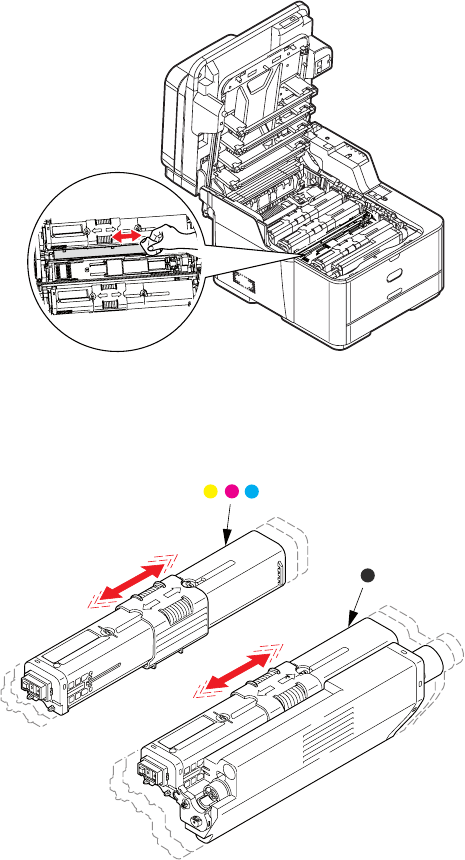
9. Holding the cartridge by its top centre, lower it into the printer over the image drum
unit from which the old cartridge was removed.
10. Insert the left end of the cartridge into the top of the image drum unit first, pushing
it against the spring on the drum unit, then lower the right end of the cartridge down
onto the image drum unit.
11. Pressing gently down on the cartridge to ensure that it is firmly seated, slide the
colo
red collar fully towards the left hand side of the printer. This will lock the
cartridge into place and release toner into the image drum unit.


