FaxFinder IP® IP Fax Server Model: FF240-IP Administrator User Guide
FaxFinder IP® Administrator User Guide S000493A, Version A Model: FF240-IP Copyright © 2011, by Multi-Tech Systems, Inc. This publication may not be reproduced, in whole or in part, without prior expressed written permission from Multi-Tech Systems, Inc. All rights reserved. Multi-Tech Systems, Inc. makes no representations or warranties with respect to the contents hereof and specifically disclaims any implied warranties of merchantability or fitness for any particular purpose.
CONTENTS CHAPTER 1 – PRODUCT DESCRIPTION & SPECIFICATIONS ..................................................................... 5 PRODUCT DESCRIPTION .................................................................................................................................. 5 SAFETY WARNINGS ........................................................................................................................................ 5 TECHNICAL SPECIFICATIONS .................................................
Global Groups ...................................................................................................................................... 62 SEND A FAX SCREEN ..................................................................................................................................... 63 Send Fax ............................................................................................................................................... 64 LOGOUT ..........................................
Chapter 1 – Product Description & Specifications Product Description The FaxFinder IP provides fax functionality to an IP-based telephony environment, eliminating the need for analog-based phone connections dedicated to supporting analog fax applications.
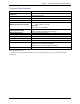
Chapter 1: Product Description and Specifications Technical Specifications FF240-IP Connectors Size Weight Input Voltage Requirements Maximum Power Consumption* Operating Environment Storage Temperature EMC Approvals Safety Approvals Maximum T.38 Ports Web Connections File Upload Size** Warranty 1 RJ45 Console Serial Port, 1 RJ45 Ethernet Port, 2 USB Ports (inactive) 9.1” W x 6.1” L x 1.7” H (23.11 cm x 15.49 cm x 4.32 cm) 2.6 lbs. (1.2 kg) 12 V @ 5A 12 v Typical: 0.870 A / 10.65 W; Max: 0.955 A / 11.
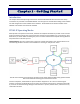
Chapter 2 – Getting Started Introduction This chapter shows example usage scenarios for inbound and outbound faxes as well as basic setup instructions for your Multi-Tech Model FF240-IP. The setup process includes both cabling of the FF240-IP unit and configuration of the FF240-IP server software. The FF240-IP server software resides on the FF240-IP unit and does not need to be installed.
Chapter 2: Getting Started Outbound Routing. FaxFinder users on the network can send faxes directly from their Windows PC using any application program that can print (if the Client software is installed). The application program must be set so that the FF240-IP itself is its printing destination. In response to the ‘Print’ command, the FF240-IP turns the ‘print file’ image into a fax. Store and Forward faxing (T.
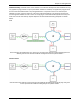
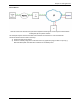
Chapter 2: Getting Started Client software Here the red arrows show the use of the Client software and the green arrows represent the FF240-IP sending that fax to a phone number. This example requires that the FaxFinder Client software be installed on a user’s Windows PC. The Client software can be used in two ways: 1) Invoke it directly to send faxes. 2) Invoke it indirectly using the Print function from any application program that can print (e.g.
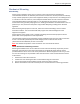
Chapter 2: Getting Started Mechanical Mounting Rack Mounting Ensure proper installation of the unit in a closed or multi-unit enclosure by following the recommended installation as defined by the enclosure manufacturer. Do not place the unit directly on top of other equipment or place other equipment directly on top of the unit. If installing the unit in a closed or multi-unit enclosure, ensure adequate airflow within the rack so that the maximum recommended ambient temperature (40° C) is not exceeded.
Chapter 2: Getting Started External Descriptions Back Panel Connections Descriptions of the connections available on the back of the FF240-IP unit. Power Connector: Threaded connector for the provided power supply. Console: RJ 45 connection for serial access and control of the FF240-IP units. USB Ports (reserved for future use): These ports are inactive. Reset: Pressing the reset button will reboot the unit. LAN 1: RJ 45 receptacle for network connection.
Chapter 2: Getting Started Installation Overview Part A: Cabling – Connecting the FF240-IP to Power and Ethernet Summary: Place the FF240-IP in a convenient location, and then connect the power supply to your AC power outlet and then connect to the Ethernet network. 1. Connect FF240-IP to AC Outlet. Plug the DC power transformer into a power outlet or power strip. Secure the other end to the Power Receptacle on your FF240-IP. Caution: Use only the DC power transformer supplied with the FF240-IP.
Chapter 2: Getting Started Part B: Configuring the FF240-IP Server 1. Setting Admin PC to Startup IP Address To initially access the FF240-IP, you will need to connect the unit directly to a compatible computer. This process is detailed below. After the first setup, you can change the IP address of the FF240-IP unit to one that is capable of operating on the network where it will permanently reside. If the FF240IP is already attached to a network, the Client software can Auto-discover the IP address.
Chapter 2: Getting Started 2. Logging In A. Bring up a Web browser on your PC. In the browser address line, type the IP address of the FF240-IP: type 192.168.2.1 and press Enter. Note: Your browser may show a warning message at this point. This is related to the certificate issued by the FF240-IP. Browsers will not allow access without a valid certificate - the FF240-IP does have a valid certificate, but it is self-signed (i.e. no third party verification), so your browser displays a warning about this.
Chapter 2: Getting Started 5. Log In After Reset Having reset the IP address of the administrator’s PC, you must log into the FF240-IP Server software again. Enter the new IP address of the FF240-IP into your browser, and then enter admin as Username and admin as Password to log in again. If the IP has been changed, your browser may show a warning message at this point. This is related to the certificate issued by the FF240-IP (the default is for the IP address 192.168.2.
Chapter 2: Getting Started 6. Save your Configuration to a File on the Local PC Now that you have setup the FF240-IP unit to the necessary configuration, it is a good idea to save the parameters in case the unit needs to be restored after a factory default. This will save you time if you want to test different settings or need to do some troubleshooting as you will be able to return to these settings easily.
Chapter 2: Getting Started Sending a test fax on your SIP network: A. Go to the Fax Configuration page and configure SIP Proxy/Gateway field with the IP address of the SIP device the FF240-IP will communicate with when sending faxes. This could be a SIP proxy, SIP Gateway or IP PBX. Enter the SIP Domain if required by your SIP device. If your SIP Device requires authorization, enable the Authorization Required check box, and fill out the Username, Password, Confirm Password fields as required.
Chapter 3 – Web Management Interface Introduction In this chapter, we present the screens of the FF240-IP web management interface and describe the sub-categories for each screen. The major sections are presented along the top navigation bar of the web interface and most of these will activate a left-hand navigation window of sub-categories when clicked. As with any secure browser-based user interface, a certificate is required to allow access.
Chapter 3: Web Management Interface Home Screen The FF240-IP Home screen displays the model name, software version and contact resources. Multi-Tech Systems, Inc.
Chapter 3: Web Management Interface Status & Logs Section System Status System Status The System Status screen provides many key pieces of information that can be used diagnostically or simply as a confirmation of correct settings. Current Time This field displays the current time and date on the FF240-IP unit. The format for this display is set in the System Configuration: Time screen.
Chapter 3: Web Management Interface Fax Status Fax Status details the current state for several key items. Here also the administrators can view and change the state of the channels. Channel Status Channel This column displays the sequential channel number associated with each installed T.38 port. State This column displays the current state that the channel is in. Messages include: Waiting for Ring, Connected, and Busied Out.
Chapter 3: Web Management Interface Inbound Fax Status Inbound Fax Status displays information pertaining to each fax that is incoming, divided into a variety of categories. State This column displays the state of a fax that has not yet been completely received. Messages include: receiving or delivering. Start Time This shows the time that the inbound fax was initiated. Channel This column displays the channel number associated with each installed T.38 port.
Chapter 3: Web Management Interface Outbound Fax Status Outbound Fax Status displays information pertaining to each fax that is set to be sent, divided into a variety of categories. There is also an Action section for aborting the fax before it is sent. State This column displays the state of a fax that has not yet been sent or completed being sent. Messages include: new, pending and sending. Created At This shows when the outbound fax was initially queued.
Chapter 3: Web Management Interface Mail Queue The Mail Queue displays a list of emails residing in the queue waiting to be completed. Information is broken into six sections. Resend Queued Mails Clicking on this link will tell the FF240-IP to resend all mail items in the queue immediately. Date This column displays the date the email was created on. Size This column shows the size of the mail message in bytes. Sender This column displays the user name of the party sending the email.
Chapter 3: Web Management Interface Mail Log The Mail Log displays recent delivery attempts, listed from most recent to oldest. Date This column displays the date that this mail entry was attempted. Sender This column displays the sender of this particular mail attempt. Recipient This column displays the recipient for this attempted mailing. Delivery Message This column displays a message showing the result of the mail delivery attempt.
Chapter 3: Web Management Interface Inbound Fax Log The Inbound Fax Log is a running tally of all of the faxes received by the FF240-IP unit. The individual logs have several categories that are tracked. Descriptions are below. State This will show the current or final state of the fax in question. States include: complete, error – no page received, error – partial fax, and delivery failure. Complete Time This logs the time at which that the incoming fax was successfully received.
Chapter 3: Web Management Interface Outbound Fax Log The Outbound Fax Log is a running tally of all of the faxes sent by the FF240-IP unit. The individual logs have six categories that are tracked. Descriptions are below. Status This column displays the final result of the outgoing fax. Status messages include: sent, aborted and failed. Start Time This column displays the time that the transmission was started. End Time This column displays the time when the fax transmission completed.
Chapter 3: Web Management Interface Call Log Channel This column displays which channel the logged fax used. Status This column displays the current state that the outgoing fax is considered to be in. Status messages include: pass, aborted and failed. Direction This column shows which direction the logged fax went: either inbound or outbound. Fax Number This column displays the phone number that the fax was logged on. Time This column displays the time when the fax transmission completed.
Chapter 3: Web Management Interface System Configuration Section Network Network Configuration This section is for entering the specific network settings needed for the FF240-IP to run on your network. By factory default, the FF240-IP ships with the IP address 192.168.2.1 for setup purposes. After setup and prior to connecting to your live network, enter the needed parameters for proper operation on the network where the FF240-IP is to operate.
Chapter 3: Web Management Interface SMTP The SMTP section contains the information needed to setup email usage with the FF240-IP, as well as a way to test the setup by sending an email. SMTP Configuration SMTP Server Address Enter the IP address of your simple mail transfer protocol server here. This can be either an IP address or Hostname. This is where emails will be sent. SMTP Port Enter the SMTP port to be used here (the default value for SMTP is 25).
Chapter 3: Web Management Interface Time Time Configuration Correct time settings are important for logging and verification purposes. This section allows you to enter a preferred time server as well as your preferences for time and date display format. Time Server Select a time server from the choices available in the drop-down box or you may also select ‘none.’ When you select None, use the Set Time and Set Date at the bottom.
Chapter 3: Web Management Interface Printer Here you can add the printers available to the FF240-IP. Until the first printer is added, the section states ‘There are no Printers.’ Click the Add link to add a printer. Printers The Add and Advanced Setup screens are detailed in the next section. Clicking the Add link will bring up the Add Printer screen where you can add a printer to be used by the FF240-IP. Printer Name This displays the name you have entered for this printer.
Chapter 3: Web Management Interface Add Printer The Add Printer and the Edit Printer screens are identical, the only difference being that the Edit Printer screen will already contain information previously entered. Printer Make Select the manufacturer of the printer you are adding from the drop-down list. If you do not see the manufacturer (make) of your printer, you can use the Generic selection. Printer Model Select the model of the printer you are adding from the provided list.
Chapter 3: Web Management Interface Shares The shares screen allows the administrator to create a place for faxes to be sent for retrieval by more than one person. Anyone with network rights to the shared folder can view the faxes sent there. Creating a location to share access to multiple users can be a good way to ensure that faxes are responded to in a timely manner, especially in a sales environment.
Chapter 3: Web Management Interface Add Network Share After entering and saving a new network shared resource, you will see the message “Network Share updated” appear at the top of the screen. The network share is a common location when received faxes may be routed to. For those with access rights to this shared location, all information is accessible for use. UNC / Location Enter the Universal Naming Convention identifier or network location in this box.
Chapter 3: Web Management Interface Certificates A site certificate is needed for a browser to allow access to the FF240-IP unit. This certificate is selfsigned, so your browser will likely show a security warning (which simply means the certificate is not authenticated by a third party) before you can continue. Use this page to replace the default certificate with the one that contains details specific to your installation. These values are for identification purposes only.
Chapter 3: Web Management Interface Generate Server Certificate continued: Email Address Enter the email address of who is responsible for the FF240-IP (typically the administrator). This field may be left blank. No more than 64 characters are allowed. Generate button Click on the generate button to create the certificate based on the information above. This will require an immediate reboot of the unit (a pop-up window will allow you to cancel the action).
Chapter 3: Web Management Interface Save/Restore After you have entered the specific settings to have your FF240-IP working in your environment, coming here to save those settings is a good idea. Were something to happen and you lost what had been entered, you can easily reset the unit to working condition if you have a saved configuration file.
Chapter 3: Web Management Interface Software Update There may be occasions where features are refined or added to the FF240-IP unit. Such features will be available through updating of the software that exists in the FF240-IP. Software Update Update Source This is the URL for software updates, when they are available. Clicking the Default link will return the factory URL for checking update availability. Current Version This displays the current software version installed on your FaxFinder.
Chapter 3: Web Management Interface Reboot Reboot Unit Clicking on the Reboot button will log off the current user and restart the unit. Please make sure that there are no faxes being sent before you click reboot. The FF240-IP will not be able to send or receive faxes during the reboot process. Debug The Debug page is for those rare occasions when standard troubleshooting is not enough and debugging files need to be gathered and sent to Multi-Tech for more in-depth analysis.
Chapter 3: Web Management Interface Fax Configuration Section SIP / T.38 Configuration This screen is where you will need to set all of the necessary settings for your FaxFinder IP to work properly on your network. If you need to reset all of the SIP and T.38 settings on this screen back to their factory default settings, click on the Defaults link in the upper right corner. Be aware that the default for many of the boxes is a blank entry. Multi-Tech Systems, Inc.
Chapter 3: Web Management Interface SIP Transport Protocol SIP call setup messages are transmitted using UDP. There is currently no option for TCP. SIP Proxy/Gateway This displays the IP address of the SIP device the FF240-IP will communicate with when sending faxes. This could be a SIP proxy, SIP Gateway or IP PBX. SIP Domain Enter the SIP domain into the box if necessary. Authorization Required Check this if the SIP proxy or the registrar the FF240-IP is communicating with requires authentication.
Chapter 3: Web Management Interface T.38 Fax ID Enter the Fax ID you want the FaxFinder to send out. Fax Method Use the drop-down box to select T.38 Re-invite, T.38 Pass Through or T.38 Direct as your fax method. Fax Codec Check the box for each fax codec you want in use. G 7.11 Alaw and G 7.11 µlaw are available depending on your Fax Method (T.38 Re-invite and T.38 Pass Through only). Redundancy Level Enter a redundancy level for the FaxFinder. Default is 3.
Chapter 3: Web Management Interface Inbound Routing There are several ways an incoming fax can be routed: They can be routed globally or by extension. A global routing entry will route every incoming fax to the defined global routing Fax Destination. Incoming faxes from PBXs that provide DTMF digits to the FF240-IP can be routed based on the extension digits to recipients as defined in the Recipient Fax Destination.
Chapter 3: Web Management Interface Global Routing Fax Destinations This displays a destination for inbound faxes to always be routed in addition to their intended recipient. Action Here you will find a link to Edit the parameters set for Global Routing. Details of the edit Global Routing screen are found below. Add Destination (Global) Select the global destination from the drop down list. Some of these selections will require you to add the related information in the second field.
Chapter 3: Web Management Interface Recipients This will display a list of inbound recipients. There are four action links available: Add, Import, Export and Delete All. Add Recipients Clicking on the Add link will bring up the Add Recipients screen. Extension Enter the phone number of the recipient to be added. Name Enter the name of the recipient to be added. Destinations (Extension) After adding a Recipient, the Add Destination section for this extension will appear.
Chapter 3: Web Management Interface Inbound Recipients CSV Import Format Fields Extension,Description,Destination type,Destination value Values • • • • Extension: numerical extension Description: The description for the recipient. Does not need to be repeated for multiple destinations for the same extension. Only the description for the first destination is used.
Chapter 3: Web Management Interface Outbound The Outbound page contains a selection box for allowing simultaneous faxing and archiving options. Outbound Options By checking the “Allow simultaneous faxing to the same number” box and clicking the Save button, you allow the FF240-IP unit to send multiple faxes to the same phone number at the same time. This is beneficial for fax configurations where a single number is mapped to multiple lines or a trunk.
Chapter 3: Web Management Interface Outbound Approval Outbound approval gives an administrator the ability to restrict outgoing faxes through several categories. The details of each section are found on the next page. Multi-Tech Systems, Inc.
Chapter 3: Web Management Interface Outbound Approval Setup If you want to use any, some or all of the outbound approval options, you must check the ‘Enable Outbound Approval’ box here. Approvers The ‘Approvers’ section allows you to add users who are able to allow faxes to be sent out. By default, the Admin account is here. Add Click on the Add link to add the selected user from the drop-down list to the list of those who can approve outbound faxes.
Chapter 3: Web Management Interface Cover Pages Here you can view or delete a cover page from the supplied pages created by Multi-Tech, or you can import (Add) one of your own. For tips on creating custom cover pages, please see the customization appendix. Cover pages must be in the PDF version 1.4 format. The Opt-Out section is available if you use the FF240-IP for advertisement purposes. The “Editable cover pages” link will take you to the Multi-Tech FTP site where the templates are available in the .
Chapter 3: Web Management Interface Cover Pages PDF Cover pages to be used with your FF240-IP unit need to be version 1.4 to work properly. The Editable cover pages link will take you to the .pdf files on the Multi-Tech website. Add Click on the Add link to open the Add Cover Page screen detailed below. Cover Page This column lists the file names of available cover pages as links. Clicking on the name will open the file for viewing.
Chapter 3: Web Management Interface Store & Forward Fax (T.37) Store and Forward fax (or T.37) is described in detail with examples in a later chapter. Here we are describing the parameters for T.37 that can be input into the FF240-IP unit through the web interface. Store & Forward Fax (T.37): Parameters Enable T.37 To allow the use of Store and Forward faxing on this FF240-IP unit, check this box, else it will not be allowed.
Chapter 3: Web Management Interface Email Fax Receipt Select the condition that will trigger an email to the sender. There are three options here: Failure – An email receipt will only be sent if the fax fails. Always – On completion (success or failure) an email receipt will be sent. Never – The FF240-IP will not send a receipt for any result. Fax Attachment with Receipt Use this drop down box to set the attachment type for fax receipts. Options are PDF, TIFF or None with the default set to .pdf format.
Chapter 3: Web Management Interface Fax Log The interval at which the fax log files are deleted can be adjusted here. By default, the logs are removed each day at midnight. Fax Log Purge Here is where the timing of log purging is set. The different columns allow for many settings. You can select multiple options by clicking and dragging or by holding down the Shift or Control key while selecting. Clicking on the Examples link will open a pop-up displaying examples as shown below.
Chapter 3: Web Management Interface Users Section The FF240-IP Users section of the FF240-IP unit displays a list of all of the users that have been entered or imported into the unit itself. With the exception of the default admin account, all users can be edited or deleted as needed. Users are the definitions of people that have access to the FF240-IP for sending faxes. Each user will have a list of Contacts that they use to send faxes.
Chapter 3: Web Management Interface Organization This displays the organization (if any) that is associated with the account. Action Edit Clicking on the Edit link will bring up the editing screen for a user. You will also see this list of Contacts associated with this user. The same options are available: Add, Import, Export and Delete All. Contact lists use four primary pieces of information for speed and simplicity of use: Name, Fax Number, Phone Number and Organization.
Chapter 3: Web Management Interface Add Clicking the Add link will bring up the Add FF240-IP User screen. Here you will enter the information to be associated with the new user account. Import CSV File Click on the Browse button to navigate to an existing CSV file to import. See Contact CSV File Import Format below for specifics on the fields imported. Existing Users Select to either merge the new CSV file with the existing data or to replace the existing data with the new CSV information.
Chapter 3: Web Management Interface Users CSV Import Format There are two types of records in the User CSV format: a User record type and a Contact record type. The first column determines which type of record the line is, so you may see both types in one CSV file.
Chapter 3: Web Management Interface Export Click on the Save File button, then click OK to save the current Users as a Comma Separated Value file. Delete All This will permanently delete all users in the list. Contacts Section The contacts section will list all of the available recipients for the user that is currently logged in. This is separated into four sections for organization and ease of use (Personal, Global, Personal Groups and Global Groups).
Chapter 3: Web Management Interface Global The global contact group displays all of the global contacts entered by the administrator for use by all users. Global Contacts There are four links for managing global contacts: Add, Import, Export and Delete All. Name This displays the contact name as entered. Fax Number This displays the fax number entered for this contact. Phone Number This displays the voice phone number entered for this contact.
Chapter 3: Web Management Interface Personal Groups The personal groups screen will display all personal groups available for the logged in user. Personal Groups There are two links available for personal groups: Add and Delete All. Name This displays the contact name as entered. Description This will display the description entered for the created group. Action Edit Clicking on the Edit link will open the editing screen so that the personal contact information can be changed.
Chapter 3: Web Management Interface Send a Fax Screen The Send Fax screen is a one page form for sending faxes directly from the FF240-IP unit when accessed from a web browser. Multi-Tech Systems, Inc.
Chapter 3: Web Management Interface Send Fax Sender Information If a cover page is selected (the ‘Yes’ check box detailed below), much of the sender information will be already populated in the cover page from what is provided for the logged-in user. This can be changed if needed, or left as is. Name Enter the name of the sender here. Organization Enter the name of the sending organization (if needed) here.
Chapter 3: Web Management Interface Add Recipient button Click this button to add a selected or manually entered recipient to the list. Repeat the process to add more recipients. Recipient list The current list of added recipients is listed here. If needed, you can Delete individual entries. Cover Page Information Include cover page with this fax? Select Yes or No for your choice. Select Cover Page Choose a cover page from the drop-down box. Subject Enter a subject for the fax here.
Chapter 3: Web Management Interface Logout Clicking this navigational link will log you out of the FF240-IP unit. This is always a good practice to follow when you are finished using the FF240-IP, especially if you were logged in with an administrators privileges for security reasons. There is no screen associated with the Logout link – after clicking Logout, you will be redirected to the Login screen. Multi-Tech Systems, Inc.
Chapter 4 – Client Software Installation The Client software is for general use of the FF240-IP, but it needs to be associated with a FF240-IP unit for proper operation. Your administrator should provide the software or a location where it can be obtained from. You will need to install the Client software on your PC and set the FF240-IP that it is to work with. You will need to be logged in with administrator rights before starting any installation. Installation A.
Chapter 4: Client Installation B. At the Welcome screen, click Next. C. At the Select Installation Folder screen, browse to the desired file location for the FF240-IP client software. In most cases, the default file location is recommended. Clicking on the Disk Cost button will show you the size of the software being installed as well as the available disk space of the target drive. When the destination location is correct, click Next. Multi-Tech Systems, Inc.
Chapter 4: Client Installation D. At the Confirm Installation screen, click Next to begin the installation. A transient screen (“Installing FF240-IP Client Software”) will appear while files are being copied. E. The FF240-IP Client software can place a shortcut in the Startup directory so that the client software will start automatically when the PC is booted. F. You will be asked if you want the Client software to automatically launch when the installation is complete. Select your preference.
Chapter 4: Client Installation G. You will be asked whether or not you want to associate .tif and .cpg files with the Multi-Tech Tiff Viewer. Click Yes (unless you prefer to use a different viewer program). The .cpg files become associated with the legacy Cover Page software that is used with the legacy FaxFinder FFx20 models. If a Question screen appears asking "Warning - the extension .
Chapter 4: Client Installation Push Installation Method Push Installs of the Client Software The FF240-IP Client installer is now available as an MSI package. This provides the ability to perform remote installation using Microsoft Group Policy, SMS, as well as other third party tools. The installer can be run like any other Windows software installer and it can also be invoked from the command line using the Windows Installer command ‘msiexec’. Previous versions of the FF240-IP Client (1.08.
Chapter 4: Client Installation Setting the Usage Rights for the Printer The printer that is installed into Windows for the FF240-IP to work requires some settings of the rights. For Windows Server 2003, Windows XP and earlier: The Windows account/user that is to "use" the printer, needs to have the "Print" permission associated with (enabled on) their Windows account (regarding the printers security properties).
Chapter 4: Client Installation 1. At the main screen of the FF240-IP Fax Client Software, click on Edit and select “Add FF240-IP” if you know the IP address or Host Name of the FF240-IP, otherwise open the Tools menu and select “Auto-Discover Devices” to have the Client software search the network for FF240-IP units. Add FF240-IP Manually Use Auto Discover to Locate FF240-IP a.
Chapter 4: Client Installation 2. To add a FF240-IP when the IP address is known, select the FF240-IP model family from the Type drop-down, enter the IP address “Server Address” field along with your Username and Password. If you need to use a secure login, tick the ‘Use SSL’ checkbox. If the Auto Discover Devices feature was used, you may Right-click and select Add or double Leftclick on the IP address or name of the FF240-IP unit that was detected.
Chapter 4: Client Installation 4. A new FF240-IP entry should appear on the “Devices” tab of the FF240-IP Fax Client Software screen. The status of the newly registered FF240-IP unit may momentarily go from “Not logged in” to “Logging in” to “Connected.” A FF240-IP x20 unit will show Idle instead of connected. If it goes to Login Failure, then one of two things is wrong: a. The IP address or domain name is wrong.
Chapter 5 – FaxFinder-IP Operation Introduction This chapter describes the things that a user can do with the FF240-IP system. The software programs involved are the FF240-IP Client Software and the Multi-Tech Tiff Viewer (or designated PDF viewer). The FF240-IP Client Software interfaces with the FF240-IP Server and has its own user interface. When previewing outgoing faxes, the PC’s operating system calls up the designated TIFF viewer to display the outgoing fax.
Chapter 5: FaxFinder-IP Operation Sending Faxes Sending faxes through the FF240-IP is quick and simple and offers a variety of methods that can be used to accomplish this. This section will show all the possible ways to send a fax with the FF240-IP. Depending on how your administrator has set up the unit, several or even all options may be available. First, the FF240-IP Schedule Fax window will be explained as it is used for the majority of faxing through the FF240-IP unit.
Chapter 5: FaxFinder-IP Operation Schedule Options pane Options text box: This text box will display ‘Send Immediately’ by default. If you want to schedule this fax to be sent at a specific time or date, then you must click the Options button. Options (button): If you want to specify a time or date for the fax to be sent, you must click the Options button which will open the Fax Scheduling Options window.
Chapter 5: FaxFinder-IP Operation Recipients pane Name (column): Party to whom the fax will be sent. You cannot type in this window. When a recipient is specified either from the Contacts or from the New Recipient window (the ‘+’ button), that recipient’s name will appear in this field. Fax Number (column): Fax number to which the fax will be sent. You cannot type in this window.
Chapter 5: FaxFinder-IP Operation Cover Page pane Use Cover Page (check box): Check this checkbox to include a cover page with your fax. Cover Page (drop-down selection box): This field will be active when the ‘Use Cover Page’ check box is ticked. By clicking on the down arrow, you will see the selection of cover pages available from the FF240-IP unit. Click to highlight and select the cover page you want to use. View (button): Brings up the cover page to be used.
Chapter 5: FaxFinder-IP Operation Send Fax with Client Software When a document (.tif, .pdf, or .txt) is complete and ready to be sent as a fax, opening the client software and using the Schedule Fax option is quick and easy. To begin, either double-click the FF240-IP Client Software icon in the System Tray or launch it manually from the program listing on the Start menu, which will place it down in the System Tray. 1. 2. 3. 4. 5. 6. 7. 8. 9.
Chapter 5: FaxFinder-IP Operation Send Fax from Email (T.37) When you wish to send an email as a fax, using the T.37 format in the To: field will take advantage of the FF240-IP from your Outlook email software. To do this you will need to know a few things: your administrator should provide you with the domain name of the FF240-IP unit and you need to know the phone number of the fax recipient. To begin, compose the message as a new email. 1.
Chapter 5: FaxFinder-IP Operation Send Fax by Web API If your administrator has created a custom API (Application Programming Interface) for you to use, that is another option available for sending faxes through the FF240-IP. This will be unique for your company, so you should look for information from your Administrator or IT department. Using the Client Software This section will detail all of the commands, tabs and screens that the Client Software offers.
Chapter 5: FaxFinder-IP Operation Edit Menu Command Descriptions The following options are available from the Edit menu. Add FF240-IP Type: Select the FF240-IP series you are connecting to. FFx30 for the FF130, FF230, FF430 and FF830 FFx20 for the FF120, FF220, FF420 and FF820 Server Address: Enter the IP address of the FF240-IP unit that you want to add. Use SSL: Check this box to use the secure sockets layer when accessing the FF240-IP.
Chapter 5: FaxFinder-IP Operation Options The following is available from the Edit | Options menu. Date/Time tab: Here you enter the date and time formats for the fax header from the drop-down menus provided. Advanced tab: Here you designate the circumstances that will make the Send Fax window become minimized (on close or after scheduling) and allow the enabling of the importation of a Microsoft Outlook address book.
Chapter 5: FaxFinder-IP Operation Tools Menu Command Descriptions Auto Discover Devices: Selecting Auto Discover Devices will have the Client software search the network for active FF240-IP units that are on the same network. Click on the Search button to begin the auto discovery. Once begun, you can click the Stop button to end the search at any time. When you are finished, click the Close button.
Chapter 5: FaxFinder-IP Operation Devices Tab (Main Window) The Devices tab will show all of the FF240-IP units that are associated with the client software. This window has three columns: Host (the name or IP address of a FF240-IP unit), Model (the model number of the FF240-IP unit) and Status (displays the connection state of the FF240-IP unit as well as showing which unit is set as the default unit for use).
Chapter 5: FaxFinder-IP Operation Schedule Options tab In the options tab you can change the default settings that are used for faxing: Max Attempts, Fax Priority, Fax Receipt, Try Interval. Save (button) Click the save button to make these changes to the FF240-IP unit for this user. Reconnect Selecting this option will attempt to reconnect the user to the selected FF240-IP. Delete Selecting this will delete the FF240-IP unit from use by this software.
Chapter 5: FaxFinder-IP Operation Print Capture Tab (Main Window) Any potential faxes sent from the print to FF240-IP option will be here, ready for additions, setting changes or scheduling. There are two columns to this field: Document (the name of the document ready to be scheduled) and Pages (the total number of pages in the document). To access the options for items in the print capture area, right-click on the document name.
Chapter 5: FaxFinder-IP Operation Using the Multi-Tech Tiff Viewer The Multi-Tech Tiff Viewer program has a variety of features that enhance the viewing of fax messages in graphic file form (thumbnails, zooming, spot magnification, scrolling, rotating, etc.). The program can also manipulate and permanently alter the graphic files. Toolbar Icons The most commonly used functions are available as icons on the toolbar. In the diagram below, we label the functions of these icons.
Chapter 5: FaxFinder-IP Operation Copy. The Copy function allows you to copy the fax file and insert it into a different application program. When you click the copy button, the current image will be copied to Windows Clipboard, from which you may then Paste into another applicable program or document. See “Importing Fax Images into Other Application Programs” below. Pan (Omni-Directional Scroll).
Appendix A – Troubleshooting 1. What if I can't see the web page for my FF240-IP? REMEDY: Verify that the Admin PC is actually on the same subnet as the FF240-IP and that it can be “pinged.” Launch a Command Prompt. (In WinXP, go to Start | All Programs | Accessories | Command Prompt. In Win2000, go to Start | Programs | Accessories | Command Prompt.) Type ipconfig to verify that the Admin PC’s IP address is in the same network as the FF240IP’s IP address. Then type ping 192.168.2.
Appendix A: Troubleshooting CAUSE A: During transmission, the name server’s address could not be resolved (that is, the FF240-IP unit could not contact your name server). RESPONSE A: Contact the FF240-IP unit using secure shell and try to ping the name server. ssh user@ip user: admin password: admin # ping 192.168.y.y (where this is the address of the name server) If the name server ping fails, you must determine why it failed. The name server may not be reachable because it is on a different subnet.
Appendix A: Troubleshooting No email message after mail server setup (cont’d) CAUSE E: The email server does not support SMTP. RESPONSE E: Contact the FF240-IP unit using secure shell either at its IP address or name (if a name server is present) and specify the SMTP Port Number (25 is the common/standard port number, but this number is configurable in the FF240-IP System Configuration | SMTP screen). Using Telnet (IP address: port) to get to the SMTP server is the easiest method.
Appendix B – Customization Web Services API Introduction This section illustrates the HTTP/XML communication between the FF240-IP Web Service (FFWS) and a client. FFWS provides an interface to the FF240-IP units for client applications. Client applications can use FFWS for sending faxes, managing contacts and monitoring fax status. Authorization All request requiring authorization must have the Authorization header set using Basic authentication.
Appendix B: Customization Example: POST /ffws/v1/ofax HTTP/1.1 content-type: application/xml authorization: Basic YWRtaW46YWRtaW4= https://192.168.2.1/ffws/v1/data/cover_pages/default.
Appendix B: Customization https://192.168.2.1/ffws/v1/data/cover_pages/default.pdf true Test Subject Test Message admin Sender Name Sender Org 111-222-3333 111-222-3334 sender@example.
Appendix B: Customization HTTP Response Status Codes: 200 OK Here are the fax entries. Example: GET /ffws/v1/ofax HTTP/1.1 content-type: application/xml authorization: Basic YWRtaW46YWRtaW4= ----------------------------------HTTP/1.1 200 OK content-type: application/xml Success https://192.168.2.1/ffws/v1/ofax/0000001B/0000 https://192.168.2.
Appendix B: Customization Aborting a Fax Entry HTTP Request line: DELETE /ffws/v1/ofax/FAXKEY HTTP/1.1 DELETE /ffws/v1/ofax/FAXKEY/ENTRYKEY HTTP/1.1 HTTP Response Status Codes: 202 Accepted An abort has been sent. The fax entry will be aborted if possible. 400 Bad Request The fax specified could not be aborted. The user may not be the owner of the fax or the fax could not be found. Example: DELETE /ffws/v1/ofax/0000001B/0000 HTTP/1.
Appendix B: Customization Retrieving User Information HTTP Request line: GET /ffws/v1/users/USERNAME HTTP/1.1 HTTP Response Status Codes: 200 OK Success 403 Forbidden Authenticated user does not have permission to view data associated with username. 404 Not Found No user found with that username. Example: GET /ffws/v1/users/admin HTTP/1.1 content-type: application/xml authorization: Basic YWRtaW46YWRtaW4= ----------------------------------HTTP/1.1 200 OK content-type: application/xml
Appendix B: Customization Retrieving Contacts HTTP Request line: GET GET GET GET /ffws/v1/contacts/USERNAME HTTP/1.1 /ffws/v1/contacts/USERNAME/ID HTTP/1.1 /ffws/v1/contacts/global_contact_list HTTP/1.1 /ffws/v1/contacts/global_contact_list/ID HTTP/1.1 Query Parameters: limit=LIMIT Limit the number of results to LIMIT. offset=OFFSET Skip OFFSET entries from the start. Only valid when limit is specified.
Appendix B: Customization Adding New Contacts HTTP Request line: POST /ffws/v1/contacts/USERNAME HTTP/1.1 HTTP Response Status Codes: 200 OK Created 403 Forbidden Authenticated user does not have permission to change data associated with username. 404 Not Found No user found with that username. 400 Bad Request The provided XML is not valid. Example: POST /ffws/v1/contacts/admin HTTP/1.1 content-type: application/xml authorization: Basic YWRtaW46YWRtaW4=
Appendix B: Customization Modifying Contacts HTTP Request line: POST /ffws/v1/contacts/USERNAME/id HTTP/1.1 HTTP Response Status Codes: 200 OK Modified successfully. 403 Forbidden Authenticated user does not have permission to change data associated with username. 404 Not Found No user found with that username. 400 Bad Request The provided XML is not valid. Example: POST /ffws/v1/contacts/admin/6 HTTP/1.1 content-type: application/xml authorization: Basic YWRtaW46YWRtaW4=
Appendix B: Customization Deleting Contacts HTTP Request line: DELETE /ffws/v1/contacts/USERNAME/id HTTP/1.1 HTTP Response Status Codes: 200 OK Deleted 403 Forbidden Authenticated user does not have permission to change data associated with username. 404 Not Found No user found with that username. Example: DELETE /ffws/v1/contacts/admin/6 HTTP/1.1 content-type: application/xml authorization: Basic YWRtaW46YWRtaW4= ----------------------------------HTTP/1.
Appendix B: Customization Retrieving Contact Groups HTTP Request line: GET /ffws/v1/contact_groups/USERNAME HTTP/1.1 GET /ffws/v1/contact_groups/global_contact_list HTTP/1.1 Query Parameters: limit=LIMIT Limit the number of results to LIMIT. offset=OFFSET Skip OFFSET entries from the start. Only valid when limit is specified. name=SUBSTR description=SUBSTR Search for groups by field name. If you specify more than one, they are logically ANDed.
Appendix B: Customization Retrieving Cover Pages HTTP Request line: GET /ffws/v1/data/cover_pages HTTP/1.1 HTTP Response Status Codes: 200 OK Success Example: GET /ffws/v1/data/cover_pages HTTP/1.1 content-type: application/xml authorization: Basic YWRtaW46YWRtaW4= ----------------------------------HTTP/1.1 200 OK content-type: application/xml Success default.pdf application/pdf https://192.168.2.
Appendix B: Customization Verify User Authenticates the user and then simply returns 200 OK. HTTP Request line: GET /ffws/v1/verify HTTP/1.1 HTTP Response Status Codes: 200 OK Verified Example: GET /ffws/v1/verify HTTP/1.1 content-type: application/xml authorization: Basic YWRtaW46YWRtaW4= ----------------------------------HTTP/1.1 200 OK content-type: application/xml
Appendix B: Customization General Status Codes Be aware that other Status Codes that do not pertain specifically to the resource requested may be returned. See RFC 2616 for a listing of all possible codes.
Appendix B: Customization Sender Name Sender Org 111-222-3333 218-555-3336 inline https://192.168.2.
Appendix B: Customization false admin test recipient test org 5816 3 3
Appendix B: Customization User Element This element represents a user registered on the FF240-IP. https://192.168.2.
Appendix B: Customization Contact Element This element represents a user contact. https://192.168.2.
Appendix B: Customization T.37 Advanced Usage Introduction For individual faxes, you can use the commands below to override settings entered in the administrator or user web interface. Many options for the use of email to fax (T.37) follow the Request For Comment (RFC) standards provided by the IETF. We will briefly describe some of these options, but in-depth descriptions are available at the IETF website (www.ietf.org) where you will need to search for the relevant RFC number to see the explanations.
Appendix B: Customization RECEIPT-ATTACHMENT=pdf|tiff|none Determines the format and whether or not to include a copy of the sent fax with any email receipts sent to the sender. A value of "pdf" will attach the sent fax in PDF format to any email receipts, "tiff" will attach the sent fax in TIFF format, and "none" will disable attaching the sent fax entirely.
Appendix C – Creating Cover Pages Cover pages for the FF240-IP are PDF forms. The FF240-IP will fill out the form fields that it knows about, with information specific to the fax, and insert the PDF as the first page of the fax. In order to do this, the field names in the form must match exactly with the field names that FF240-IP will try to fill in. FF240-IP x30 models only know how to fill in text fields and ignores most formatting. For best results make your form as simple as possible.
Appendix E: Regulatory Compliance Appendix E – Regulatory Compliance 47 CFR Part 15 Regulation This equipment has been tested and found to comply with the limits for a Class A digital device, pursuant to 47 CFR Part 15 regulations. The stated limits in this regulation are designed to provide reasonable protection against harmful interference in a commercial environment.
Appendix E: Regulatory Compliance Canadian Limitations Notice Notice: The ringer equivalence number (REN) assigned to each terminal device provides an indication of the maximum number of terminals allowed to be connected to a telephone interface. The termination on an interface may consist of any combination of devices subject only to the requirement that the sum of the ringer equivalence numbers of all the devices does not exceed 5. Notice: The Industry Canada label identifies certified equipment.
Appendix F: Environmental Info Appendix F - Environmental Information WEEE Statement (Waste Electrical and Electronic Equipment) July, 2005 The WEEE directive places an obligation on EU-based manufacturers, distributors, retailers and importers to take back electronics products at the end of their useful life. A sister Directive, ROHS (Restriction of Hazardous Substances) complements the WEEE Directive by banning the presence of specific hazardous substances in the products at the design phase.
Appendix F: Environmental Info REACH Statement Registration of Substances: After careful review of the legislation and specifically the definition of an “article” as defined in EC Regulation 1907/2006, Title II, Chapter 1, Article 7.1(a)(b), it is our current view Multi-Tech Systems, Inc. products would be considered as “articles”. In light of the definition in § 7.
Appendix F: Environmental Info C-ROHS HT/TS Substance Concentration 依照中国标准的有毒有害物质信息 根据中华人民共和国信息产业部 (MII) 制定的电子信息产品 (EIP) 标准-中华人民共和国《电子信息产品污染控制管理办法》(第 39 号),也称作中国 RoHS,下表列出了 Multi-Tech Systems Inc.
Appendix G: EULA Appendix G – End User License Agreement IMPORTANT – READ BEFORE OPERATING MULTI-TECH SYSTEMS, INC. END USER LICENSE AGREEMENT PLEASE READ THIS END USER LICENSE AGREEMENT (“AGREEMENT”) CAREFULLY BEFORE USING THE MULTI-TECH PRODUCT, ACCESSING THE SOFTWARE, OR DOWNLOADING ANY SOFTWARE UPDATES FOR THE MULTI-TECH PRODUCT. BY USING THE MULTI-TECH PRODUCT OR DOWNLOADING SOFTWARE UPDATES FOR THE MULTI-TECH PRODUCT, YOU AGREE TO BE BOUND BY THE TERMS OF THIS LICENSE.
Appendix G: EULA 5. OWNERSHIP; CONFIDENTIALITY. You agree that the Software contains trade secret information, copyrights, trademarks, and other intellectual property rights that are owned by Multi-Tech Systems, Inc. or its licensors. Multi-Tech retains all right, title and interest in and to the Software. All rights not expressly granted herein are reserved.
Index Push installation ............................................................... 71 A Administrator Add users .....................................................................17 Login.............................................................................14 S Home screen .....................................................................19 Send a fax screen.............................................................. 63 Setup Cabling ...................................................