
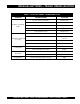
Specifications


MODULAR LIGHT TOWER — PARTS & OPERATION MANUAL — REV. #3 (06/26/06) — PAGE 33
MODULAR LIGHT TOWER — TOWER MAST PRE-SETUP
Mast (Top and Center Tower Sections)
Once the tower mast has been locked into its vertical position,
the top and center tower sections can now be raised. These two
tower sections allow the flood lights to be extended upwards in
excess of 30 ft. Perform the following steps when extending the
floodlights:
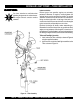
1. Locate the "vertical mast extension hand winch", see
Figure 3, Item 2.
2. Turn the vertical mast extension hand winch lever
clockwise, and observe that the flood lights begin to
climb upward.
3. Continue turning the hand winch lever in the clockwise
direction until the desired height has been reached.
4. Release the hand winch lever, this winch is of the self-
locking type. The tension on the cable will keep the
mast sections in place.
WARNING:WARNING:
WARNING:WARNING:
WARNING:
ALWAYS check overhead for clearance of the
mast. NEVER raise the mast in the vicinity of
power lines! DO NOT stand behind the trailer
while the mast is being raised or lowered.
Mast (Bottom Tower Section)
Follow the steps below to raise the bottom tower mast:
1. To release the mast from the support stand locking
cradle, PULL the large cradle locking pin ( see Figure 3,
item 8). This will unlock the mast from the horizontal
position.
2. Remove the bottom mast quick release locking pin (see
Figure 3, Item 18, before raising tower to the vertical
position.
3. To place the mast in the vertical position, TURN the
vertical winch hand lever (Figure 3, item 16) clockwise
until the mast is pointing upwards at 90 degrees.
4. Once the mast in the vertical position, insert the quick
release locking pin to prevent the mast from falling.
Lowering Mast (Top and Center Tower Sections)
1. Turn the vertical mast extension hand winch lever
counter-clockwise, and observe that the flood lights
begin to drop downward.
2. Continue turning the hand winch lever counter-clockwise
until the top and center mast sections have been fully
retracted.
Lowering Mast (Bottom Section)
1. Remove the quick release locking pin to allow the bottom
mast section to be lowered to the horizontal section.
2. Turn the vertical mast hand winch lever counter-
clockwise, and observe that bottom tower mast begins
to approach the horizontal position.
3. Continue turning the vertical hand winch lever in the
counter-clockwise direction. As the bottom tower mast
approaches the locking cradle, pull the tower release
pin to allow the tower mast to rest in the cradle.
4. Once the bottom mast is resting in the cradle of the
tower support stand, align the hole on the mast with the
hole on the cradle and insert locking pin.
Outriggers and Support Stands
1. Make sure both outriggers are extended. To extend the
outriggers, pull the locking pin on the outrigger and hold
while sliding out the outrigger assembly.
2. As soon as the pin clears the travel position hole, release
it and continue sliding out the outrigger. The pin must
snap into the outrigger locking hole in the extended
position.
3. After extending all outriggers, rotate all trailer
jack stands
into the foot down position, then turn the crank handle
on the
jack stands
clockwise to lower it and level the
light tower.
4. Check behind the light tower and make sure all
personnel and objects are clear of the tower mast.
DANGER:DANGER:
DANGER:DANGER:
DANGER:
Stay out of the travel path of the tower mast
while raising or lowering. ALWAYS be care-
ful to check that the mast does not inter-
fere with any obstacles, especially over-
head power lines. Contact with high volt-
age power lines could damage the equipment and cause
serious injury or even death to personnel.