
Operating instructions

Operating Instructions - Telemetry-Display
Page 25
Operating instructions - Telemetry-Display # 985 5310 (31.01.2012 PaCh) • Errors and omissions excepted. •
¤
MULTIPLEX
x The pin assignment of the UNI lead is not correct.
x The hardware requirements of the RF module or the trans-
mitter for use with the Telemetry-Display are not fulfilled
(Î 6.).
Error:
x The Telemetry-Display does not show a version number
adjacent to “HFM”; instead it just shows “-.- -”.
Remedy:
x The firmware requirements of the RF module or the
transmitter for use with the Telemetry-Display are not fulfilled
(Î 6.).
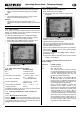
11. “SETTINGS / EINSTELLUNGEN” MENU
11.1. Menu overview
In this menu you can alter the basic settings for the Telemetry-
Display. It is advisable to enter these settings immediately after
switching the unit ON for the first time.
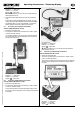
The “Settings / Einstellungen” menu is accessed as follows:
x Switch the transmitter ON, and wait until a screen display
showing four telemetry values appears (Î 12.).
x Hold the SET button ( SET ) pressed in for about three se-
conds until the following menu structure appears:
x Release the SET button.
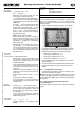
11.2. Menu points and possible settings
Menu point Possible settings
Exit To leave the menu
Alarm OFF, ON / AUS, EIN
Vario switch / Vario-Schalter ---, SET, K01, K02, …, K16
K01, …, K16 also: Ĺ , Ļ
Tone variant / Tonvariante 1, 2 (neutral suppression)
Sink rate / Eigensinken 0,0m/s, 0,1m/s, …, 2,0m/s
(default 0.5 m/s)
LCD contrast / LCD Kontrast -8, -7, …, -1, +0, +1, …, +8
Language / Sprache DE, EN
A detailed explanation of the menu points and set-up facilities
can be found in Chapter (Î 11.3.3.).
11.3. Selecting individual menu points, changing set
values
11.3.1. Moving between menu points
From the ¨Exit menu point use the DOWN () and UP ()
buttons to move to and fro between the individual menu points
on the left-hand side of the screen. The selected menu point is
highlighted (black background and bar).
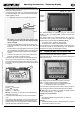
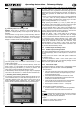
11.3.2. Changing set values
x Select the desired menu point (Î 11.3.1.).
x Briefly press the SET button ( SET ):
Î The currently valid value for this menu point is now
highlighted:
x At this point you can change the current value using the
DOWN (
) and UP () buttons. The selected value is
highlighted (dark background and bar).
x Once you have changed the value as required, press the
SET button ( SET ) briefly to return to the left-hand side of
the screen with the menu points.
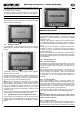
x When you have adjusted all the menu points to your preferred
values, select the “Exit“ menu point. This is again highlighted
with a black bar: ¨Exit.
x A brief press on the SET button ( SET ) quits the “Settings /
Einstellungen“ menu:
Î The screen display now switches to the last four selected
telemetry values (Î 12.).
11.3.3. Detailed explanation of the menu points and
possible settings
Menu point Possible settings
Exit To leave the menu.
Alarm OFF, ON / AUS, EIN
OFF / AUS: the screen continues to display
the four selected telemetry values even though
a warning threshold has been reached. In this
case the Telemetry-Display also does not
generate any audible alarm sounds.
! Tip: this setting on the Telemetry-Display
is particularly useful in conjunction with the
integral screen of a COCKPIT SX M-LINK or
ROYALevo/pro transmitter, since telemetry da-
ta can be displayed on both screens:
When a warning threshold is reached, the
transmitter screen always switches to the
critical value. At the same time the transmitter
always emits an audible alarm. However, if the
Telemetry-Display is set to Alarm = OFF, it
continues to output the four selected telemetry
values instead of switching to the critical value.
ON / EIN: if an alarm threshold is reached, the
Telemetry-Display emits an audible alarm. At
the same time the screen display switches to
the critical telemetry value, which is shown
highlighted and with a thick black bar.