RX-7-DR M-LINK # 985 5319 (10-02-24/MIWA) D Esser RX-9-DR M-LINK Bedienungsanleitung 3- 8 Operating Instructions 9 - 14 Notice d´utilisation 15 - 20 Istruzioni per l´uso 21 - 26 Instrucciones 27 - 32 MULTIPLEX Modellsport GmbH & Co. KG z Westliche Gewerbestraße 1 z D-75015 Bretten © MULTIPLEX 2010, Printed in Germany www.multiplex-rc.
Bedienungsanleitung 2,4 GHz Empfänger RX-7-DR M-LINK / RX-9-DR M-LINK ! Diese Bedienungsanleitung ist Bestandteil des Produktes. Sie beinhaltet wichtige Informationen und Sicherheitshinweise. Sie ist deshalb jederzeit griffbereit aufzubewahren und beim Verkauf des Produktes an Dritte weiterzugeben. 1. TECHNISCHE DATEN Best.-Nr.
Bedienungsanleitung 2,4 GHz Empfänger RX-7-DR M-LINK / RX-9-DR M-LINK 7. EMPFÄNGERANSCHLÜSSE Die Empfänger verwenden das UNI-Stecksystem. Dieses ist kompatibel zu den Stecksystemen der meisten Fernsteuerhersteller (z.B. HiTEC, robbe/Futaba, Graupner/JR). Die Steckplätze der Empfänger sind folgendermaßen beschriftet: 1, 2, 3 … 7 (… 9) Servoanschlüsse Kanal 1, 2, 3 … 7 (… 9). Alternativ: Anschluss Empfängerakku.
Bedienungsanleitung 2,4 GHz Empfänger RX-7-DR M-LINK / RX-9-DR M-LINK x Empfänger EIN schalten bzw. Akku anstecken: Die Binding-Prozedur läuft, die LED am Empfänger blinkt mit hoher Blinkfrequenz (LED Code 2 Î 8.1). x Jetzt die SET-Taste loslassen. ! Hinweis: bei der ersten Inbetriebnahme des Empfängers oder nach einem RESET startet der Bindingvorgang automatisch, auch wenn die SET-Taste nicht gedrückt wird. 2.
Bedienungsanleitung 2,4 GHz Empfänger RX-7-DR M-LINK / RX-9-DR M-LINK 8.6 RESET auf Werkseinstellungen Die Einstellungen des Empfängers können auf den Lieferzustand (Default-Werte) zurückgesetzt werden. Alle von Ihnen vorgenommenen Einstellungen (z.B. Binding-Information, FAILSAFE-Stellungen, …) gehen dabei verloren. Drücken Sie die SET-Taste für mindestens 10 Sekunden (zur Hilfestellung geht die LED mit dem Drücken der Taste aus, nach 2 Sekunden wieder an und nach 10 Sekunden wieder aus).
Bedienungsanleitung 2,4 GHz Empfänger RX-7-DR M-LINK / RX-9-DR M-LINK gute „Sicht“ einer Empfängerantenne zum Sender. Im ZweiEmpfänger-Betrieb können so weitere Sicherheitsreserven aktiviert werden. Zwei-Empfänger-Betrieb ist insbesondere bei Großmodellen zu empfehlen. 11.
Bedienungsanleitung 2,4 GHz Empfänger RX-7-DR M-LINK / RX-9-DR M-LINK ! Achtung: keinesfalls die Antennen in Eigenregie austauschen! Für einen fachgerechten Antennenwechsel sind sowohl Spezialwerkzeug als auch entsprechendes Knowhow erforderlich.
Operating Instructions for RX-7-DR M-LINK / RX-9-DR M-LINK 2.4 GHz receivers ! These operating instructions are an integral part of the product, and contain important information and safety notes. Please store them in a safe place, where you can find them at any time, and pass them on to the new owner if you sell the receiver. 1. SPECIFICATION Order No. Reception system Instructions for RX-7/9-DR M-LINK 2.
Operating Instructions for RX-7-DR M-LINK / RX-9-DR M-LINK 2.4 GHz receivers 7. RECEIVER CONNECTIONS This receiver employs the UNI connector system, which is compatible with the connector systems used by most radio control manufacturers (e.g. HiTEC, robbe/Futaba, Graupner/JR). The receiver sockets are marked as follows: 1, 2, 3 … 7 (… 9) Servo sockets, channels 1, 2, 3 … 7 (… 9). Alternatively: receiver battery socket.
Operating Instructions for RX-7-DR M-LINK / RX-9-DR M-LINK 2.4 GHz receivers x x Switch the receiver ON, or connect the battery: The binding procedure runs, the receiver LED flashes at high frequency (LED code 2 Î 8.1). Now release the SET button. ! Note: the binding process starts automatically when the receiver is used for the first time, and after a RESET even if you have not pressed the SET button. 2.
Operating Instructions for RX-7-DR M-LINK / RX-9-DR M-LINK 2.4 GHz receivers Hold the SET button pressed in for at least ten seconds (as a guide, the LED goes out when you press the button, comes on again after two seconds, then off again after ten seconds). When the RESET has been carried out, the LED displays the confirmation signal (LED code 5 Î 8.1), and the receiver switches to binding mode.
Operating Instructions for RX-7-DR M-LINK / RX-9-DR M-LINK 2.4 GHz receivers 11. MULTIMATE AND RX DATAMANAGER PC PROGRAM All MULTIPLEX M-LINK receivers are based on modern microcontrollers (FLASH technology). In the case of most M-LINK receiver types (see the operating instructions supplied with your receiver) it is also possible to connect the unit to the MULTImate (# 8 2094) and / or to a PC or notebook computer using the PC connecting lead (# 8 5149); the PC program RX DataManager can then be used.
Operating Instructions for RX-7-DR M-LINK / RX-9-DR M-LINK 2.4 GHz receivers 15. CE CONFORMITY DECLARATION This device has been assessed and approved in accordance with European harmonised directives. This means that you possess a product whose design and construction fulfil the protective aims of the European Community designed to ensure the safe operation of equipment. 18.
Notice d’utilisation du récepteur 2,4 GHz RX-7-DR M-LINK / RX-9-DR M-LINK ! Ces instructions font partie intégrante du produit. Celle-ci contient des informations importantes ainsi que des consignes de sécurités. Elle doit donc être consultable à tous moments et à joindre lors d’une revente à tierces personnes. 1. DONNEES TECHNIQUES RX-7-DR M-LINK RX-9-DR M-LINK Nr. com. Système de réception # 5 5811 Nbr.
Notice d’utilisation du récepteur 2,4 GHz RX-7-DR M-LINK / RX-9-DR M-LINK plus longues interruptions en dessous de 3,5 V peuvent amener à un redémarrage de celui-ci et donc une interruption de réception momentanée. Cela peut arriver avec un accu trop faiblement dimensionné, vide ou défectueux, utilisation de câble de trop faible section, de mauvaises connexions ou d’un système BEC défectueux. 7.
Notice d’utilisation du récepteur 2,4 GHz RX-7-DR M-LINK / RX-9-DR M-LINK x x Appuyez sur la touche SET sur le dessus du récepteur (Î 8.2) à l’aide d’un objet pointu et maintenez la pression. Mettez en marche le récepteur ou branchez l’accu: Le processus de Binding a débuté, la LED du récepteur clignote avec une fréquence plus élevée (LED Code 2 Î 8.1). x Relâchez maintenant la touche SET.
Notice d’utilisation du récepteur 2,4 GHz RX-7-DR M-LINK / RX-9-DR M-LINK ment“ (voir notice) afin d’éviter le blocage des servos. Les régulateurs modernes se coupent. Certains servos digitaux restent „dur“ et gardent la position. Avec le MULTImate ou le RX DataManager la fonction FAILSAFE peut être activée ou désactivé servo par servo. Exemple: uniquement Gaz au ralenti / Arrêt, les autres servos = HOLD. 8.
Notice d’utilisation du récepteur 2,4 GHz RX-7-DR M-LINK / RX-9-DR M-LINK Dans la suite de la notice nous appellerons ce type de Diversity utilisation en „double bi récepteur“. Avec différents types de récepteurs MULTIPLEX M-LINK à partir de RX-7-DR M-LINK l’utilisation en double bi récepteur est possible. Vous pouvez également combiner divers types de récepteurs MLINK différents, aussi longtemps que les deux sont compatibles double bi récepteur (par ex.: 1x RX-16-DR pro M-LINK et 1x RX-7-DR M-LINK).
Notice d’utilisation du récepteur 2,4 GHz RX-7-DR M-LINK / RX-9-DR M-LINK 14. CHANGEMENT D’ANTENNE En sortie d’usine, les antennes montées sur les récepteurs du type RX-7/9-DR M-LINK sont assez longues pour la plus part des applications. Si vous avez besoin d’une adaptation d’antenne plus longue ou plus courte, prenez contact avec une de nos station service MULTIPLEX ou directement avec notre service après vente MULTIPLEX.
Istruzioni per l’uso - Riceventi 2,4 GHz RX-7-DR M-LINK / RX-9-DR M-LINK ! Queste istruzioni sono parte integrante del prodotto e contengono informazioni importanti. Per questo motivo è indispensabile conservarle con cura e, in caso di vendita del prodotto, consegnarle all’acquirente. 1. DATI TECNICI Art.nr.
Istruzioni per l’uso - Riceventi 2,4 GHz RX-7-DR M-LINK / RX-9-DR M-LINK 7. CONNETTORI SULLA RICEVENTE La ricevente usa il sistema di connessione UNI. Questo tipo di connessione è compatibile con la maggior parte dei componenti RC (p.es. HiTEC, robbe/Futaba, Graupner/JR). Le spine sulla ricevente sono contrassegnate in questo modo: 1, 2, 3 … 7 (… 9) Connettori per i servi, canali 1, 2, 3 … 7 (… 9). In alternativa: per il collegamento del pacco batteria Rx.
Istruzioni per l’uso - Riceventi 2,4 GHz RX-7-DR M-LINK / RX-9-DR M-LINK x x Con un oggetto appuntito, premere e tenere premuto il tasto SET posto sulla parte superiore della ricevente (Î 8.2). Accendere la ricevente / collegare il pacco batteria Rx: Il processo Binding ha inizio, il LED sulla ricevente lampeggia velocemente (LED Code 2 Î 8.1). x Adesso rilasciare il tasto SET.
Istruzioni per l’uso - Riceventi 2,4 GHz RX-7-DR M-LINK / RX-9-DR M-LINK 8.6 RESET (ripristinare le impostazioni di fabbrica) Le impostazioni della ricevente possono essere ripristinate a quelle di fabbrica (valori Default). Tutte le impostazioni effettuate precedentemente (p.es. informazioni Binding, posizioni FAILSAFE, …) andranno perse. Premere il tasto SET per almeno 10 secondi (dopo la pressione del tasto, il LED si spegne per 2 secondi, poi si riaccende per spegnersi una volta trascorsi i 10 secondi).
Istruzioni per l’uso - Riceventi 2,4 GHz RX-7-DR M-LINK / RX-9-DR M-LINK l’effetto direzionale delle antenne. Questo significa, che in ogni posizione del modello, almeno un’antenna Rx ha una buona „visuale“ verso la radio. Il funzionamento a due riceventi permette quindi di migliorare ulteriormente la sicurezza di ricezione, ed è particolarmente indicato per l’impiego su maximodelli.
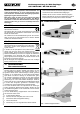
Istruzioni per l’uso - Riceventi 2,4 GHz RX-7-DR M-LINK / RX-9-DR M-LINK assolutamente sostituita dall’assistenza MULTIPLEX o da un centro assistenza autorizzato MULTIPLEX! Lo stesso vale anche per le prolunghe antenne danneggiate. 15. DICHIARAZIONE DI CONFORMITÀ CE 18. POSIZIONE DEI COMPONENTI A La valutazione degli apparecchi avviene secondo le normative europee. Lei è quindi in possesso di un apparecchio che rispetta i requisiti di costruzione e sicurezza stabiliti dall’Unione Europea.
Manual de instrucciones de los receptores 2,4 GHz. RX-7-DR M-LINK / RX-9-DR M-LINK ! Este manual de instrucciones forma parte del producto. Contiene información muy importante y recomendaciones de seguridad. Por tanto, téngalo siempre al alcance de la mano y entréguelo con el producto si vende éste a una tercera persona. 3. 1. ! Lea las instrucciones antes de su uso. CARACTERÍSTICAS TÉCNICAS Referencia RX-9-DR M-LINK # 5 5811 # 5 5812 2,4 GHz.
Manual de instrucciones de los receptores 2,4 GHz. RX-7-DR M-LINK / RX-9-DR M-LINK más largas por debajo de 3,5 V. podrían producir un reinicio del receptor, provocando breves cortes en la recepción. Puede deberse a baterías agotadas, con poca carga o defectuosas, cables con sección insuficiente, falsos contactos o un sistema BEC sobrecargado o defectuoso. 7. CONEXIONES DEL RECEPTOR El receptor utiliza conectores UNI.
Manual de instrucciones de los receptores 2,4 GHz. RX-7-DR M-LINK / RX-9-DR M-LINK x x Pulse la tecla SET de la parte superior del receptor (Î 8.2) con ayuda de un objeto puntiagudo y manténgala pulsada. Encienda el receptor o conecte la batería: El proceso de asociación arranca, el LED del receptor parpadea con mayor frecuencia. (Código LED 2 Î 8.1). x Suelte ahora la tecla SET. Manual de instrucciones de los receptores 2,4 GHz.
Manual de instrucciones de los receptores 2,4 GHz. RX-7-DR M-LINK / RX-9-DR M-LINK desconectarán. Algunos servos digitales seguirán “duros” y mantendrán la posición. Con el MULTImate o con el programa RX DataManager podrá activar o desactivar la función de FAIL-SAFE servo a servo. Ejemplo: Solo Gas al ralentí / apagado, el resto de servos = HOLD. 8.6 Volver a los valores de fábrica, RESET Manual de instrucciones de los receptores 2,4 GHz.
Manual de instrucciones de los receptores 2,4 GHz. RX-7-DR M-LINK / RX-9-DR M-LINK Puede trabajar en modo doble receptor con distintos tipos de receptores MULTIPLEX M-LINK, a partir del RX-7-DR M-LINK. También puede unir entre sí distintos tipos de receptores M-LINK, siempre que estos dos receptores sean capaces de trabajar así (P. eJ.,1x RX-16-DR pro M-LINK y 1x RX-7-DR M-LINK).
Manual de instrucciones de los receptores 2,4 GHz. RX-7-DR M-LINK / RX-9-DR M-LINK 14. SUSTITUCIÓN DE ANTENAS Los cables de antena instalados de serie en los receptores del tipo RX-7/9-DR M-LINK tienen la longitud suficiente para la mayoría de usos. Si tuviese que usar un cable de antena más largo o más corto, póngase en contacto con el Servicio Técnico de MULTIPLEX o un punto de servicio autorizado por MULTIPLEX.