
Operation Manual True Air Speed Vario Sensor


15
Once you have installed the Prandtl tube and
completed the various connections (silicone tubes
and sensor lead), your True Airspeed + Vario
sensor is ready to use.
· First switch your transmitter on.
· Switch your receiver on (e.g. connect the ight batte-
ry, speed controller ...).
· After a brief period the vario will display the rate of
descent / climb and the current altitude.
· The True Airspeed sensor now carries out an
automatic calibration process. This is indicated by
a display of “-/- km/h” on the transmitter screen.
When calibration is complete, the screen displays “0
km/h” to conrm readiness.
Please note:
The Prandtl tube should not be subjected to moving
air during the automatic calibration process on the
ground, i.e. there should be zero wind. If calibration
is not conrmed after ten seconds or more, switch
the receiver off and on again, and this time hold a
cloth or your hand in front of the Prandtl tube for the
duration of the calibration process to protect it from
air movements.
· Once calibration is complete, the sensor is ready for
use.
3. Using the sensor for the rst time
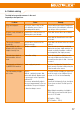
4. Default set-up
The True Airspeed + Vario sensor is delivered with
the following factory default settings:
Airspeed address 5
Airspeed max. address off
Airspeed max. alarm off
Airspeed min. alarm (stall-warning) off
Airspeed min. alarm erase < 10 km/hr
If you wish to change any of the default settings,
you will need to re-congure the sensor.
In this case please continue with the chapter en-
titled “Conguration”.
Altitude address 6
Altitude max. address off
Altitude alarm min. off
Altitude alarm max. off
Vario address 7
Vario address max. climb off
Vario alarm, descent rate ... m/s off
Vario integration 1 s
Vario inherent rate of descent off
GB