
User Manual


Seite 12
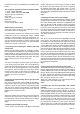
Complete the linkages as described for the ailerons, but in
this case use M2 x 14 mm threaded couplers. At the other
end of the pushrod t an adapter sleeve to ensure that the
clevis is a good t on the CFRP rod. Take care to produce
sound glued joints between all the linkage components.
Slit the side force generators to allow them to t on the wings
and tailplane, then glue them in place as shown.
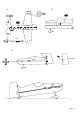
Fig. 9
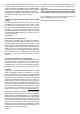
7. Adding the upper fuselage section and the rudder
linkage:
Glue the upper fuselage section to the model, then install
the rudder servo and linkage using the procedure already
described for the elevator pushrod. Glue a 3 x 0.5 x 100
mm CFRP reinforcement (26) and the rudder horn (35) to
the rudder. The rudder can now be glued to the fuselage
using UHU
®
POR before completing the rudder linkage. Glue
the motor bulkhead 32 permanently to the front end of the
fuselage using Zacki.
Figs. 10 & 11
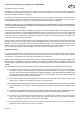
8. Installing the RC components:
Screw the motor (ROXXY C27-13-1800kV # 1-00018) to
the front face of the motor bulkhead, and attach the speed
controller (ROXXY BL Control 712 BEC # 318971) to the
underside of the fuselage using hook-and-loop tape. The
same method is used to x the receiver and battery to the
fuselage. Since the battery-mounting tape is subject to
considerable stress, it is advisable to rub a little UHU
®
POR
into the EPP foam at the mounting position, and allow the
adhesive to air-dry for ten minutes to improve the tape’s
adhesion.
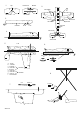
9. Centre of Gravity, control surface travels:
The model should balance at a point 100mm back from the
wing leading edge, measured close to the fuselage. The
control surface travels should be chosen to suit the pilot’s
personal preference, but we recommend adding about 80%
EXPO on elevator and 60% EXPO on aileron and rudder.
15. Safety
Safety is the First Commandment when ying any model
aircraft. Third party insurance is mandatory. If you join a
model club, suitable cover will usually be available through
the organisation. It is your personal responsibility to ensure
that your insurance is adequate (i.e. that its cover includes
powered model aircraft). Make it your job to keep your
models and your radio control system in perfect order at all
times. Check and observe the correct charging procedure for
the batteries you are using. Make use of all sensible safety
systems and precautions which are advised for your system.
An excellent source of practical accessories is the MUL-
TIPLEX main catalogue or our website www.multiplex.de
MULTIPLEX products are designed and manufactured
exclusively by active modellers for practising modellers.
Always y with a responsible attitude. You may think that
ying low over other people’s heads is proof of your piloting
skill; others know better. The real expert does not need to
prove himself in such childish ways. Let other pilots know
that this is what you think too, as it is in all our interests.
Always y in such a way that you do not endanger yourself
or others. Bear in mind that even the best RC system in the
world is subject to outside interference.
No matter how many years of accident-free ying you have
under your belt, you have no idea what will happen in the
next minute.
Before every ight, check that the battery, the wings
and the tailplane are attached and rmly seated. Check
in turn that each control surface is operating correctly!
We - the MULTIPLEX team - hope you have many hours of
pleasure building and ying your new model.
MULTIPLEX Modellsport GmbH &Co. KG