
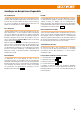
Instructions


20
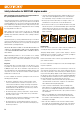
The basics of model ying
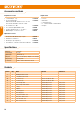
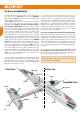
Any aircraft - whether model or “man-carrying” - can be controlled around
three primary axes: the vertical axis, lateral axis and longitudinal
axis. Operating the elevator produces a change in the aeroplane’s ight
attitude around the lateral axis (pitch).
Giving a rudder command turns the model around the vertical axis
(yaw). If you move the aileron stick, the model rotates around the
longitudinal axis (roll). All three axes can be controlled regardless
of the aeroplane’s flight attitude. All aircraft are subject to external
inuences, such as turbulence, which tend to disturb the aircraft, causing
it to deviate from its intended ight path; the pilot’s task is then to apply
control commands so that the model continues to y in the desired
direction. The power system (motor and propeller) provides control over
rate of climb and speed. The rotational speed of the motor is innitely
variable using the speed controller, which follows your control commands
from the transmitter. The important point to note is that pulling upelevator
by itself causes the model to climb, but only until it reaches its minimum
airspeed. The aeroplane’s ability to climb at different angles depends
on the power of the motor. If the model’s speed falls below its minimum
airspeed, it tips forward and dives: this is known as stalling. This occurs
when the airow which generates the lift required to keep the aircraft
in the air is no longer attached to the wing, and the lift collapses. The
EasyStar 3 is designed in such a way that it exhibits very docile stalling
characteristics, and loses very little height when it does stall. In this
situation it drops its nose, immediately picks up speed, and is very soon
under the pilot’s control once more.
If you are a beginner to model ying, we recommend that you initially
control the EasyStar 3 using rudder and elevator only. To turn the model
(initial turns and circles), use the rudder to set up a slight angle of bank,
then apply gentle up-elevator to avoid the nose dropping during the turn.
Always try to turn away from you at rst.
Once you have mastered basic control of the EasyStar 3, it is time to try
the ailerons. However, this does not mean that you can afford to forget the
rudder. A smooth turn, i.e. one which makes efcient use of the airow, is
always own best by co-ordinating rudder and aileron commands. This is
a basic skill required to y any model aeroplane smoothly and accurately.
Without this level of co-ordination the EasyStar 3 will not y so efciently,
although it is very tolerant of such abuse. However, if you concentrate on
learning the art of ying smoothly right from the outset, you will nd it
much easier to control more demanding models at a later date, and will
be able to avoid many a critical situation.
Concentrate constantly on moving the sticks slowly and gradually.
Abrupt, jerky movement of the transmitter controls often places the model
in ight situations from which the beginner is unable to escape. If this
should happen, it is generally better simply to let go of the sticks and
switch the motor off. Wait a few moments until the model has “calmed
down”, and you will then nd it easier to regain full control. If you cannot
avoid a crash, at least the motor is stopped, minimizing the energy which
has to be dissipated through the impact, and thereby limiting damage to
the airframe.
As a beginner you are bound to nd it difcult to steer in the correct
direction when the model is flying towards you. Learn this rule by
heart: the stick must be moved to the side where the “danger” lurks, i.e.
move the stick towards the low wing, and “prop it up”.
Important: We suggest that you learn these suggestions in the period
before the rst ight, so that you are not surprised by the model’s
behaviour when you are actually ying!
Longitudinal axis
Vertical axis
Wing (left)
Wing (right)
Aileron
Aileron
Fin
Elevator
Tailplane
Fuselage
Rudder
Motor pod
Canopy
Lateral axis
EN