
Instructions


26
Building instructions
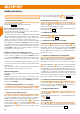
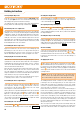
39. Preparing the ap servos
For the ap servos the servo output arms should be angled back relative
to the case by 1 spline. The two servos should form a mirror-image pair.
This setting provides greater down-travel for the aps.
Once again it is also possible to offset the centre position at the transmitter;
the ap pushrods are deliberately longer to allow for this.
Fig. 30
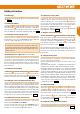
40. Shortening the servo output arms
The output levers of all four wing-mounted servos have to be modied by
cutting off one arm com-pletely, and shortening the remaining arm. When
cutting them to length, cut exactly through the third hole from the inside,
so that the two inner holes can still be used. The best tool for this is a
small pair of side-cutters: cut off the unwanted output arms to leave two
mirror-image pairs - two with arms on the left, two with arms on the right,
when tted to the servos. The output arms must be shortened to prevent
them fouling the inside of the servo shrouds.
41. Installing the aileron / ap servos
Apply hot-melt adhesive to the slots for the servo mounting lugs, and
immediately press the servo into its recess. Apply a little more glue to
the mounting lugs in the slots if necessary. Cut off any excess hot-melt
adhesive ush with the wing surface before deploying the servo leads.
42. Deploying the servo leads in the wing
Thread the servo extension leads (different lengths) through the connector
opening in the root ribs and route them towards the servos. Engage the
retaining lug in the small notch in the green M6 connector, so that the
connector lies almost ush with the rib. Secure the connector on the
cable side with a little hot-melt adhesive.
Now connect the servo leads to the extension leads, and press the cables
into the channels, starting at the servos. The connectors t in the wider
part of the channels. The remaining loops of cable can be stowed in the
empty area behind the root rib and secured with a little hot-melt adhesive;
ensure that they do not project beyond the wing skin.
The nal step here is to apply a strip of clear, matt adhesive tape (approx.
20 mm wide) over the cables to conceal and secure them.
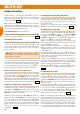
43. Installing the aileron / ap linkages
Connect the pre-formed end of the aileron pushrods
(50 mm) to the
servo output arms, using the second hole from the inside. Connect the
pre-formed end of the ap pushrods
(80mm) to the servo output
arms, using the second hole from the inside.
Slip the plain end of each pushrod through the barrel connector attached
to the aileron / ap horn, set the control surface to neutral, then securely
tighten the socket-head grubscrew
in the barrel connector
.
Repeat the procedure with each ap and aileron. If you have used the
Offset facility at your transmitter, you may need to adjust the neutral
position of the control surfaces.
Figs. 29 + 30
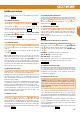
44. Installing the servo shrouds
The servo shrouds
and
should be tted over the pushrods as shown
in the illustration; glue the tongues in the slots in the wing.
Figs. 31 + 32
45. Fitting the wingtip skids
Glue the dummy wheel / skid
to the underside of each wing tip over
the raised moulding; their purpose is to protect the wings when they
contact a hard landing strip.
Fig. 33
46. Preparing the wing retaining bolt
Attach a cable-tie
to the retaining bolt
, and tighten it just to the
point where a large loop re-mains. Cut off the projecting end so that it
cannot be tightened further by accident. The loop is later used to withdraw
the wing retaining bolt.
47. Fitting the wings on the fuselage
Plug the wings fully into the fuselage, then secure them by pushing the
retaining bolt
into the wing retaining clips between the wings. We
suggest that you store the retaining bolt inside the fuselage with a length
of string to prevent it getting lost in storage.
Fig. 35
48. Final assembly
Connect the receiver, and x it to the undercarriage in-ll piece or the
retract unit support using the hook-and-loop tape strips
and
.
You will nd channels in the foam at the rear end of the canopy opening.
Deploy the receiver aerials in the recesses and secure them with tape or
a little adhesive.
49. Applying the decals
The kit is supplied complete with the comprehensive decal sheets
+
. The individual name plac-ards and motifs are pre-cut, and can now
be applied to the model either following our suggested scheme (kit box
illustration) or using your own ideas. Start by applying the small, white n
stickers
over the rudder and elevator servos, and seal the remaining
openings in the n.
Caution: The decals for the outboard end of the wing panels
serve to increase the bending and torsional strength of the wings.
We recommend that you apply them as shown in the illustration!
The building instructions include a number of pictures designed to aid
positioning of the decals. We suggest that you cut out the larger decals
together with the backing paper, leaving them oversize, then carefully
remove the scrap material (clear lm) around the decal itself. Now place the
decal on the surface to establish the correct position.
Remove all dust from the area to be covered, peel back the backing paper
from the area to be initially positioned to a length of about 15 cm, and cut off
the exposed backing paper - leaving the rest of the backing paper in place
for the moment. Lay the decal in place, holding the exposed adhesive away
from the surface, and adjust its position carefully. When you are sure all is
well, lay the raised part of the decal on the surface to hold it in position. Lift
the rest of the decal and slowly peel the backing paper off, starting from
the cut line. Gradually pull the backing paper out, smoothing the decal down
with your hand as you go.
Take care to lay the decal down evenly, but do not rub it rmly at this point,
as you may have to lift it again and adjust its position. Don’t pull the decal
hard, as this could distort it, in which case it might not lie at on the surface.
EN