Multi-Announcer Model 349 Version 01.02 USER GUIDE Multimessage Systems Ltd Units 1 & 2 Cranborne Ind. Estate, Cranbourne Road, Potters Bar Herts, EN6 3JH Telephone: ++44 (0) 1707 644480 Fax: ++44 (0) 1707 646745 www.multimessage.co.uk M349 Announcer version 01.
CONTENTS TECHNICAL NOTES 3 Introduction to your announcer 4 Facilities 4 Installation 5 Choosing A Suitable Site 5 Unpacking The System 5 Installation Procedure (You must follow this!) 5 Read This First (How to control it ) 8 Menus 8 Function Displays 8 Getting started 8 Confirmation 9 Record- Play- Assign Announcements 10 The External Audio Input Socket 11 Remote control of the M349 11 Remotely Rerecord 12 Remote Assignment of Announcement to ports 12 Erasing Announcements
TECHNICAL NOTES 1. This equipment has been approved pursuant to Council Decision 98/482/EC [CTR 21] for pan-European single terminal connection to the Public Switched Telephone Network (PSTN). However, due to differences between the individual PSTN provided in different countries, the approval does not, of itself, give an unconditional assurance of successful operation on every PSTN termination point. In the event of problems, you should contact your equipment supplier in the first instance. 2.
Introduction to your announcer Read this section to get an overview of how your Multimessage announcer works. This section also contains some important information about conditions for installing and connecting the unit. The Model 349 is fitted in a one-unit-high case, equipped with 5 ports (analogue telephone lines) in addition to 1 local control telephone handset port. All ports are analogue 2-wire type.
Installation Choosing A Suitable Site The system should be installed on a level, solid surface, where: ♦ It is near an earthed mains socket outlet, so that the mains lead will reach. This socket shall remain easily accessible. ♦ The telephone line cords will reach your telephone line sockets. ♦ There is a minimum of background noise, so that you can record your announcements satisfactorily. ♦ ♦ ♦ ♦ ♦ You can easily see the display (preferably at head height).
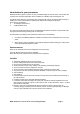
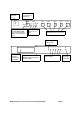
Connect mains power lead here. Connect the local control telephone handset here. LOCAL HANDSET PORT 5 AUDIO IN OUT PORT 4 PORT 3 PORT 2 PORT 1 OUT(8R) BATTERY OFF ON Battery switch You must switch to ON before making recordings. Switch to off, if taken out of service. Optional external audio connections. Connect leads from incoming PSTN/PBX telephone lines here. Lit when local control handset is lifted. Multimessage Systems Ltd. M349 Display shows information.
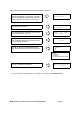
Watch the display and check that it shows the information as follows: When the M349 is first switched on this is the information that appears on the screen. The date is when the software was created. Check that the version is the same as at the foot of this page. M394 V01.02 22 July 2005 After a few seconds you will see. This should take approximately 30 seconds. memory check please wait .. The numbers will vary, depending on the amount of memory installed in your unit.
Read This First (How to control it ) Menus The system works via a series of menus. The display offers you a number of options, to be selected by pressing a key on the telephone. When you press a key, you may see another menu. Inviting you to choose a further option. If you then lift the handset ( You will hear a tone or an announcement if it has been recorded and assigned to port 0 ), press the # key, a ‘pip pip’ tone is played indicating that you are now in the initial menu.
Confirmation When you have completed the recordings and assignments, replace and then pickup the local handset. The local telephone now plays the announcements, in the same way as callers would hear them. To make changes, press # for the main menu. When an announcement has started to play, you will need to press the # key within the first 10 seconds to gain control. If longer than this, replace the handset and start again. M349 Announcer version 01.
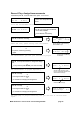
Record- Play- Assign Announcements Lift handset press # . From the main menu press 1 for record. Record ann 1 01..99 #-start Enter announcement number or press # to accept the one offered. Or if the announcement exists. Re-record 1 ? 0-next ∗-no #-start Enter announcement number, press # to re-record the one offered, 0 to find first available or ∗ to end without re-recording. Press # to start the recording. Recording 1 free 1634 #-stop After the tone, speak clearly into the handset.
The External Audio Input Socket The external input socket may be used for recording speech or music. If speech with background music is required then follow the section 'Record Announcements' until it displays ' # to start'. Start the CD Player (or Tape), press # key to start the recording, say your announcement, then press the # key to end the recording. If speech from the handset is not required then follow the section 'Record Announcements' until it displays ' # to start'.
Remotely Rerecord The following assumes that the Announcement number you wish to rerecord is the same as currently assigned to the port you are using for remote control. If the number is different then go to Remote Assignment of Announcement to ports first. Press # X X X X (your remote access key code) After gaining remote access you will hear ‘pip pip’, press 1 # to start recording, speak after the tone, press # to stop. The recording that you have just made is played back to you for confirmation.
Erasing Announcements Lift handset press # . From the main menu press 1 for record. Re-record 0-next *-no 1 ? #-start Enter announcement number, press ∗ Erase 21 ? ∗-no #-yes Callers listening to this will be dropped. Use re-record if you wish callers to stay online. Offers the next announcement. Press # to erase or press ∗ to return to the main menu Re-record 22 ? 0-next ∗-no #-start Press 1-Record 2-Play/Assign The peep-peep is played indicating that you are back at the main menu again.
Playing Announcements If you are playing in a noisy environment, press the Secrecy key to ensure that noises from the handset microphone do not interfere with any MF digits. Selecting an announcement to play Shows length of recording in seconds. Lift handset press # . From the main menu press 2 for play 1 Playing Time 14 1..9 #-assign 0-next The first recorded announcement starts playing. Press # To select an announcement: press digits for the announcement number 1.. 9 9 , press # Ann 23 1..
Review or Change Assignment of Announcement to Ports Shows length of recording in seconds. Lift handset press # . From the main menu press 2 for play 1 Playing Time 14 1..9 #-assign 0-next The first recorded announcement starts playing. 1 Playing Time 14 1..9 #-assign 0-next Select announcement. Press digits for it’s number 1.. 9 9 , press # to start playing it. Press # , to review or change the assignment. The announcement is played repeatedly. Ann 1 assigned to ports 0..
Remote control access Changing Key Code for remote control At the time of installation remote control access will be barred. You may only change the access key code. It cannot be reviewed. Lift handset press # # . From this 2nd menu press 7 (hidden key) 3 for Guard. 1 for Remote control key. Enter the your new code and make a note of it 1-Delays 2-Enable 3-Guard 4-Reset #→ 1-Key Code - Security *-Quit 0000 code for key remember? *-no #-yes 1234 code for key remember? *-no #-yes 0 0 0 0 .. 9 9 9 9.
Allow or bar remote control Change or review the range ports allowed to control the system for making changes such as new recordings or assign announcements to other ports. At the time of installation remote control access will be barred. Lift handset press # # . From this 2nd menu press 7 (hidden key) 1-Delays 2-Enable 3-Guard 4-Reset #→ 3 for Guard. 1-Key Code 2- Security 2 for Security. *-Quit Ports 01..5 remote= barred 1-alter #→ 1 to allow remote access. Or Allow remote control via ports? 01..
Call Counters Total Count Of Calls Received Lift handset press # # . From the 2nd menu press 1 for Hits. 1 for Reset Calls. ∗ to return to the 2nd menu. 0 for reset to zeros. 1-ResetCalls 2-Calls per port #→ Total calls = 000028 0-reset to zero Calls = 000000 #→ ∗ to return to the 2nd menu. ∗ to return to the 1st menu. 1-Hits 2-Free 4-Setup 5-Clock Press 1-Record 2-Play/Assign The peep-peep is played indicating that you are back at the main menu again. M349 Announcer version 01.
Count of Calls Received by each port Lift handset press # # . From the 2nd menu press 1 for Hits. 1-ResetCalls 2-Calls per port #→ Port0 (Local handset) calls are not counted. 2 for Calls per port. or ∗ to return to the 2nd menu. 00 01 Port number 0000 0120 Re-settable counter. 0000 0120 Non-resettable counter. Selected port re-settable counter blinks. 8 to scroll down. 01 02 0120 0045 0120 0045 0 to zero and scroll down. 01 02 0000 0045 0120 0045 2 to scroll up.
Enable number of announcement plays or disable ports from answering Change or review the number of times the announcement will be repeated to callers for a range ports. Lift handset press # # . From this 2nd menu press 7 (hidden key) 1-Delays 2-Repeats 3-Guard 4-Reset #→ Number of repeats blinks. 2 for Repeats # to review next range of ports. (Only if different settings have been used) Or 1 .. 7 for number of repeats.
Ring delay Review or change the time before an incoming call is answered. Lift handset press # # . From this 2nd menu press 7 (hidden key) 1 for Delays. 1 for Ring 1..99 seconds. # to accept 1-Delays 2-Enable 3-Guard 4-Reset #→ Delay? 1-Ring 2-Tone *-Quit Ring delay = 01 sec 0..99 #-accept or ∗ to quit. Clearing to dial-tone delay Review or change the time dial-tone has to be present before an incoming call is cleared. If the time is short, noise from the caller may cause premature clearing.
Reset all ports Only use this if you are experiencing problems. Calls in progress will be cut off. The stored announcement data will be tested and cleared if found to be incorrect. Make a note of your current settings before you follow this procedure. Lift handset press # # . From this 2nd menu press 7 (hidden key) 4 for Reset. 1 for Reset All. After a few seconds it returns to the 1st menu.
GUARANTEE Multimessage Systems Ltd. guarantees this product for one year from the date of purchase provided that: • • • The product has only been used for its intended purpose, and has not been subjected to misuse, or been wilfully or accidentally damaged. The product has been installed according to the maker's lnstallation Instructions. The product has not been tampered with or repaired by anyone other than Multimessage Systems Ltd. or its approved agents.