
User guide


Passive+Relay Version 8.19 page 10
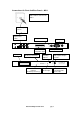
Installation Procedure
Please make sure you follow these steps in the correct order, and that you have read the
safety information.
1 Carefully remove the unit from its plastic bag.
2 Plug the local handset in to the front socket marked ‘LOCAL HANDSET’.
3 Remove the battery fuse and holder from its bag. Fit it into the socket marked
‘BATTERY FUSE’ at the rear of the unit making sure it is securely screwed in. (you
can test this. After installation make a short test recording for announcement 1 then
disconnect mains power for 5 minutes. After this, if you can play the announcement
then all is well)
4 For the M311 plug the telephone line cords into the sockets marked ‘TELEPHONE
LINES’ on the rear of the unit starting with the socket marked ‘2’. The socket marked
‘1’ cannot be used because the corresponding port is used for the local handset. Or for
the M310 hardwire the lines on to the krone strips.
5 Plug the mains lead into the socket at the rear of the unit.
6 With the switch on the mains socket set to Off, plug the mains lead into the socket.
Switch on at the socket.
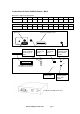
Watch the display and check that it shows the correct information as follows:
The number displayed shows the amount of memory on your system.
You are now ready to set the system up to answer your callers. Go to Read This First.
When the Multi-Announcer is first switched on
this is the information that appears on the
screen. The unit checks the size of installed
memory and displays the memory size.
Memory Top 8800
Size 0800