Multi-Announcer Models 311 and 310 Passive+Relay Version 8.19 USER GUIDE Multimessage Systems Ltd Unit 2..4 Furzewood House,Cranborne Road Ind.
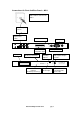
Introduction To Your Multi-Announcer___________________________________ 4 Approval Information _________________________________________________ 4 System Capacity:_________________________________________________________ 4 Installation __________________________________________________________ 5 Choosing A Suitable Site __________________________________________________ 5 Unpacking The System ____________________________________________________ 5 Connection And Conditions For Use___________________________
Passive+Relay Version 8.
Introduction To Your Multi-Announcer Read this section to get an overview of how your Multimessage Multi-Announcer works.
Installation These installation instructions apply to Multi-Announcer Model 311 only. Model 310 must be installed by engineers authorised by Multimessage Systems Ltd. If you are installing a Model 311 Multi-Announcer please make sure you follow the instructions carefully and in the order given.
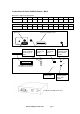
Connections On Front And Rear Panels - M311 Push the plug just below the shutter and use it to raise the shutter Connect to your sockets Ports 2..8 Telephone line sockets Battery fuse holder Mains fuse 250 V 50-60 hZ 2 3 4 TEL No. (+44) 01707 644480 FAX No. MODEL No: 311 5 6 7 8 (+44) 01707 646745 SERIAL No: 3281 DESIGNED AND MANUFACTURED IN THE U.
Connections On Front And Rear Panels - M310 M310 Krone Strip Connection Details Krone strip 1 2 3 4 5 6 7 8 9 10 Announcer line 2 3 4 5 6 7 8 9 10 11 Krone strip 1 2 3 4 5 6 7 8 9 10 Announcer line 12 13 14 15 16 NU NU NU NU NU NU = Not Used Mains fuse Software configuration label P ‰ E E T 5 y Œ †††††††††‰W ›‰††††††††††1 Mains input socket Display Battery fuse holder Port 1 local handset indicator (on when port is busy) Telephone line Port indicators
Connections on front and rear panels - M310L M310 Krone Strip Connection Details Krone strip 1 2 3 4 5 6 7 8 9 10 Announcer line 2 3 4 5 6 7 8 9 10 11 Krone strip 1 2 3 4 5 6 7 8 9 10 Announcer line 12 13 14 15 16 17 18 19 20 21 Krone strip 1 2 3 4 5 6 7 8 9 10 Announcer line 22 23 24 25 26 27 28 29 30 31 Krone strip 1 2 3 4 5 6 7 8 9 10 Announcer line 32 NU NU NU NU NU NU NU NU NU NU = Not Used Port 1 local handset indicat
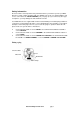
Safety information Please be aware of this important safety information before you install or operate your MultiAnnouncer. Only a simple telephone with tone dialling-such as the one supplied with the unit is to be connected to the LOCAL HANDSET port (see page 9). If you connect any other type of telephone, you may damage the unit and make it unsafe.
Installation Procedure Please make sure you follow these steps in the correct order, and that you have read the safety information. 1 2 3 Carefully remove the unit from its plastic bag. Plug the local handset in to the front socket marked ‘LOCAL HANDSET’. Remove the battery fuse and holder from its bag. Fit it into the socket marked ‘BATTERY FUSE’ at the rear of the unit making sure it is securely screwed in. (you can test this.
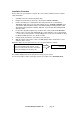
Read This First Menus The system works via a series of menus-the display offers you a number of options, to be selected by pressing a key on the telephone. When you press a key, you may see another menu. Inviting you to choose a further option. When you first switch the system on, the display shows the size of installed memory.
Setting The Time And Date Lift handset press #. From the 1st menu press 8 for time. Enter current time in 24 hour format. Press # to complete. Enter new time hh mm Press # again to return back to the menu. From the 1st menu press 9 for date. Enter new date dd mm yy Enter current date. Press # to complete. Record Announcements Lift handset press #. From the main menu press 1 for record. Enter announcement number or press # to accept the one offered. Record ann 01 0..
RECORD TRANSFER TO AGENT Any announcement recording may be converted to a transfer to an extension of the PBX. This facility is only to be used with the multi-announcer connected to extension ports of a PBX. It transfers calls to the extension number recorded by the following procedure.
Example of Recordings to give Auto-attendant functions In this example there are two different published telephone numbers one for the personnel department and the other for the training department. The company’s Private Branch exchange (PBX) is set-up so the calls arriving for the personnel department are routed to ports 2,3,or 4 of the M310/M311 announcer system where these ports have had announcement 2 assigned to them.
Other Displays During Record All 63 announcements have been recorded-delete those no longer needed to make room for the new recording. All anns used The full memory capacity has been used-delete unwanted announcements to make room for the new recording. Memory full You are trying to record an announcement that someone else is recording on another line-use a different announcement number.
Erasing Announcements Lift handset press #. From the main menu press 2 for play/delete To select announcement, press 6 or 4 (chosen announcement blinks). Then press #. Play / Delete 3 21 Announcement 21 1-Play 3-Delete Delete 21 *-no #-yes Press 3 to delete announcement. Ann 21 Deleted Press # to confirm the delete or ∗ to cancel delete. Press # twice to return back to the main menu. Playing Announcements Lift handset press #.
Enable Lines Lift handset press #. From the main menu press 5 for enable Enter line number (Tens digit followed by units digit), or press # to accept the one offered as the beginning of the range. Ena/Inh/Drop/Zero lines 02.64 Enter line number for the end of the range. Press # to accept. Lines 02..32 1-ena 2-inh 3-drop 4-zero 2.32 enabled Press 1 to enable. #→ Press # twice to return back to the main menu. Inhibit Lines Follow the enable sequence until: Enter line number for the end of the range.
Zero Calls Follow the enable sequence until: Enter line number for the end of the range. Press # to accept. Lines 02..32 1-ena 2-inh 3-drop 4-zero 2.32 - 0 calls Press 4 to zero call counters for the selected range of lines. Press # twice to return to the main menu. #→ Assign Announcement Lift handset press #. From the main menu press 4 for assign. Select announcement number, press # to accept. Press # to accept the line offered or select the one of your choice as the beginning of the range.
Checksum Lift handset press # twice. Version RLY 8.14 Chksm 262C #→ From the second menu press 1 for checksum of the ROM. Press # twice to return back to the main menu. Directory Of Lines Lift handset press # twice. 1e 01n 2i 1n 0000 0000 From the second menu press 3 to select the directory. Press 8 or 2 to select the line you wish to review or change Press ∗ twice to return back to the main menu. Line number i = inhibited e = enabled d = drop 1e 01n 2i 1n.