
User manual


(ill.11)
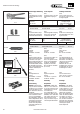
Angecrimpter Kontakt von
hinten in die Isolation ein-
führen bis er einrastet.
Korrektes Einrasten kon-
trollieren durch leichtes
Ziehen an der Leitung
(ill.11)
Push the crimped contact
into the insulator until
they engage.
Check correct engage-
ment by pulling on the ca-
ble.
(ill.11)
Inserrer le contact dans le
capuchon isolant jusqu'à
ce qu'il s'enclenche.
Contrôler l'enclenche-
ment correct en tirant sur
le câble.
ill.11
ill.12
(ill.12)
Prüfstift mit der entspre-
chenden Seite in die Buch-
se oder den Stecker bis
zum Anschlag einstecken.
Bei richtig montiertem
Kontakt, muss die weisse
Markierung am Prüfstift
noch sichtbar sein.
(ill.12)
Insert the test pin with
the corresponding side in-
to the socket or plug up
to the stop.
If the contact is correctly
assembled, the white mar-
king on the test pin must
be still visible.
(ill.12)
Insérer la fiche de test
avec le coté correspon-
dant dans la douille ou la
fiche jusqu'en butée.
Si le contact est monté
correctement, le mar-
quage blanc sur la fiche
de test est encore visible.
weisse Markierung
white marking
marquage blanc
Einrast-Prüfung Engagement test Test de l'enclenchement
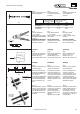
Stecken und Trennen
Plugging and
unplugging
Embrochage et
débrochage
4/8
(ill.13)
Die Kabelkupplung zu-
sammenstecken bis zum
Einrasten. Korrektes Ein-
rasten kontrollieren durch
Ziehen an den Kabelkupp-
lungen.
(ill.13)
Connect the contacts un-
til they engage. Check
the correct engagement
by pulling on the
coupling.
(ill.13)
Embrocher le connecteur
jusqu’au verrouillage.
Contrôler le verrouillage
en tirant sur chaque côté
du connecteur.
Plugging
Stecken
Embrochage
ill.13
Trennen ohne Sicher-
ungshülse PV-SSH4
Unplugging without
safety lock clip PV-SSH4
Débrochage sans clip de
sécurité PV-SSH4
(ill.14 - 15)
Beim Trennen der Kabel-
kupplung die Einrastla-
schen (X) von Hand oder
mit dem Werkzeug PV-
MS zusammendrücken
und die Kabelkupplungen
trennen.
(ill.14 - 15)
Compress the two snap-
in springs (X) by hand or
with the PV-MS tool.
Separate the coupling.
(ill.14 - 15)
Presser les clips d'enclen-
chement manuellement
ou avec l'outil PV-MS.
Débrocher les contacts.
ill.14
ill.15
www.multi-contact.com
Advanced Contact Technology