
Owner manual
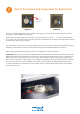

Connection to the Data Acquisition Computer
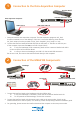
1. Setupandstartthedataacquisitioncomputer.ThedataacquisitionprogrammMC_Rack
shouldbeinstalled(icononthedesktop).Iftheiconisnotonthedesktop,pleasendthe
MC_Racksetup.exeontheprovidedCD(MC_RackSetup/MC_Rack_Setupx.x.x.exe).
2. Connecttheinterfaceboard(MEA2100-IFB)withtheUSBcableA-MiniBtoanUSB2.0port
ofthecomputer.Important:Donot useanUSB3.0port(blue)!
2a: Ifonlyoneheadstagewillbeconnected,pleaseusetheconnectorlabelledwithUSB1
ontherearpaneloftheInterfaceBoard.
2b: Incaseyouhavetwoheadstages,useUSB2forthesecondUSBconnection.
Donotuseahub,butconnecttheinterfaceboarddirectlytothecomputer!
1
2
Data Acquisition Computer
Interface Board Rear Panel
USB Cable A-Mini B
USB 2.0 Ports
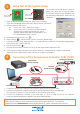
Connection of the MEA2100 Components
Headstage
Power Outlet
Headstage Side Panel
eSATAp Cable
Power Supply Unit
Interface Board Side Panel
Interface Board Rear Panel
1. ConnecttheinterfaceboardtotheheadstagewiththeeSATApcable.
1a: Ifonlyoneheadstageisconnected,pleaseusetheconnectorlabelledwithHS1.
1b: Foranoptionalsecondheadstage,usetheHS2connector.
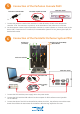
2. Connecttheinterfaceboardwiththepowersupplycabletothepoweroutlet.Switchonthe
interfaceboard(I/Oontherearpanel).Ifitcomesup,followtheupcominghardwareinstallationguide.
3. Forgrounding,pleaseconnecttheinterfaceboardandthecomputertothesamepoweroutlet.
HS2 HS1
USB 1 USB 2
Interface Board
Interface Board
Switch ON