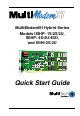
MultiModemISI Hybrid Series Models ISIHP- 1S/2S/2U, ISIHP- 4S/4U/4SD, and ISIHI-2S/2U Quick Start Guide
MultiModemISI Hybrid Server Cards Models ISIHP-1S/2S/2U/4S/4U/4SD & ISIHI-2S/2U Quick Start Guide 82093804 Revision E All rights reserved. This publication may not be reproduced, in whole or in part, without prior expressed written permission from Multi-Tech Systems, Inc. All rights reserved. Copyright © 2004 by Multi-Tech Systems, Inc. Multi-Tech Systems, Inc.
Contents Chapter 1: Introduction About This Manual .......................................................................... 12 Peripiheral Component Interconnect (PCI) for ISIHP Cards ........... 12 Communication Protocols for ISIHP Ports ...................................... 13 Chapter 2: Hardware Installation Introduction ..................................................................................... 16 Computer Requirements .................................................................
Chapter 3: Software Installation (continued) NetWare Driver Installation ............................................................. 54 Configuring Ports for NetWare Connect .......................................... 55 Removing the Driver (Novell) ......................................................... 55 SCO Open Server 5 Driver Installation ........................................... 56 To install from CD-ROM: .....................................................................
Chapter 4: Warranty, Service, and Tech Support Limited Warranty ............................................................................ 81 Upgrades and Support ................................................................... 81 Service ........................................................................................... 82 Index ..............................................................................................
Introduction W elcome to Multi-Techs MultiModemISI Hybrid Series of ISDN BRI server cards. The series consists of eight models: B us Ty pe # of ISD N B R I Lines Accepted ISD N Interface ISIHP- 2S PCI 2 S 4 4 4 ISIHP- 2U PCI 2 U 4 4 4 ISIHP- 4S PCI 4 S 8 8 8 ISIHP- 4U PCI 4 U 8 8 8 ISIHI- 2S ISA 2 S 4 4 4 ISIHI- 2U ISA 2 U 4 4 4 ISIHP- 1S PCI 1 S 2 2 2 ISIHP- 4SD PCI 4 S none 8 8 Model # of # Term. Max. Modem Adap.
Introduction The ISIHP-4SD is a serial interface card equipped with four terminal adapters only (no analog modems are present). The ISIHP-4SD is otherwise like the ISIHP-4S/4U models. The ISIHP-2S/2U contains two terminal adapters and four V.90/ K56flex modems. The ISIHP-2S/2U uses two ISDN BRI lines (each offering two B-channels) to connect to the telco and these connect to its two built-in terminal adapters. In addition to handling ISDN calls, each terminal adapter can detect analog modem and fax calls.
Introduction The ISIHP-4SD contains four terminal adapters only (the daughter card containing the eight modems is absent). Since it accommodates four ISDN BRI lines (each offering two B-channels), it supports eight independent digital data connections. Each terminal adapter appears as two ports to the server PC using the ISI card. ISIHx cards also support dial-out applications via their modems or terminal adapters.
Introduction From the perspective of the server PC, the ISIHP-2S/2U (or ISIHI-2S/ 2U) is an eight-port serial card with eight devices permanently attached to the serial ports (Figure 1-1). The first four ports are the two terminal adapters, each of which appear as two ports. The remaining four ports are the four central site modems. The following chart summarizes the correlation of ports and devices.
Introduction From the perspective of the server PC, the ISIHP-4S/4U is an sixteenport serial card with sixteen devices permanently attached to the serial ports (Figure 1-2). The first eight ports are the four terminal adapters, each of which appear as two ports. The remaining eight ports are the eight central site modems. The following chart summarizes the correlation of ports and devices. The ISIHP-4SD contains terminal adapters only; no modems are present.
Introduction 4S/4U Port # Device ISDN Line Number 1 TA 1 2 TA 1 3 TA 2 4 TA 2 5 TA 3 6 TA 3 7 TA 4 8 TA 4 9 Modem 1 10 Modem 1 11 Modem 2 12 Modem 2 13 Modem 3 14 Modem 3 15 Modem 4 16 Modem 4 About This Manual This ISI Quick Start Guide contains installation instructions and technical support information. In the instructions given here, minimal basic PC skills are assumed.
Introduction (PCI) bus used by your ISIHP card provides high performance and is easy to use. Because PCI devices contain registers with the device information required for configuration, full auto configuration of PCI Local Bus add-in boards and components is supported. Performance factors include a bus data path of 32 bits, and clock speeds of 33 MHz. Communication Protocols for ISIHP Ports Ports on the ISIHP card can be associated with different protocols, as follows: Auto-Protocol.
Introduction 14 MultiModemISI Hybrid Server Cards, ISIHP & ISIHI Series
Hardware Installation Chapter 2: Hardware Installation MultiModemISI Hybrid Server Cards, ISIHP & ISIHI Series 15
Hardware Installation Introduction This section describes how to install the ISIHx server card into the expansion slot in your personal computer, which involves Opening your PC Installing the card into the PC (ISIHP uses PCI-bus expansion slots; ISIHI uses ISA slots) Set I/O address DIP switch and IRQ jumper (ISIHI only) Computer Requirements Pentium-based PC or compatible (PCI bus required for ISIHP; ISA required for ISIHI) Microsoft Windows 2000, Windows 95, Windows 98, Windows Me, Windows NT
Hardware Installation Safety Warnings Telecom 1. Never install telephone wiring during a lightning storm. 2. Never install telephone jacks in wet locations unless the jacks are specifically designed for wet locations. 3. This product is to be used with UL and cUL listed computers. 4. Never touch uninsulated telephone wires or terminals unless the telephone line has been disconnected at the network interface. 5. Use caution when installing or modifying telephone lines. 6.
Hardware Installation a 3. Visually inspect the ISIHP-2S/2U/4S/4U/4SD. If you have any concerns about the condition of your ISI card, call Technical Support at (800) 972-2439. Intelligent Serial Interface Hybrid (ISDN/POTS) Cards (Side View) ISIHP-2S International a Modem Card ISIHP-2U U.S. Domestic Modem Card ISIHP-4S/4U Figure 1-3: ISIHP Cards; Side View (on ISIHP-4SD, right daughter card is not present) 4.
Hardware Installation 7. Install the ISI card in the selected expansion slot in the same manner as any other add-on card according to your computers documentation. 8. Fasten retaining bracket to computer chassis and replace the cover. 9. Connect the ISI to your ISDN telephone wall jack(s) with the provided modular telephone cable.
Hardware Installation LED Indicators The mounting brackets for the various ISI cards are similar, but the LEDs are labeled differently. Below, and on the next page, are graphics for each bracket along with descriptions of the LED indicators. 1 2 3 4 LINE 1 Line 1 Line 2 ISIHP-4U LEDs (one LED per BRI) Flashes between OFF and RED to indicate that neither SPID for that ISDN line has been verified. Flashes between RED and GREEN to indicate that one SPID is correct.
Hardware Installation ISIHP-2U LED Indicators P LED Indicator D P LINE 1 D P LINE 2 Indicates U interface status connection. Controlled by NT-1, which converts S/T interface (4-wire ISDN) to U interface (2-wire ISDN). When U interface and S/T interface are NOT active, LED remains off. Flashes 8 times/second (8 Hz)U interface is attempting to activate. Flashes once/second (1 Hz)U interface is active; S/T interface is not fully active. Lit, not flashingBoth U and S/T interfaces are active.
Hardware Installation ISIHP-1S LED Indicators B1 LED Indicator B1 B2 LINE 1 When lit, indicates active or voice connection on B-channel 1. B2 LED Indicator When lit, indicates active or voice connection on B-channel 2.
Hardware Installation ISIHI-2S LED Indicators B1 LED Indicator LINE 1 When lit, indicates active or voice connection on B-channel 1. B2 LED Indicator B1 B2 LINE 2 B1 B2 When lit, indicates active or voice connection on B-channel 2. The settings of the multiple DIP switch unit on the mounting bracket determine the base Input/Output address for the ISIHI-2S/2U card. Input/Output (I/O) addresses are used to route information to and from the card.
Hardware Installation ISIHI-2U LED Indicators P LED Indicator LINE 1 P D LINE 2 P Indicates U interface status connection. Controlled by NT-1, which converts S/T interface (4-wire ISDN) to U interface (2-wire ISDN). When U interface and S/T interface are NOT active, LED remains off. Flashes 8 times/second (8 Hz) U interface is attempting to activate. Flashes once/second (1 Hz) U interface is active; S/T interface is not fully active. Lit, not flashingBoth U and S/T interfaces are active.
Software/Driver Installation Chapter 3: Software Installation Installation Essentials (Chapter Contents) ISIHI Driver (Windows 2000) ........................................................ 26 ISIHP Driver (Windows 2000) ....................................................... 28 ISI Management Software (Windows 2000 only) ........................ 29 ISIHx TAs & Modems (Windows 2000) ........................................ 30 ISIHP-1S: Special Installation Instructions .................................
Software/Driver Installation (Windows 2000) Introduction This chapter describes software/driver installation for the ISI cards when used in Windows 2000, Windows NT4, Windows NT3.51, Novell, Linux, and SCO Open Server 5. We also describe installation of MultiTechs Management Software for use with ISI cards under Windows 2000. Installing ISIHI Software for Windows 2000 1. Turn off the PC. 2. The ISIHI card must already be installed in an ISA expansion slot in the PC.
Software/Driver Installation (Windows 2000) 5. Go to Start | Settings | Control Panel | Add/Remove Hardware. Click Next. 6. At the Choose a Hardware Task screen, select "Add/Troubleshoot a device." Click Next. 7. At the Choose a Hardware Device screen, select "Add a new device." Click Next. 8. At the Find New Hardware screen, select "No, I want to select the hardware from a list." Click Next. 9. At the Hardware Type screen, select "Multi-port serial adapters." Click Next. 10.
Software/Driver Installation (Windows 2000) Installing ISIHP Software for Win 2000 NOTE: A series of installation wizard screens will appear repeatedly during this procedure (step 12). This is not an error. Do not discontinue the procedure when the installation wizard screens repeatedly appear. 1. Shut down Windows 2000 and turn off the PC. 2. Install the ISIHP card in an available PCI expansion slot in the computer.
Software/Driver Installation (Windows 2000) sequence of screens deals with the setting up of ISI ports. The first screen in this sequence is the Found New Hardware Wizard -Welcome screen. The Found New Hardware -- MultiTech ISI Port screen will appear once for each modem and terminal adapter on the ISIHP card: 16 times for the ISIHP-4S/4U/4SD (although only 8 devices can be installed on the 4SD); or, 8 times for the ISIHP-2S/2U/1S (although only 4 devices can be installed for the ISIHP-1S). 12.
Software/Driver Installation (Windows 2000) ISIHx for Win 2000: Installing ISI Management Software (server OSs only) If you are using a Windows 2000 Server operating system ("Server" or "Advanced Server"), you must decide whether you want to use the MultiTech ISI Management Software in conjunction with your ISIHx board. The ISI Management Software is shipped with the ISI card. 1. Turn on your computer and start Windows 2000. 2.
Software/Driver Installation (Windows 2000) ISIHx for Windows 2000: Installing TAs and Modems to COM Ports Pre-Requisite: Installation of Windows 2000 driver software must be completed before you can install the terminal adapters and modems of the ISIHx card. 1. Go to Start | Settings | Control Panel | Phone and Modem Options. 2. The Location Information screen appears. Enter the appropriate area code and access number. Click OK. 3.
Software/Driver Installation (Windows 2000) Highlight the COM ports on which you want terminal adapters to be installed. You must allocate 8 ports for the ISIHP-4S/4U/4SD, or 4 ports for the ISIHP-2S/2U/1S, or 4 ports for the ISIHI-2S/2U. (Note that, even though the ISIHP-1S will only support two modem ports, it is necessary to allocate four ports temporarily during installation. The allocated-but-unused ports can be used for a different purpose after installation is complete.) Click Next. 11.
Software/Driver Installation (Windows 2000) 13.A completion screen will appear. Click Finish. 14. The Phone and Modems Options screen (Modems tab) will reappear and display the TAs that have just been assigned to COM ports. If you are installing a ISIHP-4SD, installation is now complete. (The 4SD has no modems.) Installing modems to COM Ports (not applicable to -4SD): 15. At the Phone and Modems Options screen (Modems tab), click Add. 16. The Install New Modems screen will appear.
Software/Driver Installation (Windows 2000) select ISIHI_HP-2S Central Site 56K Modem. For 2U/4U models, select ISIHI_HP-2U Central Site 56K Modem. Click Next. 20. The Install New Modem port list screen will appear. Highlight the COM ports on which you want modems to be installed. You must allocate 8 ports for the ISIHP-4S/4U, or 4 ports for the ISIHP-2S/ 2U/1S, or 4 ports for the ISIHI-2S/2U. NOTE about ISIHP-1S.
Software/Driver Installation (Windows 2000) 22. Screens denoting the installation of modems to specific COM ports will appear. 23. A completion screen will appear. Click Finish. 24. The Phone and Modems Options screen (Modems tab) will reappear and display the modems that have just been assigned to COM ports. Installation of terminal adapters and modems to COM ports is now complete.
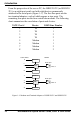
Software/Driver Installation (Windows 2000) 25. For the ISIHP-1S card only. The ISIHP-1S is a scaled-back revision of the ISIHP-2S card meant for low-density applications where hybrid flexibility (having TAs and modems on the same card) is advantageous. The diagram below describes the design differences between the ISIHP-1S and ISIHP-2S. It also summarizes how the ISIHP-1S must be treated during installation.
Software/Driver Installation (Windows 2000) Remove ISIHx Driver (Windows 2000) 1. Go to Start | Settings | Control Panel. 2. Click on Add/Remove Hardware. Click Next. 3. Click on Uninstall/Unplug a device and click Next. 4. In the subsequent screen, click on Uninstall a device and click Next. 5. At the Add/Remove Hardware Wizard screen, highlight the ISI driver file for the specific server card that you intend to remove. Click Next. 6.
Software/Driver Installation (Windows NT) Recommended Base I/O Address and IRQ Values ISIHI-2S/2U Initial 8 port board Base I/O Address 210h IRQ 10 First 8 port upgrade 220h 11 Second 8 port upgrade 230h 12 Third 8 port upgrade 240h 15 The I/O Address DIP Switch is on the endplate of the ISIHI; the IRQ Jumper Block is on the component side of the circuit card, lower middle area. 3. Turn on the PC and start Windows NT4.0. 4. Insert the driver CD-ROM into the CD-ROM drive.
Software/Driver Installation (Windows NT) Select the first port number for ISI devices (TAs or modems), which is usually COM3. For ISIHI cards, click "ISA" in the Bus Type field. Enter the Base I/O Address and IRQ as in Step 2 above. For ISIHP cards, click "PCI" in the Bus Type field. 11. The ISI Cards dialog box appears again and shows the port resource allocation just made. To add more cards, click Add and repeat Step 9. After the last ISI card has been added, click Close. 12.
Software/Driver Installation (Windows NT) Installing ISIHx TAs & Modems to COM Ports in Windows NT To install terminal adapters: 1. In the Control Panel, double-click the Modems icon. 2. The Modem Properties dialog box appears. Click Add. 3. The Install New Modem dialog box appears. Check the box marked Don't detect my modem; I will select it from a list and click Next. 4. The Install New Modem dialog box appears. In the Manufacturers list, highlight "MultiTech Systems.
Software/Driver Installation (Windows NT) 5. The Install New Modem dialog box appears. Select the ports that correspond to: the first two ports of the ISIHP-1S card, OR the first four ports of the ISIHP-2S/2U card, OR the first eight ports of the ISIHP-4S/4U/4SD (the 4SD model has no modems). Any ports that existed prior to installing the ISIHP appear first in the list of available COM ports. Click Next.
Software/Driver Installation (Windows NT) To install modems: {does not apply to -4SD} 1. In the General tab, click Add. 2. The Install New Modem dialog box appears. Check the box marked Don't detect my modem; I will select it from a list. Then click Next. 3. The Install New Modem dialog box appears. In the Manufacturers list, select "MultiTech Systems." From the Models list, select Central Site Modems. Then click Next.
Software/Driver Installation (Windows NT) 4. Select ports for modem use. For the ISIHP-2S/2U, you should have reserved 8 ports during driver installation. The first four of these ports should have been assigned as terminal adapters (in the previous procedure). Now select the last four ports, which will be used as modems. For the ISIHP-4S/4U, you should have reserved 16 ports during driver installation.
Software/Driver Installation (Windows NT) 5. After the modems install to the ports, click Finish to return to the General tab. 6. To view COM port assignments and make necessary changes, use the Modem Properties dialog box. 7. Close the Modems Properties dialog box. The message below appears asking if you want to configure dial-up networking. Click Yes.
Software/Driver Installation (Windows NT) 8. The Remote Access Setup dialog box appears. Click Add. 9. Each COM port appears in a separate Add RAS Device dialog box. To add the highlighted device, click OK. 10. The Remote Access Setup dialog box displays again. Repeat steps 8 and 9 until all devices are added. 11. When all devices have been added, click Continue. 12. After the bindings have been reviewed and stored, you will be prompted to restart your computer. Click Yes.
Software/Driver Installation (Windows NT) Removing ISIHx Card and Driver in Windows NT 3.51/4.0 1. Go to Start | Settings | Control Panel | Network. Click on the Adapters tab. 2. Select "MultiTech 4, 8, 16-port ISI card," and then click Remove. To complete the un-install procedure, restart your computer. I/O Addresses and IRQ Codes Unlike the ISIHI, the ISIHP has no DIP switch for I/O addresses and no jumper to determine the IRQ code.
Configuring Terminal Adapters Configuring the Terminal Adapter Introduction North American users must configure the terminal adapter to match network switch type, the service profile identifier (SPID), and the directory number (DN). For international users, the terminal adapter ships already configured for NET3, which should work on most phone lines in Europe. However, you may want to customize settings, regardless of your location. (See Optional Settings below.
Configuring Terminal Adapters The Directory Number (DN) is the phone number another user would call to contact this TA once it is attached to the ISDN. AT commands: AT!N1= and AT*!N1= Note: SPIDs only apply for North American switch types. International Users The terminal adapters ship already configured for NET3, which should work for most telephone lines in Europe. If you want to customize settings, refer to the Optional Settings below.
Configuring Terminal Adapters Auto Answer Data Calls _________ Rings to Answer _________ Select Auto Answer if you want the TA to automatically answer all incoming data calls (option does not affect analog port). The Rings to Answer number (range: 1255) selects number of rings the TA waits before answering an incoming call. Default: 1 ring. AT command: S0= Dialing Method ________________________ Select either the Enbloc or the Overlap dialing method for use when establishing a data call.
Configuring Terminal Adapters ISDN TA Configuration Utility 1. Make sure Windows NT Remote Access Service (RAS), or any other application that is using the modem, is shut down. To shut down RAS, click Start, Programs, and then Administrative Tools (Common). Then click Remote Access Admin and click Server, which will indicate whether or not RAS is running. If it is running, click Stop Remote Access Service. 2. Insert the Config Utility diskette into the floppy drive. 3.
Configuring Terminal Adapters 10. The Welcome dialog box appears. Click Next. 11. The Searching for TA dialog box appears. Click Next. The next dialog box specifies the TA that has been identified. 12. The Configuration dialog box appears. If you have questions about choices, click Help. After entering information in each dialog box, click Next. 13.The SPID dialog box appears (North America only). Referring to your network configuration notes, enter the appropriate information; then click Next. 14.
Configuring Terminal Adapters ConfigMenu Configuration Utility The ConfigMenu configuration utility can be used as another means of configuring the TA. ConfigMenu is installed in the TAs as part of the firmware. To use ConfigMenu: 1. Start a data communication program and select the COM port where the TA is connected. 2. In the communication program dialog box, type AT@CONFIG and press ENTER. ConfigMenus Main Menu appears (see screen below). 3. To select menu item, type its number and press ENTER.
Configuring Terminal Adapters Call Control Configuration Menuchanges how the TA originates and answers calls. Options include Auto Answer, Rings to Answer, Dialing Method, and Persistent DTR Dialing. Data Protocol Menuchanges rate adaption protocol used by the TA. Stored Numbers Menustores up to ten phone numbers ( maximum of 20 characters each). Stored number 0 is the phone number that will be dialed if persistent DTR dialing is enabled.
Software/Driver Installation (Novell Netware) NetWare Driver Installation Multi-Tech Systems provides AIO drivers for the ISIHx cards, so they can function with Novell compatible asynchronous applications (e.g., NetWare Connect). The AIO driver is simply an NLM (NetWare Loadable Module) that runs on the file server. Drivers must be loaded on the file server where the board is installed. Drivers can be loaded from the file servers console prompt or incorporated for autoloading in the AUTOEXEC.NCF file.
Software/Driver Installation (Novell Netware) LOAD AIOISIX [port=W] [interrupt=X] [name=Y] [note=Z] For PCI-bus cards (ISIHP models) Netware will set up the interrupt (IRQ) and I/O address automatically. To install the ISI card scripts, copy aiomdms.mdc to f:\system\aio\directory. Click Yes to overwrite the existing aiomdms.mdc file.
Software/Driver Installation (SCO Open Server) SCO Open Server 5 Driver Installation The ISI driver for SCO Open Server 5 is shipped on CD-ROM (FAT file system) and can also be downloaded from the Multi-Tech web site. In both cases, the driver files are compressed (tarred). Users installing from the CD-ROM should begin at To install from CDROM directly below. Users installing from a floppy disk should skip down to To install driver from floppy disk later in this section.
Software/Driver Installation (SCO Open Server) 2. Copy the tarred isi driver file into the temporary directory. # cp sco50x.tar /isi 3. Untar this file and put its contents into the temporary directory. # cd /isi # tar xvf sco50x.tar 4. Copy the untarred (inflated or non-compressed) files to a floppy disk # cd /isi/unifiedinstimg301 #scosh - Select Manager. - Select Archive. - Select Create. - Press space bar to highlight tmp/ and usr/ directories. - Press to copy.
Software/Driver Installation (SCO Open Server) To install driver from floppy disk (Users starting with the untarred SCO5 driver on a floppy disk can begin the installation here). 1. Run the custom utility. 2. Select Software. 3. Select Install New. 4 Highlight driver file from local host and select Continue. 5. Select as the Media Device Floppy Disk Drive. 6. Select Continue. 7. Highlight Multi-Tech ISA/PCI ... and select Install. 8. Enter Y (yes) to continue installing the ISI driver. 9.
Software/Driver Installation (SCO Open Server) 13. After the driver is installed, press ENTER to continue. For further details see MultiTech Installation Script step 4(last paragraph) and step 5. 14. Exit the custom utility. For further details see MultiTech Installation Script step 6. 15. Remove the floppy disk and reboot your computer. For further details see MultiTech Installation Script step 7.
Software/Driver Installation (SCO Open Server) The Multi_View utility initializes the multiple-page capability of terminals with multiple pages of memory. The number specified here is the total number of devices (between 1 and 256) available to all Multi-Tech terminals and its the number of pseudo devices available to the Multi_View utility.
Software/Driver Installation (SCO Open Server) For most users, its best to select y, which entails accepting the default values. Then proceed to step 4. Details for use of non-default port/printer values. The /dev directory holds device-information files used by the kernel to access the hardware. When you add an ISI card, you must give the ISI ports unique names so they do not conflict with existing ports or with other devices known to your system.
Software/Driver Installation (SCO Open Server) You have chosen the following setup The tty prefix is ttyl. The printer prefix is prnl. Number of Multi_View pseudo devices [user-specified number]. If these values are correct, type Y and the installation process will continue. If there is an error in any of the values displayed, type N and the first screen displays. Then re-enter the information for each card.
Software/Driver Installation (SCO Open Server) does not load, none of its ports will be accessible. (If this happens, see Multi-Techs Administrative Utility section in this manual.) 2. Type the complete name of the first device you want to create in usr/lib/uucp/Devices. Substitute the specific base name, board number, and port letter for the generic parameters in the expression ttylbx.
Software/Driver Installation (Linux) Linux Driver for Multi-Tech ISI Server Cards (for PCI and ISA busses) This is the standard installation procedure for Linux and is applicable to all Linux operating systems of the correct kernel level (2.0, 2.2, or 2.4). The next major section of this manual, RedHat Linux 6.2/7.0 RPM Drivers for ISI Server Cards (PCI bus only), is an alternative installation procedure applicable only to RedHat Linux 6.2 and 7.0 using the RedHat Package Management System (RPM).
Software/Driver Installation (Linux) 3. List the files on the CD-ROM and locate the directory for the kernel in use (2.0 or 2.2/2.4), using this command ls 4. Untar the appropriate Linux driver using this command: > tar vxf {filename}/isi At this writing, the filename will be either L300_20X.tar (for 2.0 kernel) or L305_22X_24X.TAR (for 2.2/2.4 kernel). LINUX: Copying & untarring the driver from a floppy The ISI driver .
Software/Driver Installation (Linux) LINUX: Driver installation and loading Execute the 'Install' script to build the driver and to copy the driver and firmware files to the required folder. > cd /isi > ./Install For ISI cards with the ISA bus, the installation script requires the user to type in the I/O address and the IRQ to be used. For ISI cards with the PCI bus, simply press ENTER when asked for addresses and IRQs. The installation creates the script file 'ISICOMStart' in the destination folder.
Software/Driver Installation (Linux) LINUX: Setting the baud rate The 'stty' utility can be used to set the baud rate of a particular port. For example, to set the baud rate of the first port on the first card (ttyM1a) to 38400 bps, execute 'stty 38400 < /dev/ ttyM1a'. The current baud rate can be viewed by executing 'stty < /dev/ ttyM1a'. LINUX: Verifying the ports Terminal utilities like 'minicom' can be used to verify the ports, 'talk' to the modem, and dial out.
Software/Driver Installation (Linux) For 4-port cards, it uses the following: - /dev/ttyM1a TO /dev/ttyM1d for the first ISI card - /dev/ttyM2a TO /dev/ttyM2d for the second ISI card - /dev/ttyM3a TO /dev/ttyM3d for the third ISI card - /dev/ttyM4a TO /dev/ttyM4d for the fourth ISI card For 8-port cards, it uses the following: - /dev/ttyM1a TO /dev/ttyM1h for the first ISI card - /dev/ttyM2a TO /dev/ttyM2h for the second ISI card - /dev/ttyM3a TO /dev/ttyM3h for the third ISI card - /dev/ttyM4a TO /dev/ttyM
Software/Driver Installation (Linux) - /dev/ttyM1a to /dev/ttyM1d for ISDN ports. (These four ports correspond to the total of four B-channels available on the two BRI lines that can be connected to these cards.) - /dev/ttyM1e to /dev/ttyM1h for modem ports. (These four ports accommodate the total of four 56K modems that can operate on the four B-channels available on the two BRI lines that can be connected to these cards.
Software/Driver Installation (Linux) LINUX -- PPP setup: The 'PPP-HOWTO' (a document that is available as a part of the 'HOWTO' documentation on most of the distributions under /usr/doc/ HOWTO) explains in detail the procedure for configuring a Linux machine as a PPP server. This information is also available at http://www.interweft.com.au/other/ppp-howto/ppp-howto.html. The documentation in the PPP-HOWTO is directly applicable to ISI ports. Note: A base I/O address of 0, e.g.
Software/Driver Installation (Linux) To remove the driver manually, enter rmmod isicom. This removes the driver only if no ISI ports are in use. Removing the ISI Driver (Linux) 1. Type cd /usr/local. Press ENTER. 2. Type rm -r ISICOM. Press ENTER. 3. This will remove driver for all ISIHx cards in that Linux server. 4. Remove the isictl file by typing rm isictl in the /dev directory. 5. Remove all devices that start with ttyM1x, ttyM2x, ttyM3x and ttyM4x in the /dev directory.
Software/Driver Installation (Linux) RedHat Linux 6.2/7.0 RPM Drivers for ISI Server Cards (PCI bus only) This installation procedure applies only to RedHat Linux versions 6.2 and 7.0 and only when used with ISIHP server cards, that is, those with the PCI bus. The standard Linux installation procedure (Linux Driver for Multi-Tech ISI Server Cards (for PCI and ISA busses)) still applies to all use of Linux in ISIHI and ISIHP server cards. (Note that RedHat Linux versions 6.2 and 7.0 both use the Linux 2.
Software/Driver Installation (Linux) LINUX-RPM: Copying the driver from a floppy The ISI driver .rpm file can be copied from a DOS formatted floppy using the 'mcopy' command if the 'mtools' have been installed. For RPM version 6.2, issue the command 'mcopy a:isicom-1.1-3.src.rpm ' to copy the isicom-1.1-3.src.rpm ( or current driver name) file to the destination folder. For RPM version 7.0, issue the command 'mcopy a:isicom-1.2-3.src.rpm ' to copy the isicom-1.2-3.
Software/Driver Installation (Linux) 5a. For RPM version 6.2: Copy the RPM to a temporary folder. In this example, well use /isi. Installation is in three parts, building the isicom-smp.spec file from the source file, then building the actual RPM from that spec file, and finally, installing the RPM. Do not type the quotation marks shown in the commands below. - Run rpm -i /isi/isicom-1.1-3.src.rpm. - Run rpm -ba /usr/src/redhat/SPECS/isicomsmp.spec.
Software/Driver Installation (Linux) LINUX-RPM: Verifying the ports To test the installation, you can use the terminal program minicom. Use the command minicom -s to set up the tty port that you will use to communicate. 1. In the Configuration window, select Serial Port Setup. 2. Select A to set the Serial Device (for example, /dev/ttyM1a). 3. Select E to set the baud rate. 4. Press Escape (Esc) to exit. 5. Select Exit to communicate with the port. 6. Issue AT commands and make sure it returns OK.
Software/Driver Installation (Linux) For 8-port cards, it uses the following: - /dev/ttyM1a TO /dev/ttyM1h for the first ISI card - /dev/ttyM2a TO /dev/ttyM2h for the second ISI card - /dev/ttyM3a TO /dev/ttyM3h for the third ISI card - /dev/ttyM4a TO /dev/ttyM4h for the fourth ISI card For 16-port cards, it uses the following: - /dev/ttyM1a TO /dev/ttyM1p for the first ISI card - /dev/ttyM2a TO /dev/ttyM2p for the second ISI card - /dev/ttyM3a TO /dev/ttyM3p for the third ISI card - /dev/ttyM4a TO /dev/tty
Software/Driver Installation (Linux) For the 4-BRI hybrid cards (16 ports; ISIHP-4S/4U/4SD): - /dev/ttyM1a to /dev/ttyM1h for ISDN ports. (These eight ports correspond to the total of eight B-channels available on the four BRI lines that can be connected to these cards.) - /dev/ttyM1i to /dev/ttyM1p for modem ports. (For the ISIHP-4S/4U, these eight ports accommodate the total of eight56K modems that can operate on the eight B-channels available on the four BRI lines that can be connected to these cards.
Flash Firmware for TA Ports Removing the ISI Driver (Linux-RPM) 1. To remove the ISI driver, type rpm -e isicom If more than one instance of the isicom file exists in the system, an error message will be returned. To resolve this, type rpm -q isicom. Press ENTER. All isicom RPM modules will be listed. Decide which of these files you want to delete. Then type rpm -e filename to delete those files.
Flash Firmware for TA Ports 5. Select the Baud Rate value in the Configuration menu and press ENTER. 6. Select 115200 and press ENTER. 7. Select the Device Type value in the Configuration menu and press ENTER. 8. Select MODEMFILE and press ENTER. 9. Select the Base-Address-for-Port value in the Configuration menu and press ENTER. 10. Type the base address for the ISI card and press ENTER. 11. Select IRQ Number value in Configuration menu and press ENTER. 12.
Software/Driver Installation (Linux) 25. Select the terminal adapter hex file needed for this ISI card. Then press ENTER. 26. Select Program Firmware in the Main Menu and press ENTER. 27. Wait until the programming of the terminal adapter is complete. 28. For ISIHP-4S/4U/4SD, repeat steps 22-27 two more times, typing 5 on the first repetition and typing 7 on the second repetition. 29. Hit Escape to exit from FlashPro. (Select Yes when asked whether to Save Changes to Disk? Then press ENTER.
Warranty and Service Information Chapter 4: Warranty & Service Information Limited Warranty Multi-Tech Systems, Inc. (MTS) warrants that its products will be free from defects in material or workmanship for a period of two years from the date of purchase, or if proof of purchase is not provided, two years from date of shipment. MTS MAKES NO OTHER WARRANTY, EXPRESSED OR IMPLIED, AND ALL IMPLIED WARRANTIES OF MERCHANTABILITY AND FITNESS FOR A PARTICULAR PURPOSE ARE HEREBY DISCLAIMED.
Warranty and Service Information Service Multi-Tech has an excellent technical support staff available to help you get the most out of your Multi-Tech product. If you have any questions about the operation of this product, call Technical Support at (800) 972-2439. Model and serial numbers are located on the Multi-Tech label on the component side of the ISIHP. To display the firmware version, type ATI1 in terminal mode. Software versions are printed on the diskette labels.
Index activating ports in SCO 63 AT commands 47 Auto-Protocol Callback description 13 ConfigMenu 47, 52 ISDN Configuraiton Utility 50 ISDN Configuration Utility 47 ports in Netware 55 connecting to ISDN wall jack 19 Contents, package 12 B E Basic Rate Interface (BRI) 9 "broken" ports in Netware explanation, ISIHP-1S 55 explanation, ISIHP-4SD 55 enabling ports in SCO 63 Index A C COM ports installing modems to in Linux 68 in Linux RPM 76 in Netware 55 in SCO 62 in Windows 2000 30 in Windows NT 42 ins
install modems to COM ports in Linux 68 in Linux RPM 76 in Netware 55 in SCO 62, 63 in Windows 2000 30 in Windows NT 40 install TAs to COM ports in Linux 68 in Linux RPM 76 in Netware 55 in SCO 62 in Windows 2000 30 in Windows NT 40 installation activating ports in SCO Open Server 5 62 hardware 17 modems to COM ports in Netware 55 in SCO 62 in Windows 2000 30 in Windows NT 42 Linux 68 Linux RPM 76 software/drivers in Linux 65 in SCO Open Server 5 56 in Windows 2000 26 terminal adapters to COM ports in Linux
Index ISIHP install in Linux 65 in Netware 54 in Windows 2000 28 in Windows NT 37 ISIHP-1S special modem/TA install instructions Linux 68 Linux RPM 76 Netware 55 SCO 60 Windows 2000 36 Windows NT 43 ISIHP-4SD special modem/TA install instructions Linux 69 Linux RPM 77 Netware 55 SCO 60 Windows NT 41 ISIHx model distinctions 7 K kernel versions, Linux 64 L LED indicators 20 Linux, install in 64 Linux, RedHat RPM drivers, applicability (PCI cards only) 72 install 72 Linux RPM, removing driver 78 M modem/TA
Index PPP async description 13 PPP, info for Linux 70 PPP, info for Linux RPM 77 PPP protocol description 49 R removing software/driver Linux 71 Linux RPM 78 Netware 55 SCO 63 Windows 2000 37 Windows NT 46 removing driver, Linux RPM 78 S S Interface 7, 20 safety warnings 17 SCO driver installation detailed form 59 from CD-ROM 56 from diskette 58 terse form 56, 58 SCO Open Server 5 install in 56 service 82 shipping contents 16 special modem/TA install instructions ISIHP-1S Linux 68 Linux RPM 76 Netware 55
Index U U Interface 7 uninstall ISI driver Linux 71 Linux RPM 78 Netware 55 SCO 63 Windows 2000 37 Windows NT 46 V V.110 and GSM 13 description 13, 49 V.120 description 13, 49 W Windows 2000 ISIHI install 26 ISIHP install 28 modem/TA install 30 uninstall driver 37 Windows NT ISIHI install 37 ISIHP install 37 modem/TA install 40 uninstall driver 46 X X.
82083804