MultiModem® ZPX V.
MultiModem® ZPX User Guide MT9234ZPX-UPCI, MT9234ZPX-UPCI-NV, MT9234ZPX-PCIe, MT9234ZPX-PCIe-NV P/N S000414C, Revision C All rights reserved. This publication may not be reproduced, in whole or in part, without prior expressed written permission from Multi-Tech Systems, Inc. Copyright © 2010 by Multi-Tech Systems, Inc. Multi-Tech Systems, Inc.
Contents Contents CHAPTER 1 – DESCRIPTION AND SPECIFICATIONS ............................................................................................. 4 PRODUCT DESCRIPTION .................................................................................................................................................. 4 Features ....................................................................................................................................................................
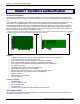
Chapter 1 - Description and Specifications Chapter 1 – Description and Specifications Product Description The Multi-Tech MultiModem ZPX is an internal universal PCI bus card, MT9234ZPX-UPCI or a PCI Express bus card, MT9234ZPX-PCIE. The UPCI card operates in either 3.3 or 5V slot. The PCI Express card operates in a 3.3V slot. The MultiModem provides high-speed data transfer and fax capabilities for small businesses, telecommuters, and SOHO users. It is compatible with the IUT-T V.
Chapter 1 - Description and Specifications Technical Specifications Category Receiver AGC Dynamic Range Data Compatibility Data Format Error Correction (ECM) Data Compression Fax Compatibility Fax Classes Fax Data Rates Fax Compression Command Buffer DAA Isolation Dimensions Flow Control Frequency Stability Modes of Operation Operational Temperature Storage Temperature Power Requirements Voice Compatibility Serial Speeds Transmit Level Receiver Sensitivity Cleaning Manufacturing Information Approvals D
Chapter 2 - Installation Chapter 2 – Installation General Safety ● ● ● ● ● ● ● ● ● Use this product only with UL- and CUL-listed computers (U.S.A.) To reduce the risk of fire, use only UL-listed 26 AWG (.41mm) or larger telephone wiring. Never install telephone wiring during a lightning storm. Never install a telephone jack in a wet location unless the jack is specifically designed for wet locations.
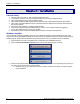
Chapter 2 - Installation 4. Click on the next button to start the driver pre-installation. 5. You will be prompted 3 times to confirm the installation of the three necessary drivers. Click the Install button to continue each time. There will be a transitory screen, then the process will complete. Click on the Finish button. 6. 7. 8. 9. Your driver installation is complete.
Chapter 2 - Installation Physically Installing your MultiModem • • • Remove the cover from your system as instructed in the system manual. Before handling the MultiModem ZPX, discharge any static in your body by touching a piece of grounded metal such as the computer chassis. Electrostatic discharge (ESD) is the release of stored static electricity that can damage electrical circuitry or components.
Chapter 2 - Installation Make the External Connections Now connect the MultiModem to the telephone line and, optionally, to your telephone. For voice mail or speakerphone use, you can also connect it to a microphone and an external speaker, headphone, or sound card. The microphone can be used for recording answering machine messages or for speakerphone use. The speaker or headphone can be used for playing back messages or as a speakerphone.
Chapter 2 - Installation Manually Installing Drivers If you choose not to use the Windows Installer or have already physically installed your MultiModem ZPX, the following instructions will guide you through the process of installation for the various Windows operating systems. The MultiModem MT9234ZPX ships with drivers for each of the following operating systems: Windows Server® 2008, Windows® 7, Vista, XP, 2003, 2000 Server, 2000 Advanced Server, and Linux.
Chapter 2 - Installation Driver Installation for Windows 7 If you did not use the pre-installer for Windows, this is the process for installing your modem. The following driver installation procedure is based on Windows 7 32-bit Operating System. The Windows 7 64-bit Operating System installs in the same manner.
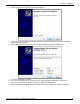
Chapter 2 - Installation 3. Update Driver Software – PCI Serial Port screen appears. Select Browse my computer for driver software 4. Insert the product CD that came with your device into the CD-ROM drive. 5. At the Browse for driver software on your computer screen. Click Browse. Browse to the Drivers folder on your on your product CD, then select the Drivers folder. Within the Drivers folder, select Win32bit-Vista-2008-Win7 folder.
Chapter 2 - Installation Click Next. 6. Windows Security ‘Would you like to install this device software?’ screen appears. Click Install. 7. Installing driver software on screen appears. Multi-Tech Systems, Inc.
Chapter 2 - Installation 8. When the software for this device has been updated. The Windows screen Multi-Tech 9234ZPX is displayed. Click Close. Continue to the next section for the completion of the installation. Windows 7 Port Installation Immediately after the MultiModem ZPX driver installation is complete, another set of installation wizard screens will appear.
Chapter 2 - Installation 2. Update Driver Software – PCI Serial Port screen appears. Select Browse my computer for driver software 3. At the Browse for driver software on your computer screen, click on the Browse button to open an Explorer window where you can navigate to the correct drivers folder that matches your operating system. Select that folder and click OK. Example: If you are installing drivers for a Windows 7 64-bit Operating System, you would browse to the Win64bit-Vista-2008-Win7 subfolder.
Chapter 2 - Installation 4. The Windows Security ‘Would you like to install this device software?’ screen appears. Click Install. 5. Installing driver software on screen appears. 6. When the software for this device has been updated. The Windows screen Updated Driver Software is displayed. Click Close. The port is now ready to have a number assigned to it – proceed with the installation instructions found below. 16 Multi-Tech Systems, Inc.
Chapter 2 - Installation Installation of the COM port The Device Manager window will still be open (unless you have closed it – then you will need to open it again) and there is a new entry in Other devices: Multifunction Device. 1. Right-Click on the Multifunction Device in Other devices and a submenu will come up; now click on Update Driver Software. Update Driver Software – Multifunction Device screen appears. 2.
Chapter 2 - Installation 3. The Windows Security ‘Would you like to install this device software?’ screen appears. Click the Install button to continue. 4. When the software for this device has been updated, the Updated Driver Software window is displayed. Click Close. The port is now ready to have the modem installed to it – proceed with the installation instructions found below. 18 Multi-Tech Systems, Inc.
Chapter 2 - Installation Installation of the modem The Device Manager window will still be open (unless you have closed it – then you will need to open it again) and there is a new entry in Other devices: MultiTech System’s MT9234ZPX. 1. Right-Click on the MultiTech System’s MT9234ZPX in Other devices and a submenu will come up; now click on Update Driver Software. Update Driver Software – Multifunction Device screen appears. 2.
Chapter 2 - Installation 3. The Windows Security ‘Would you like to install this device software?’ screen appears. Click the Install button to continue. 4. When the software for this device has been updated, the Updated Driver Software window is displayed. Click Close. You may also close the Device Manager and Control Panel windows. Completion Software installation for the MultiModem ZPX is complete.
Chapter 2 - Installation Driver Installation for Vista and Windows 2008 Operating Systems If you did not use the pre-installer for Windows, this is the process for installing your modem. The MT9234ZPX driver installation is done in three parts, each directed by an installation wizard. The three parts are installation of the: (1) Serial Port, (2) Communications Port, and (3) the modem. Preliminaries 1. Power up your computer. 2. Windows will detect that the new modem is present.
Chapter 2 - Installation 6. Windows couldn’t find driver software for your device screen appears. Choose Browse my computer for driver software (advanced). 7. At the Browse for driver software on your computer screen. Click Browse. Browse to the Drivers folder on your MultiModem ZPX product CD and select the Drivers folder. Within the Drivers folder, select Win32bit-Vista-Win7 folder for a Windows 32-bit Operating System.
Chapter 2 - Installation 8. Would you like to install this device software? screen appears. Click Install. 9. Installing driver software on PCI Serial Port screen appears. 10. When the software for this device has been successfully installed screen appears with Windows has finished installing the driver software for this device: Multi-Tech’s 1-Port UART PCI Card. Click Close. This completes the installation of the drivers for the serial port. Multi-Tech Systems, Inc.
Chapter 2 - Installation Installation of the Communications Port The second install wizard installs the drivers for the Multifunction Device, Multi-Tech Communications Port 1. The Found New Hardware – Multifunction Device with Insert disc that came with your Multifunction Device screen appears. Click on I don’t have the disc. Show me other options. 2. The User Account Control – Windows needs your permission to continue screen appears. Click Continue. 3.
Chapter 2 - Installation 4. At the Browse for driver software on your computer screen. Click Next. 5. Would you like to install this device software? screen appears. Click Install. 6. Installing driver software on Multifunction Device screen appears. Multi-Tech Systems, Inc.
Chapter 2 - Installation 7. When the software for this device has been successfully installed screen appears with Windows has finished installing the driver software for this device: Multi-Tech Communication Port (COM4). 8. Click Close. This completes the installation of the drivers for the Multifunction Device. Installation of the Modem The third install wizard installs the modem drivers for the MT9234ZPX-PCIE. 1.
Chapter 2 - Installation 3. Windows couldn’t find driver software for your device screen appears. Choose Browse my computer for driver software (advanced). 4. At the Browse for driver software on your computer screen. Click Next. 5. Would you like to install this device software? screen appears. Click Install. Multi-Tech Systems, Inc.
Chapter 2 - Installation 6. Installing driver software on MultiTech Systems MT9234ZPX-PCIE screen appears. 7. When the software for this device has been successfully installed screen appears with Windows has finished installing the driver software for this device: Multi-Tech Systems MT9234ZPX-PCIE. 8. Click Close. The installation of drivers is now complete. 28 Multi-Tech Systems, Inc.
Chapter 2 - Installation Driver Installation for Windows XP and 2003 Operating Systems If you did not use the pre-installer for Windows, this is the process for installing your modem. The MT9234ZPX driver installation is done in three parts, each directed by an installation wizard. The three parts are installation of the: (1) PCI Serial Port, (2) Communications Port/Multifunction Device, and (3) modem. Preliminaries 1. Power up your computer. 2. Windows will detect that the new modem is present.
Chapter 2 - Installation 5. At the Please Choose Your Search and Installation Options screen. Select Include this location in the search: and Click Browse. Browse to the Drivers folder on your MultiModem ZPX product CD, and then select the Drivers folder. Within the Drivers folder, select Win32bit-XP-2003 folder. If you are installing drivers on an XP 64-bit Operating System, you would browse to the Win64bitXP-2003 folder. Click Next. 30 Multi-Tech Systems, Inc.
Chapter 2 - Installation 6. Please wait while the wizard searches for the PCI Serial Port. 7. Then a Hardware Installation screen appears. The software your are installing for this hardware: MultiTech’s 1-Port UART PCI Card has not passed Windows Logo testing to verify compatibility with Windows XP. Click Continue Anyway. Multi-Tech Systems, Inc.
Chapter 2 - Installation 8. Please select the best match for your hardware from the list below. Select the top choice, e:\drivers\win32bit-xp-2003\ser15x-xp-2003.inf for Windows 32-bit Operating System; or select the second choice for Windows 64-bit Operating System e:\drivers\win64bit-xp-2003\ser15x-xp-2003-64.inf. 9. 32 Please wait while the wizard installs the software.. MultiTech’s 1-Port UART PCI Card screen appears. Multi-Tech Systems, Inc.
Chapter 2 - Installation 10. A completing the Found New Hardware Wizard screen appears. This wizard installs the software for: Multi-Tech’s 1-port UART PCI Card. Click Finish. Installation of the Communications Port The wizard will install the files for the Multi-Tech Communications Port. 1. The Welcome to the Found New Hardware Wizard screen appears. In response to the question, “Can Windows connect to Windows Update to search for software? Select “No, not this time” and click Next.
Chapter 2 - Installation 2. This wizard helps you install software for: Multifunction Device. Select Install from a list or specific location (Advanced). Click Next. 3. The Please choose your search and installation options screen appears. Ensure that Search for the best driver in these locations is selected and that Include this location in the search is also selected. The Browse window shows the drive location, for example, E:\Drivers\Win32bit-XP-2003. Click Next. 34 Multi-Tech Systems, Inc.
Chapter 2 - Installation 4. Please wait while the wizard searches… Multifunction Device. 5. Then a Hardware Installation screen appears. The software you are installing for this hardware: MultiTech Communications Port has not passed Windows Logo testing to verify compatibility with Windows XP. Click Continue Anyway. Multi-Tech Systems, Inc.
Chapter 2 - Installation 6. Please select the best match for your hardware from the list below. Select the top choice, e:\drivers\win32bit-xp-2003\oemport-xp-2003.inf for Windows 32-bit Operating System; or select the second choice for Windows 64-bit Operating System e:\drivers\win64bit-xp-2003\oemport-xp-2003-64.inf. 7. 36 Please wait while the wizard installs the software... Multi-Tech Communications Port screen appears. Multi-Tech Systems, Inc.
Chapter 2 - Installation 8. A completing the Found New Hardware Wizard screen appears.This wizard finished installing the software for: Multi-Tech Communications Port. Click Finish. Installation of the Modem The wizard will install the file for Multi-Tech Systems MT9234ZPX-PCIE. 1. The Welcome to the Found New Hardware Wizard screen appears. In response to the question, “Can Windows connect to Windows Update to search for software? Select “No, not this time” and click Next. Multi-Tech Systems, Inc.
Chapter 2 - Installation 2. This wizard helps you install software for: MultiTech Systems MT9234ZPX-PCIE. Select Install from a list or specific location (Advanced). Click Next. 3. The Please choose your search and installation options screen appears. Ensure that Search for the best driver in these locations is selected and that Include this location in the search is also selected. The Browse window shows the drive location, for example, E:\Drivers\Win32bit-XP-2003. Click Next.
Chapter 2 - Installation 4. Please wait while the wizard searches… MultiTech Systems MT9234ZPX-PCIE. 5. Then a Hardware Installation screen appears. The software you are installing for this hardware: MultiTech Communications Port has not passed Windows Logo testing to verify compatibility with Windows XP. Click Continue Anyway. Multi-Tech Systems, Inc.
Chapter 2 - Installation 6. Please select the best match for your hardware from the list below. Select the top choice, e:\drivers\win32bit-xp-2003\multitech_pcie_upci_zpc.inf for Windows 32-bit Operating System; or select the second choice for Windows 64-bit Operating System e:\drivers\win64bit-xp-2003\multitech_pcie_upci_zpc.inf. 7. 40 Please wait while the wizard installs the software.. Multi-Tech Systems MT9234ZPX-PCIE screen appears. Multi-Tech Systems, Inc.
Chapter 2 - Installation 8. A completing the Found New Hardware Wizard screen appears. The wizard has finished installing the software for: Multi-Tech Systems MT9234ZPX-PCIE. Click Finish. The installation of drivers is now complete. Multi-Tech Systems, Inc.
Chapter 2 - Installation Configure the Modem for Your Country Different countries have different requirements for how modems must function. Therefore, before you use your modem, you must configure it to match the defaults of the country/region in which you are using it. You must also do this if you move the modem to another country/region after it has been configured for the first country/region. The modem is set to country, Euro/NAM, with a country code of 52 decimal by default.
Chapter 3 – Remote Configuration Chapter 3 – Remote Configuration Remote configuration is a network management tool that allows you to configure the MultiModem anywhere in your network from one location. With password-protected remote configuration, you can issue AT commands to a remote modem for maintenance or troubleshooting as if you were on site. Basic Procedure The following steps are valid regardless of whether the connection is established by the local or the remote MultiTech modem.
Chapter 4 - Troubleshooting Chapter 4 – Troubleshooting Your modem was thoroughly tested at the factory before it was shipped. If you are unable to make a successful connection, or if you experience data loss or garbled characters during your connection, it is possible that the modem is defective. However, it is more likely that the source of your problem lies elsewhere. The following symptoms are typical of problems you might encounter: ● The modem does not respond to commands.
Chapter 4 - Troubleshooting The Modem Cannot Connect When Dialing Reasons why the MultiModem may fail to connect include: ● lack of a physical connection to the telephone line. ● a wrong dial tone. ● a busy signal. ● a wrong number. ● no modem at the other end. ● a faulty modem, computer, or software at the other end. ● incompatibility between modems ● poor line conditions. You can narrow the list of possibilities by using extended result codes.
Chapter 4 - Troubleshooting The Modem Disconnects While Online ● If you have Call Waiting on the same phone line as your modem, it can interrupt your connection when someone tries to call you. If you have Call Waiting, disable it before each call. In most telephone areas in North America, you can disable Call Waiting by preceding the telephone number with *70 (but first check with your local telephone company).
Chapter 4 - Troubleshooting Data Is Being Lost ● If you are using data compression, set the serial port baud rate to two to six times faster than the data rate. ● Make sure the flow control method you selected in your software matches the method selected in the modem (see AT commands &K and \Q.) ● Enter the I11 command in command mode and before the modem is reset to display information about the last connection.
Chapter 4 - Troubleshooting Loopback Test 1. Connect a microphone and speaker to the MultiModem. To avoid feedback, make sure the microphone and speaker are well separated; better yet, use a headphone instead of a speaker. 2. Select Start, point to Programs, point to Accessories, and click HyperTerminal. 3. Click Cancel in the Connection Description dialog box. 4. In the HyperTerminal terminal window, type AT&&S and press ENTER.
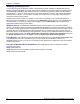
Appendix A – Environmental Info Appendix A – Environmental Information Waste Electrical and Electronic Equipment (WEEE) Statement July, 2005 The WEEE directive places an obligation on EU-based manufacturers, distributors, retailers and importers to takeback electronics products at the end of their useful life. A sister Directive, ROHS (Restriction of Hazardous Substances) complements the WEEE Directive by banning the presence of specific hazardous substances in the products at the design phase.
Appendix A – Environmental Info Restriction of the Use of Hazardous Substances (RoHS) Multi-Tech Systems, Inc. Certificate of Compliance 2002/95/EC Multi-Tech Systems, Inc. confirms that this product now complies with the chemical concentration limitations set forth in the directive 2002/95/EC of the European Parliament (Restriction Of the use of certain Hazardous Substances in electrical and electronic equipment - RoHS) These Multi-Tech Systems, Inc.
Appendix A – Environmental Info CRoHS HT/TS Substance Concentration 依照中国标准的有毒有害物质信息 根据中华人民共和国信息产业部 (MII) 制定的电子信息产品 (EIP) 标准-中华人民共和国《电子信息产品污染控制管理办法》(第 39 号),也称作中国 RoHS,下表列出了 Multi-Tech Systems Inc.
Appendix B – Regulatory Compliance Appendix B – Regulatory Compliance FCC Part 68 Telecom 1. This equipment complies with part 68 of the Federal Communications Commission Rules. On the outside surface of this equipment is a label that contains, among other information, the FCC registration number. This information must be provided to the telephone company. 2. The suitable USOC jack (Universal Service Order Code connecting arrangement) for this equipment is shown below.
Appendix B – Regulatory Compliance FCC Part 15 Class B Statement This equipment has been tested and found to comply with the limits for a Class B digital device, pursuant to 47 CFR – FCC Part 15 regulations. The stated limits in this regulation are designed to provide reasonable protection against harmful interference in a residential environment.
Appendix B – Regulatory Compliance EMC, Safety, and R&TTE Directive Compliance The CE mark is affixed to this product to confirm compliance with the following European Community Directives: Council Directive 2004/108/EC of 15 December 2004 on the approximation of the laws of Member States relating to electromagnetic compatibility; And Council Directive 2006/95/EC of 12 December 2006 on the harmonization of the laws of Member States relating to electrical equipment designed for use within certain voltage l
Appendix B – Regulatory Compliance South African Notice This modem must be used in conjunction with an approved surge protection device. Thailand Approval Translation in Thai “This telecom device and equipment is conform to technical standard no….” or “This telecom device and equipment is conform to requirement to NTC” “เครื่องโทรคมนาคมและอุปกรณนี้ มีความสอดคลองตามมาตรฐานทางเทคนิค เลขที่.........” or “เครื่องโทรคมนาคมและอุปกรณนี้ มีความสอดคลองตามขอกําหนดของ กทช.
Appendix C – Upgrading Your Modem Appendix C – Upgrading Your Modem Introduction Your modem is controlled by semi-permanent software, called firmware, which is stored in flash memory. Firmware is nonvolatile; that is, it remains stored in memory when the modem is turned off. However, it can be changed by either the manufacturer or the user as bugs are fixed or new features are added.
Appendix C – Upgrading your Modem Step 3: Download the Upgrade File 1. If you are not already at the MultiModem Firmware page of the Multi-Tech Web site, follow the procedure in “Step 2: Identify the Current Firmware.” 2. Download the upgrade file for your modem by clicking its name, and save the file in a temporary folder on your hard disk. 3. In the same section of the Web page, download the Flash Wizard utility by clicking it, and save it in the same folder.
Appendix D – Installing under Linux Appendix D – Installing in Linux Introduction This appendix explains how to verify that the Multitech MT9234ZPX-UPCI modem has been detected in Linux Operating System running kernel 2.6.xx. Assuming that the PCI card has been already installed in the system. Logon to the system as root. To check which kernel version the system is running, send the following command “uname -a” You should get a response like this: [root@armadillo ~]# uname -a Linux armadillo.net 2.6.18-8.
Appendix D – Installing under Linux This will bring minicom into configuration mode. You should get a response like this: [root@armadillo ~]# minicom -s minicom: WARNING: configuration file not found, using defaults From the configuration menu, select “Serial Port Setup” and press Enter. Configuration Filenames and paths File transfer protocols Serial port setup Modem and dialing Screen and keyboard Save setup as dfl Save setup as.. Exit Exit from Minicom This will display the Serial port settings.
Appendix D – Installing under Linux To go back to the main menu, press Enter one more time. Configuration Filenames and paths File transfer protocols Serial port setup Modem and dialing Screen and keyboard Save setup as dfl Save setup as.. Exit Exit from Minicom To go into the minicom terminal mode select “Exit” and press Enter. You should get a response like this: Welcome to minicom 2.1 OPTIONS: History Buffer, F-key Macros, Search History Buffer, I18n Compiled on Jan 7 2007, 04:48:39.
Appendix D – Installing under Linux Index • A R AT commands &D &Q &W O 44 autoanswer 47 47 44 47 C call waiting Caller ID communication programs compression, data 47 47, 48 45 48 48 47 F firmware upgrading flash memory Flash Wizard upgrade utility 57 57 58 S solving problems sound card connection speakerphone S‐registers S009 Sync/Async Mode command I 56 49 48 10 U 55 • Multi-Tech Systems, Inc.