
Instructions / Assembly

ULTIMATE GARDENER BY SMART CARTS: INSTRUCTIONS
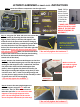
Step 1: Locate the different components. Get the right tools.
Step 2: Using the 3/4” bolts and acorn nuts create the
Floor Assembly by attaching the Floor Panel (the
biggest plastic sheet) to the two side supports. The
textured side of the Floor Panel should be facing up
and the smooth side facing toward the ground. Make
sure that the holes of the side supports match the
holes of the Floor Panel (there is a left and a right side
support) then secure only the two front holes to the
Floor Panel at this step. Make sure that the bolt head
is against the textured side of the Floor Panel making
the nut to be underneath the Panel (against the
smooth side of the sheet).
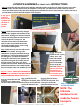
Step 3: Connect the aluminum Back Support to the Floor
Assembly. The Back Support goes over the Side Supports
making the Side Supports to be “sandwiched” between
the plastic Floor Panel and the Back Support (See
picture). Secure together the plastic Floor Panel, the
Side Support and the Back Support using the 3/4” bolts
and acorn nuts. The ¾” bolts are just long enough and
you may have to apply pressure on the assembly in order
to get the acorn nut to start engaging.
**Do not fully tighten the hardware.**
Step 4: Connect the two Upright Supports to
the Back Support using the 1/2” bolts and
acorn nuts. The 1/2” bolts are the shortest
bolts that you have. Do not connect the Side
Supports to the Upright Supports at this
point. The remaining holes will be used to
secure the plastic Side Panels (see next step).
.
Tools: Phillips
head screw
driver. Socket
or wrench set
(7/16). Pliers
to bend the
cotter pins.
Axle
Back Panel
Floor Panel
Side Panel (2)
Side Support (2)
Back Support
Leg
Handle
Wheel (2)
Upright
Support (2)
Front
The Back is in the direction of
the 2 side by side holes
located on the Floor Panel.
Back Support
Side Support
Back of the
Floor Panel
Make sure that the
bolt head sits against
the textured side of
the Floor Panel.
Front 2 Holes
**Do not fully tighten the hardware.**
**MAKE SURE TO READ
EACH STEP IN FULL AND
LOOK AT THE PICTURES
BEFORE STARTING TO
ASSEMBLE.**
**Do not fully tighten the hardware**.
Axle Bracket (2)
Spacers (2)
Cotter Pin (2)
Wing Nut (2)
3/4” Bolt (20)
Acorn Nuts (28)
1/2” Bolt (2)
Washers (8)
1 3/4” Bolt (8)
Floor Panel