
Installation Sheet


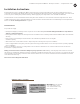


Installation and Operational Manual • Boutique Collection • SculptureStone® Tubs
5 / mtibaths.com
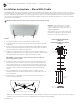
Installation Instructions – Elena With Cradle
This tub with cradle is designed to install upon finished floor and features an integral overflow, requiring only the waste to be installed.
The P-trap will be located directly below the drain. Use actual tub to determine final rough-in location. Instructions below assume subfloor
access to solder finished brass tailpiece to your waste pipe. Use of a quick connect drain kit eliiminates the need for soldering. When
using a quick connect drain, follow the instructions below to install the cradle and toe tap drain assembly, then use quick connect drain
instructions for final installation.
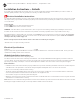
1. Ensure tub installation location is structually sound, flat and level.
2. Install P-trap with rough-in waste pipe situated directly below planned location
of tub drain.
3. Dry fit to ensure proper alignment and mark cradle location. Make sure that the
tub drain is aligned with roughed-in waste pipe, then mark location of all 5 feet
of the tub cradle before removing tub and cradle.
4. Apply silicone adhesive under each of the 5 legs of the cradle and align each
leg with previously marked locations. Wipe o excess adhesive. Allow cure time
and install drain kit onto tub before setting tub back into the cradle.
IMPORTANT: Secure protective cloth around top portion of cradle legs
before setting tub into cradle!
5. Install toe tap drain on tub using clear silicone under the waste flange and on
both sides of the silicone gasket on underside of the tub. Tighten brass hold-
down nut until it seats, plus one quarter turn. Thread decorative tail piece into
the threaded waste. Allow curing time and water test for leaks. Many products
are ready to test in as little as 30 minutes. Please refer to product label for
details.
6. Slip on and temporarily secure matching escutcheon to tailpiece before
lowering tub back onto cradle. Ensure that tailpiece is aligned with hole in the
floor for waste line.
7. From below floor, solder tailpiece to 1.5” brass waste pipe, making sure to
protect surrounding materials.
INSTALLATION INSTRUCTIONS
Silicone Cone Washer
Red Fiber Gasket
⅜”
½”
2 ¾
”
2 ¾
”
1-1/2 - 11.5 NPSM
(1-7/8” - 11.5 UNC-2A)
2 ⅝
”
⅜”
¾”
204-F
Brass Hold Down Nut
8
”
1 ½”
Foam Gasket (Optional)
Fully Finished
Matching Escutcheon
1 ½” Tubular Nipple
Fully Finished
Tailpiece
Waste Flange
TOE TAP DRAIN WITH INTEGRATED
OVERFLOW
AND THREADED BRASS DECORATIVE
TAILPIECE
NOTICE: floor protecting silicone or rubber
covers for furniture feet may be used with
cradle for additional floor protection. Item not
supplied by MTI Baths.
Using futrniture feet covers may increase slip
potential of cradle with tub. Be sure to adhere
furniture feet to floor using clear silicone.
MTI does not warrant leaks associated with improper drain installation and will not be responsible for any costs related to improper
installation. If you need assistance, please call the MTI Service Department at 800.783.8827.
MTI Recommends using clear 100% silicone sealant. Do Not use plumber’s putty.