
Installation Sheet

6
AIR BATH INSTALLATION INSTRUCTIONS
Do not attempt to remove the foam or board from the bottom of the tub. Doing so may cause
damage and will void the warranty. Do not remove the wires attached to the sensors located on
each side of the drain.
1. Never handle the bath by the blower, piping or other equipment.
2. Make sure the manifold and airlines are protected when moving the tub into the house.
3.
An access panel of at lea
st 16" x 14" must be provided
for the blower for any future servicing.
4. The blower must not be insulated and must have sufficient air space to permit proper operation.
Surrounding ambient air temperature should be between 72°F and 86°F.
5. The heating element in your blower heats the air blown into the tub to prevent the water from cooling
too quickly. It will not, under any circumstances, reheat or maintain the temperature of the bath water.
6. The area underneath and around the tub must be cleaned thoroughly before finalizing installation to
prevent any particles from entering the blower or being blown into the air jets.
7.
Before filling the tub, clean installation debris and dirt from the interior of the tub. If necessary,
use the
soft brush attachment of a vacuum cleaner.
8. Fill tub and test for proper operation and leaks. Note: The blower must be plugged into a 110V
GFCI protected outlet.
9.
The mounting bolts may be loosened or removed to aid in future servicing.
Note: Each MTI air system is equipped with two sensors on the oor of the bath near the drain. Every time
water is introduced to the bath and drained, either by showering, bathing or cleaning, the sensors activate
the purge/drying cycle. The cycle will start approximately 7 minutes after the bath is drained and run for
1-2 minutes. The purge cycle will activate even when the air bath has not been turned on. To cancel the
purge, simply press the on/off button for the air system. This will delay the purge for 7 minutes. Pressing
the on/off button to delay the purge a second time will cancel the purge until the next use.
REMOTE MOUNTING THE BLOWER
The blower may be remote mounted up to 8' from the bath. The air hose leading to the blower may be in-
stalled under the oor and the blower located inside a utility or linen closet. The blower must be in a climate
controlled location! Use care not to crush or restrict the airow in the line in any way. The blower may also
be located underneath the tub. In either case, access to the blower must be provided for any future service.
1. Disconnect the air hose from blower and use the provided clamps and coupling to attach extension hose.
If extending the hose under the floor, 1" schedule 40 PVC pipe may be used in place of the flexible hose.
2. Reconnect hose to the blower.
3. Connect sensor wire and ethernet cable to blower. Ethernet cable MUST be 1 continous length!
4. The wires leading from the keypad and sensors on the bottom of the bath to the blower are of suf-
ficient length to allow for remote mounting up to 8' away. If the sensor wire must be lengthened,
splice with 18 gauge low voltage wire. The ethernet cable for the keypad can be purchased in a
longer length from most electronic stores. The ethernet cable must be one continuos length!
5. Secure blower using wood screws through the mounting feet. The screws may be loosened or
removed to aid in future servicing.
Note: Pipe insulation may be used on the air hose to help retain the warmth from the blower. Do not use
insulation within 8" of the blower. The blower needs sufficient air space surrounding it for circulation.
The blower requires a separate 110 VAC, 15 amp GFCI circuit.
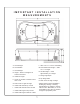
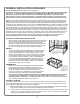
ethernet cable
Connects from blower
to keypad. The
ethernet cable MUST
be one continuos
length. Do NOT
connect two cables
together!
water sensor
wires
Wires lead from sensors
mounted on either side of
tub drain and connect to
blower. Allows activation
of purge cycle after tub
has drained.
01
keypad
Can be mounted convenient
to bather, or simply left
unattached if only the
remote control is desired.
Do not use.
13”
9”
Blower dimensions:
13” (L) x 8” (W) x 9” (H)