Wireless G Ethernet Adapter Connect your gaming console or Ethernet-equipped PC to a FASTER wireless network HSM 802.11g 2.4GHz • Wireless 802.11g 2.
Table of Contents 1 Introduction ...................................................................... 1 Benefits of a Home Network ...................................................... 1 Advantages of a wireless network ............................................ 1 Placement of your Wireless Networking Hardware for Optimal Performance ................................................................. 2 2 Overview ...........................................................................
Introduction To get the most out of your Wireless Ethernet Adapter, please be sure to read carefully through this User Manual, and pay special attention to the section entitled “Placement of your Wireless Networking Hardware for Optimal Performance” below.
Introduction Placement of your Wireless Networking Hardware for Optimal Performance Your wireless connection will be stronger the closer your computer is to your Wireless Router (or Access Point). Typical indoor operating range for your wireless devices is between 100 and 200 feet. Your wireless connection speed and performance will degrade somewhat as the distance between your Wireless Router (or Access Point) and connected devices increases. This may or may not be noticeable to you.
Introduction 1 Avoid Obstacles and Interference Avoid placing your Wireless Router (or Access Point) near devices that may emit radio “noise”, such as microwave ovens.
Introduction 4. Choose the “quietest” channel for your wireless network In locations where homes or offices are close together, such as apartment buildings or office complexes, there may be wireless networks nearby that can conflict with yours. Use the Site Survey capabilities of your Wireless LAN Utility to locate any other wireless networks, and move your Wireless Router (or Access Point) and computers to a channel as far away from other networks as possible.
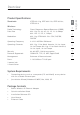
Overview 1 Product Features 2 • 2.4GHz ISM (Industrial, Science, and Medical) band operation • Integrated easy-to-use Wireless Ethernet Adapter Utility 4 • Wireless interface compliance with the IEEE 802.
Overview Applications and Advantages • Wireless roaming around the home or office • Connection rates of up to 54Mbps Offers the freedom of networking without cables Provides immediate, higher-speed wireless connectivity at home, work, and hot spot locations without compromising the use of existing 802.11b products • Compatibility with 802.11b products 802.11g wireless LAN solutions are backward-compatible with existing Wi-Fi (IEEE 802.11b) products and with other 802.
Overview 1 Product Specifications IEEE 802.11g, IEEE 802.11b, IEEE 802.3u, IEEE 802.3 2 Radio Technology Direct Sequence Spread Spectrum (DSSS) 3 Data Rate 802.11g: 54, 48, 36, 24, 18, 12, 9, 6Mbps 802.11b: 11, 5.5, 2, 1Mbps 4 Modulation 802.11g: OFDM 802.11b: CCK, DQPSK, DBPSK Operating Frequency 2.412-2.497GHz ISM band Operating Channels 802.11g: 11 for North America, 14 for Japan, 13 for Europe 802.
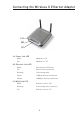
Connecting the Wireless G Ethernet Adapter (a) (b) (c) (a) Power Link LED Solid: Adapter is ON Off: Adapter is OFF (b) Ethernet Link LED Solid: Connected to Ethernet Off: Ethernet disconnected Blinking: Transferring data Green: 10Mbps device connected Amber: 100Mbps device connected (c) WAN Link LED Solid: Wireless card is ON Blinking: Transferring data wirelessly Off: Wireless card in OF 8
Knowing your Wireless G Ethernet Adapter 1 Install the Hardware 1. 2 3 4 5 6 7 8 2. Turn on your Adapter by connecting the power supply cable to your Adapter. Then plug the other end into a power outlet. 3. If used for Internet gaming play, the Adapter will work out-ofthe-box in most instances. In cases where you need to set up the Adapter for head-to-head play or special settings, you need to run the setup wizard from a PC or configure it using a webbased setup.
Connecting the Adapter Using the Setup Wizard Important: Your Adapter should work out-of-the-box. You only need to run the Wizard for special settings such as head-to-head play or wireless security. 1. Insert the CD into your CD-ROM drive. 2. The “Wireless Ethernet Adapter Setup Wizard” screen should automatically appear. Note: If the Easy Setup Wizard does not start up automatically, select your CD-ROM drive from “My Computer” and double-click on the file named “Setup” on the CD-ROM. 3.
Connecting the Adapter Using the Setup Wizard 5. Select the Adapter you wish to set up and click “Next”. 1 2 3 4 6 6. Leave the password blank and click “Next” to continue for initial setup. Note: If this is not your first time setting up this Adapter and you already were assigned a password, enter your password and click “Next”.
Connecting the Adapter Using the Setup Wizard 7. Your Adapter ships with no password entered. You can set the password now or make no changes to the password field to keep your password blank. Click “Next” to continue. 8. Select “Access point” or “Ad-Hoc” and click “Next” to continue. a. Access Point: When this option is selected, the Adapter will attempt to connect to an available network (wireless router or access point) in the area. b.
Connecting the Adapter Using the Setup Wizard 9. Enter the settings for the wireless network that you will be connecting to. The default SSID of “ANY” will connect your Adapter to the closest network automatically. After you finish entering the settings, click “Next” to continue. a. SSID: 2 3 4 b. Channel: 5 If you chose to connect in Ad-Hoc mode, you will need to specify the channel number. 6 c. Device (Adapter) Name: 7 Enter a name for this Adapter. 8 a b c 10.
Connecting the Adapter Using the Setup Wizard b. Subnet Mask: The Adapter’s Subnet Mask must be the same as your network’s subnet mask. c. Router: Enter the IP address of your network’s gateway (also known as router). a b c 11. From the Encryption drop-down menu, select “Disabled”, “64-bit”, or “128-bit” according to your wireless network’s setting. Select “Disabled” if you have not configured your wireless network to use encryption. All wireless devices on your network must share the same network key.
Connecting the Adapter Using the Setup Wizard 1 c. Passphrase: For 64-bit encryption, your key lengths will be five characters (ASCII text). For 128-bit encryption, your key length will be 13 characters (ASCII text). 2 d. Hex Key: 3 For 64-bit encryption, your key lengths will be 10 hexadecimal characters. For 128-bit encryption, your key length will be 26 hexadecimal characters. 4 c b d 6 7 8 12. Confirm all your settings are correct then click “Finish”.Setup is complete.
Connecting the Adapter Using the Setup Wizard 13.
Using the Web-Based User Interface Setting up your computer to use the Web-Based User Interface 1 The default IP address of the Adapter is 192.168.2.225. You will need to set your computer’s IP address to the same subnet such as 192.168.2.224 before you can access the Web-Based Setup Interface. Perform the following steps from Windows 98SE, Me, 2000, or XP: 2 1. Go to the Windows Control Panel and double-click on the Network icon or the Network Connections icon. 4 2.
Using the Web-Based User Interface Connecting the Adapter Using your Internet browser, you can access the web-based user interface. In your browser, type “192.168.2.225” (do not type in anything else such as “http://” or “www”). Then press the “Enter” key. Logging into the Web-Based Setup You will see the Web-Based Setup home page in your browser window. The home page is visible to any user who wants to see it. To make any changes to the Adapter’s settings, you have to log in.
Using the Web-Based User Interface 1 Status 2 (b) (a) (c) (d) 3 4 5 7 (a) Quick Navigation Links You can go directly to any of the pages by clicking directly on these links. The links are divided into logical categories and grouped by tabs to make finding a particular setting easier to find. (b) Version Information Shows the firmware version, boot-code version, and hardware version. (c) LAN Settings Shows you the settings of the Local Area Network (LAN) side of the Adapter.
Using the Web-Based User Interface Adapter Settings (a) (b) (c) (d) (e) (i) (j) (f) (k) (g) (h) (l) (a) Bridge (Adapter) Name: Enter the name of your Wireless Ethernet Adapter here. (b) IP Configuration: • Manually set the Adapter’s IP address - The default IP address of your Adapter is 192.168.2.225. You can modify it to match your network subnet if needed. For example, if your network subnet is under 192.168.1.xxx, then you can configure the Adapter to use 192.168.1.225.
Using the Web-Based User Interface 1 (d) Subnet Mask: The Adapter’s subnet mask must be the same as your network’s subnet mask. 2 e) Gateway IP Address 3 Enter the IP address of your network’s gateway (also known as router). (f) SSID 5 6 7 8 (g) Mode • Infrastructure – When this option is selected, the Adapter will attempt to connect to an available network (access point) in the area.
Using the Web-Based User Interface Adapter Settings (con’t) (a) (b) (c) (d) (e) (i) (j) (f) (k) (l) (g) (h) (i) WEP Encryption From the Encryption drop-down menu, select “none”, “64-bit”, or “128-bit” according to your wireless network’s setting. Select “none” if you have not configured your wireless network to use encryption. All wireless devices on your network must share the same network key. There are two types of encryption to choose from: 64-bit and 128-bit.
Using the Web-Based User Interface 1 (l) Network Key: Enter a network key only if you have encryption enabled in your wireless network. Type your WEP key in the Network Key box using passphrase or hex key format. All wireless devices on your network must share the same network key. • Passphrase - For 64-bit encryption, your key lengths will be five characters (ASCII text). For 128-bit encryption, your key length will be 13 characters (ASCII text).
Using the Web-Based User Interface Site Survey (b) (a) (c) (a) SSID The SSID is the wireless network name. (b) Refresh Clicking the Refresh button will give you the most up-to-date data. (c) Join You can connect to a specific wireless network by selecting the check box and click “Apply Changes”. Restart Wireless Adapter You can restart your Wireless Adapter without losing any of your configuration settings by clicking “Restart Wireless Adapter”.
Using the Web-Based User Interface 1 Restore Factory Defaults Clicking “Restore Defaults” will erase all your current settings. 2 3 4 5 Save Current Settings 7 You can save your current configuration by using this feature. Saving your configuration will allow you to restore it later if your settings are lost or changed. It is recommended that you back up your current configuration before performing a firmware update.
Using the Web-Based User Interface Restore Previous Settings This option will allow you to restore a previously saved configuration. Firmware Update From time to time, Belkin may release new versions of the Adapter’s firmware. Updates contain improvements and fixes to problems that may have existed. For the latest firmware, go to the support section of www. belkin.com/networking. a. Browse: Clicking on “Browse” will open a window that allows you to select the location of the firmware update file. b.
Using the Web-Based User Interface 1 Password The Adapter ships with NO password entered. If you wish to add a password for greater security, you can set a password here. Write down your password and keep it in a safe place, as you will need it if you need to log into the router in the future. 2 3 4 5 7 8 Login Timeout The login timeout option allows you to set the period of time that you can be logged into the Adapter’s Web-Based Setup Interface. The timer starts when there has been no activity.
Troubleshooting I can’t connect to a Wireless Network or Router If you are unable to connect to the Internet from a wireless computer and your adapter appears to be functioning properly, please check the following items: Look at the lights on your Wireless Router. If you’re using a Belkin Wireless Router, the lights should be as follows: • The “Power” light should be on. • The “Connected” light should be on, and not blinking. • The “WAN” light should be either on or blinking.
Troubleshooting Power LED does not come ON; Adapter is not working If the LED indicators are not ON, the problem may be that the Adapter’s power supply is not connected or installed properly. Verify that the Adapter’s power supply is connected to the power port on the Adapter and that the power supply is firmly connected into a working power outlet.
Troubleshooting WAN Link LED is OFF; Cannot connect to a wireless network or the Internet If your Adapter appears to be functioning properly, but you cannot connect to a network and the WAN link LED is OFF, the problem may be that there is a mismatch between the network name (SSID) in your wireless settings. Check the SSID settings to see if they match.
Troubleshooting 1 Data transfer is sometimes slow Wireless Technology is radio-based, which means connectivity and the throughput performance between devices decreases when the distance between devices increases. Other factors that will cause signal degradation (metal is generally the worst culprit) are obstructions such as walls and metal appliances. As a result, the typical indoor range of your wireless devices will be between 100 to 200 feet.
Troubleshooting What’s the difference between 802.11b, 802.11g and 802.11a? Currently there are three levels of wireless networking standards, which transmit data at very different maximum speeds. Each is based on the designation 802.11(x), so named by the IEEE, the board that is responsible for certifying networking standards. The most common wireless networking standard, 802.11b, transmits information at 11Mbps; 802.11a and 802.11g work at 54Mbps. See the following chart for more detailed information.
Troubleshooting 1 Technical Support You can find technical support information at www.belkin.com or www. belkin.com/networking.
Information FCC Statement DECLARATION OF CONFORMITY WITH FCC RULES FOR ELECTROMAGNETIC COMPATIBILITY We, Belkin Corporation, of 501 West Walnut Street, Compton, CA 90220, declare under our sole responsibility that the product, F5D7330 to which this declaration relates, complies with Part 15 of the FCC Rules.
Information • Reorient or relocate the receiving antenna. • Increase the distance between the equipment and the receiver. • Connect the equipment to an outlet on a circuit different from that to which the receiver is connected. • Consult the dealer or an experienced radio/TV technician for help.
Information Products with the CE marking comply with the EMC Directive (89/336/EEC) and the Low Voltage Directive (72/23/EEC) issued by the Commission of the European Community. Compliance with these directives implies conformity to the following European Norms (in brackets are the equivalent international standards).
Information Belkin Corporation Limited Lifetime Product Warranty 1 Belkin Corporation warrants this product against defects in materials and workmanship for its lifetime. If a defect is discovered, Belkin will, at its option, repair or replace the product at no charge provided it is returned during the warranty period, with transportation charges prepaid, to the authorized Belkin dealer from whom you purchased the product. Proof of purchase may be required.
Wireless G Ethernet Adapter belkin.com Belkin Ltd. Express Business Park • Shipton Way Rushden • NN10 6GL • United Kingdom Tel: +44 (0) 1933 35 2000 Fax: +44 (0) 1933 31 2000 Belkin GmbH Hanebergstraße 2 80637 München • Germany Tel: +49 (0) 89 143405 0 Fax: +49 (0) 89 143405 100 Belkin B.V.