
Operation Manual

English Operating Instructions
10
8LIQS[IVWLSYPHRSXFIHVMZIRSR
WPSTIW[MXLEQE\MQYQMRGPMRI
KVIEXIVXLER 2IZIVXYVRSR
E WPSTI
2IZIVTEVOXLIETTPMERGISREWPSTI
3RXLIWPSTIEP[E]WHVMZIWPS[P]
ERHGEYXMSYWP]2IZIVGLERKIXLI
WTIIHSVHMVIGXMSR;LIRQS[MRK
[IXKVEWWXLIVIMWEKVIEXIVVMWOSJ
XLIYRMXWPMHMRKEWEVIWYPXSJVIHYGIH
[LIIPKVMT3RP]QS[[LIRXLI
KVEWWMWHV]
)\GIWWMZIWTIIHGERMRGVIEWIXLI
VMWOSJEREGGMHIRX
/IITEWEJIHMWXERGI[LIR[SVOMRK
MRFSYRHEV]EVIEWIKRIEVWXIIT
WPSTIWERHYRHIVXVIIWERH[LIR
QS[MRKRIEVWLVYFWERHLIHKIW
&ITEVXMGYPEVP]GEYXMSYW[LIRHVMZMRK
MRVIZIVWI
'LIGOXLIEVIEMR[LMGL]SYMRXIRH
XSYWIXLIYRMXERHVIQSZIEPP
SFNIGXWXLEXQMKLXFILMXERH
TVSTIPPIHF]XLIYRMX
2IZIVTEVOXLIETTPMERGI[MXL
EXXEGLQIRXW;LIRI\GLERKMRK
483TS[IVIHEXXEGLQIRXWXLI
ETTPMERGILEWXSFIWXERHMRKERH
XLIIRKMRIW[MXGLIHSJJ8LIXVEGXMZI
YRMXWLSYPHRSPSRKIVXYVR
-JXLIGYXXMRKXSSPLMXWEJSVIMKRSFNIGX
IKWXSRISVMJXLIQEGLMRIWXEVXW
ZMFVEXMRKZMSPIRXP]WXSTXLIIRKMRI
MQQIHMEXIP])\EQMRIXLIYRMXJSV
HEQEKIW'SRWYPXEWTIGMEPMWX
[SVOWLSTMJHEQEKILEWSGGYVVIH
-RXLIGEWISJQS[IVW[MXLVSXEV]
FPEHIWRIZIVWXERHMRJVSRXSJKVEWW
INIGXMSRSTIRMRKW
2IZIVTPEGI]SYVLERHWJIIXSV
SXLIVTEVXWSJXLIFSH]SRSVFIPS[
VSXEXMRKTEVXW
7[MXGLXLIIRKMRI3**VIQSZIXLI
MKRMXMSROI]ERHHMWGSRRIGXXLI
WTEVOTPYKOI]FIJSVI]SYGPIEVXLI
INIGXSVSJFPSGOEKIWSVSXLIV
LMRHVERGIW
6MWOSJWYJJSGEXMSRJVSQGEVFSR
QSRS\MHI
3RP]EPPS[XLIGSQFYWXMSRIRKMRI
XS VYRMRXLISTIREMV
6MWOSJI\TPSWMSRERHJMVI
*YIPERHTIXVSPZETSYVWEVIZSPEXMPI
ERHJYIPMWLMKLP]JPEQQEFPI
&IJSVIWXEVXMRKXLIIRKMRIJMPP[MXL
JYIP-JXLIIRKMRIMWWXMPPLSXSV
VYRRMRKOIITXLIJYIPXEROGPSWIH
3RP]JMPP[MXLJYIP[LIRXLIIRKMRI
MW XYVRIHSJJERHLEWGSSPIHHS[R
%ZSMHREOIHJPEQIWXLIJSVQEXMSR
SJ WTEVOWERHHSRSXWQSOI3RP]JMPP
XLIXEROMRXLISTIREMV
(SRSXWXEVXXLIIRKMRIMJJYIPLEW
FIIRJMPPIHYTERHLEWSZIVJPS[IH
;MTIXLIEJJIGXIHEVIEWGPIERERH
[EMXYRXMPXLIJYIPLEWZETSVMWIH
8SEZSMHXLIVMWOSJJMVIOIITXLI
JSPPS[MRKTEVXWJVIIJVSQKVEWWSJSMP
PIEOWIRKMRII\LEYWXFEXXIV]JYIP
XERO
;EVRMRK
6MWOSJMRNYV]XLVSYKLXLI
ETTPMERGIFIMRKJEYPX]
3RP]STIVEXIXLIETTPMERGIMR
E JPE[PIWWWXEXI
'EVV]SYXEZMWYEPGLIGOIEGLXMQI
FIJSVIYWMRKXLIETTPMERGI'LIGOMR
TEVXMGYPEVXLIWEJIX]JIEXYVIWGYXXMRK
XSSPWERHQSYRXMRKWSTIVEXMSR
IPIQIRXWERHXLVIEHIHNSMRXWJSV
HEQEKIERHWIGYVIRIWW
6ITPEGIHEQEKIHTEVXWFIJSVI
STIVEXMRK
Operating times
Observe the national and local
regulations concerning the hours
when the appliance can be used
(where necessary, enquire at your
appropriate local authority).
Before each use
Note
The engine is already filled with oil at
the factory - please check and
where necessary, top it up.
Check:
n all protective features,
n the engine-oil level (see the
engine handbook: section
“Servicing”),
n the gear oil level (see below),
n the fuel level (see below),
n the tyre pressure,
n the side covering and the area
around the air filter for dirt and
grass,
n the cutting movement for dirt and
residue from mowing,
n the air filter condition (see section
“Servicing”).
Check the fuel level:
n Open the tank and add diesel-fuel
as required (refer to the engine
handbook to determine the
correct type of fuel).
n Wipe away any spilt fuel.
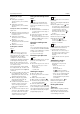
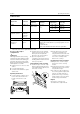
Check the level of the gear oil:
Fig. 15
The oil has to be visible in the
inspection glass (a) when the engine
is switched off.
Fill oil into the filler opening (b) (use
only ”Special Drive System Oil”).
n Clean the area around the oil fill
opening.
n Remove the screw.
n Fill the oil up until it is visible in the
inspection glass.
Do not overfill!
n Screw back into place.
Drain condensation from the diesel
filter (see section “Servicing”).
Preparing for operation
n Park the tractor on an even, solid
surface.
n Lock the parking brake.
n Conduct all work with the engine
switched off.
n Remove the ignition key.
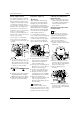
Set the driver seat
The driver's seat is adjustable in
terms of height, longitude and
hardness.
Setting the seat longitudinally
Fig. 12 a
n Take your place on the driver
seat.
n Pull the lever (1) outwards and
bring the seat into the desired
position.
n Release the lever and engage the
seat by gently moving it forwards
and backwards.