A 07 FORM NO.
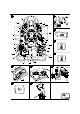
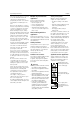
1 2 Y A X B C W 3 V HOURS 1/10 RPM 0 x1000 4 FUEL E F D U T E 4 F S H I G I R J Q K 5 P L L N O (a) 6 M 7 8 (b) L (c) H (d) 9 (a) N 10 (b) (a) (b)
11 7 3 2 12a 8 4 10 9 1 HOURS 1/10 RPM FUEL E F 0 5 x1000 4 1 6 2 12b 3 13 a b 14 15 b 16 a b MAX MIN 17 a 18 b 19 c a b b a a
20 22 21 b b a b c a a 23 b 10 8 17 10 9 1 5 2 11 7 5 19 18 4 16 15 6 12 20 6 5 3 14 15 13 24 25 a c b
English 4 Français 21 Deutsch 41 Nederlands 59 Svenska 78 Dansk 94 Español 112
English Table of Contents For your safety . . . . . . . . . . . . . . 4 Assembling the appliance . . . . . . 6 Controls and indicators . . . . . . . . 7 Operating safety . . . . . . . . . . . . . 9 Cleaning / Servicing . . . . . . . . . 14 Shutting down the machine . . . 19 Guarantee . . . . . . . . . . . . . . . . . 19 Information about the engine . . . 19 Troubleshooting . . . . . . . . . . . .
Operating Instructions Check the area in which you intend to use the unit and remove all objects that could be hit and propelled by the unit. You can thus avoid injuries and damage to the unit. Never use the appliance on slopes that are steeper than 20 %. Working on slopes is dangerous; the risk of rollover and sliding is increased. When working on slopes, always drive off and halt the unit gently and gradually.
English Operating Instructions Risk of injury from rotating blades and other rotating parts. Risk of injury through rotating engine fan! Assembling the appliance Commissioning the battery Keep these symbols visible on the appliance. There must be no persons, especially children, or animals in the area of operation. Working on steep slopes increases danger. Never fold down the rollbar on a slope. Never put the seat belt on when the rollbar is folded down.
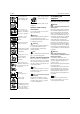
Operating Instructions If a “maintenance-free/ sealed” battery (type 1) is supplied (Battery without filler plugs) The battery is filled with battery acid and is sealed at the factory. However, even a “maintenancefree” battery requires maintenance if it is to have a longer service life. n Keep the battery clean n Avoid tipping the battery. Electrolyte fluid leaks from a ‘sealed’ battery, if it is tipped. If an empty battery (type 2) is supplied (Battery with filler plugs) Fig.
English Operating Instructions Throttle (B) Ignition lock (H) Gear lever (Q) Fig. 2 The engine speed can be adjusted continuously. Fast engine speed = . Slow engine speed = . Fig. 1 ;EVRMRK (EQEKI XS XLI ETTPMERGI 'LERKMRK XLI WTIIH WLSYPH SRP] XEOI TPEGI [LIR XLI XLI ETTPMERGI MW EX E WXERH Fig. 7 The lever serves to select high speed (H) or low speed (L). High speed – forwards (H) Forwards approx. 0–12.9 km/h Reverse ca. 0–6.4 km/h Slow speed – forwards (L): Forwards approx. 0–6.
Operating Instructions Differential lock pedal (T) Fig. 9 Press the pedal to activate the differential lock. Power is now transferred to both rear wheels (see Section Activating the differential lock). Additional parking brake (U) Fig. 10 as an additional securing means for the parking brake when switching the vehicle off. a) Actuating the brake: Lift the lever back. a) Release the brake: Depress the button in the lever and move the lever forwards. Indicator switch (optional) (V) Fig.
English 8LI QS[IV WLSYPH RSX FI HVMZIR SR WPSTIW [MXL E QE\MQYQ MRGPMRI KVIEXIV XLER 2IZIV XYVR SR E WPSTI 2IZIV TEVO XLI ETTPMERGI SR E WPSTI 3R XLI WPSTI EP[E]W HVMZI WPS[P] ERH GEYXMSYWP] 2IZIV GLERKI XLI WTIIH SV HMVIGXMSR ;LIR QS[MRK [IX KVEWW XLIVI MW E KVIEXIV VMWO SJ XLI YRMX WPMHMRK EW E VIWYPX SJ VIHYGIH [LIIP KVMT 3RP] QS[ [LIR XLI KVEWW MW HV] )\GIWWMZI WTIIH GER MRGVIEWI XLI VMWO SJ ER EGGMHIRX /IIT E WEJI HMWXERGI [LIR [SVOMRK MR FSYRHEV] EVIEW I K RIEV WXIIT WPST
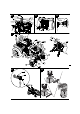
Operating Instructions Adjusting the height Fig. 12 a n Setting the seat higher. Turn the knob (2) in a clockwise direction. n Setting the seat lower. Turn the knob (2) in a clockwise direction. Setting the driver seat hardness Figure 12 b n Swivel the lever (3) forwards such that when turning, the lever does not hit the seat. n Setting the seat harder: Turn the lever in a clockwise direction. n Setting the seat softer: Turn the lever in an anti-clockwise direction. n Swivel the lever back.
English &I IWTIGMEPP] GEYXMSYW [LIR VIZIVWMRK 2IZIV GLERKI XLI HMVIGXMSR SJ XVEZIP SV XLI WTIIH [MXLSYX JMVWX FVMRKMRK XLI ZILMGPI XS E WXERH 2IZIV WIX EHNYWX XLI HVMZIV W WIEX [LMPI XLI YRMX MW QSZMRK n Set the driver seat. n Set the belt and put it on. n Start the engine as stated. n Raise the attachments which are mounted to the 3 point attachment device. n Press the brake pedal down fully and release the parking brake. n Set the drive lever to the desired speed (high/low).
Operating Instructions Remove the tractive unit protection ;EVRMRK 3RP] VIQSZI XLI XVEGXMZI YRMX TVSXIGXMSR MJ XLI XVEGXMZI YRMX MW YWIH Fig. 19 n Loosen the 2 screws (a). n Pull the tractive unit protection (b) out laterally under the screws and remove the drive shaft (c). If the PTO is no longer used: n slide the tractive unit protection over the tractive unit and slide it laterally under the screws. n Tighten the screws.
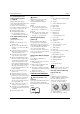
English Note Your dealer is able to offer you a mounting kit for weights calibrated to the acessory. Using the front traction gear The front traction gear can be used to pull loads but also to tow tractors. Important notes – Only tow for short distances. For transporting over longer distances, load the tractor onto a trailer or similar means. – When towing, put the drive lever into neutral. Fig. 22 n Remove the securing pins (a) and bolts (b).
Operating Instructions English Servicing and lubricating table Fig.
English Operating Instructions Lubricant table General information Application Lubricant Engine Engine oil * Capacity API class approx. 4.4 l with oil filter CF, CF-4 or CH-4 Ambient temperature Viscosity –30....+30 °C 5W-30 –20....+40 °C –20....+50 °C 10W-30 10W-40 0....+30 °C 30W Hydrostatic gear and hydraulic system Drive System Fluid Plus (hydraulic/ gear oil) approx. 19 l Grease nipple Grease If necessary 251H EP grease or universal lithium grease no.
Operating Instructions English Check engine oil level Top up the engine oil The oil level should be checked in the crank housing before each use. During “running the engine in”, the engine oil level should be carefully checked more frequently. The oil level should be checked every hour during the first 5 operating hours. Only check the oil level when the engine has come to a stand and the tractor is on a level surface.
English Cleaning the cooler and cooler grille Operating Instructions n n If the coolant level is below the MIN-mark, open the container and fill it with the coolant mixture up until the MAX-mark. Close the engine bonnet. Check that it is fully engaged. Exchanging the headlight bulbs n Open the engine bonnet. c n n n To remove the cooler grille, open the bonnet and carefully take out in the middle where the tounges are. In order to clean its surface, rinse the grille with water.
Operating Instructions English Tyre pressure ;EVRMRK 2IZIV I\GIIH XLI QE\MQYQ TIVQMXXIH X]VI TVIWWYVI WII WMHI SJ X]VI ;LIR TYQTMRK YT XLI X]VIW HS RSX WXERH MR JVSRX SV EFSZI XLIQ The recommended tyre operating pressure is: For tyre equipment suitable for lawns: Dimension Note Observe the information in the operating instructions for your battery charger. Servicing the battery. n n n Always keep the battery clean. Avoid tipping the battery.
English Operating Instructions Fault Possible cause Remedy Engine will not start. The tank is empty. Fill with diesel. Oil or air in the fuel line. Visit a specialist garage. Diesel filter is blocked. Visit a specialist garage. Battery does not provide any current. Check the battery, charge it or exchange it. Loose or corroded battery parts. Check the battery. Tighten the contacts. Clean the corroded contacts with a wire brush, tighten again and grease them using terminal grease.