
User Manual


18 310-2200 EZT
®
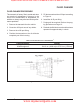
Refer to Figure 9.
Disassembly
1. Remove the bypass arm and control arm. See
page 15.
2. Remove oil from the transaxle. See page 9.
3. Remove the side housing. See page 17.
4. Remove the spiral retaining ring (45), bull
gear (46), inboard sleeve bearing (48) and
washer (47).
5. Remove the reduction gears (42 &43), jack
shaft pin (44) and washers (41).
6. Remove seal retaining ring (34), seal (51),
axle (49) and bushing (50).
7. If necessary, remove the expansion plate as-
sembly (53).
NOTE: Expansion plate removal will typically
destroy the plate. Clean all sealant from the
expansion plate area.
Inspection
1. Inspect the bull gear for wear or damage.
2. Inspect the reduction gears, jack shaft pin
and washers.
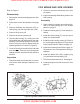
Figure 9. Axle Shaft, Reduction Gears and Expansion Plate
3. Inspect the axle shaft, bearing and bushing.
4. Inspect the expansion plate.
Assembly
1. Apply a small bead of sealant to the expan-
sion plate area of the housing. See page 27.
Install the expansion plate (53). Torque the
screws according to Table 6.
2. Reassemble and install the reduction gears
(42 & 43), jack shaft pin (44) and washers
(41).
3. Install the bull gear (46), retaining ring (45),
bearing (48) and washer (47) onto the axle
(49).
4. Install the axle (49) and bushing (50) into the
housing (1).
5. Install the axle seal (51) and retaining ring
(34).
6. Install the side housing. See page 17.
7. Install all remaining seals. See page 16.
8. Fill the transaxle with oil. See page 9.
9. Install the bypass arm and control arm. See
page 15.
AXLE SHAFT, REDUCTION GEARS AND EXPANSION PLATE
www.mymowerparts.com
Hydro Gear Parts or New Units Call 606-678-9623 or 606-561-4983