Safe Operation Practices • Set-Up • Operation • Maintenance • Service • Troubleshooting • Warranty L Self Propelled Mower m Model 46M9 MTD LLC, P.O. BOX 361131 CLEVELAND, OHiO 44136-0019 PrintedIn USA FormNo.
1 ToTheOwner ThankYou Thank you for purchasing a Lawn Mower manufactured by If you have any problems MTD LLC. It was carefully engineered to provide excellent performance when properly operated and maintained. Please read this entire manual It instructs prior to operating your machine. persons who will operate address and mailing the equipment.
2 importantSafeOperationPractices WARNING: This symbol could endanger all instructions points out important the personal safety and/or in this manual with these instructions before property attempting may result in personal When you see this symbol. safety instructions of yourself to operate which, if not followed, and others. this machine. Read and follow Failure to comply injury.
12. Amissing ordamaged discharge cover cancause blade contact orthrown object injuries. 13. Many injuries occur asaresult ofthemower beingpulled overthefootduring afallcaused byslipping ortripping. Donotholdontothemower ifyouarefalling; release the handle immediately. 14. Never pullthemower back toward youwhileyouare walking. Ifyoumustback themower away fromawallor obstruction firstlookdownandbehind toavoid tripping andthenfollowthese steps: a. Stepback frommower tofullyextend yourarms. b.
Service 3. Check the blade and engine intervals To avoid personal care in handling injury or property damage gasoline. Gasoline is extremely can ignite. Wash your skin and change flammable clothes original 3. Use only an approved Never fill containers gasoline container. inside a vehicle 4. Remove gas-powered equipment Keep all nuts, bolts, and screws tight equipment 7. trailer and refuel it on the ground.
SparkArrestor Notice Regarding Emissions Engines which are certified to comply with California and federal EPA emission regulations for SORE (Small Off Road Equipment) are certified to operate may include the following Modification (EM), Oxidizing Injection on regular emission unleaded control gasoline, and internal combustion engine and should not be used WARNING: This machine is equipped with an on or near any unimproved forest-covered, brush i_ll systems: Engine Catalyst (OC), Secondary A
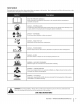
Safety Symbols This page depicts and describes safety symbols that may appear machine before attempting to assemble and operate. on this product. Read, understand, and follow all instructions on the READ THE OPERATOR'S MANUAL(S) Read, understand, assemble and follow all instructions in the manual(s) before attempting to and operate DANGER -- ROTATING BLADES To reduce the risk of injury, keep hands and feet away. Do not operate or grass catcher is in its proper place.
co Sight and hold this level with a vertical tree... -4 5 Z I ,_ or a corner of a building... i i Z __ I i I I O ' FOldo, 5 ' Z "o or a fencepost ', diine , --Lepre_n tsa15 o -4 I I 15 ° Usethis page as a guide to determine slopes where you may not operate safely. WARNING: Do not operate (a rise of approximately mowers up and down up and down slopes. your lawn mower on such slopes. Do not mow on inclines with a slope in excess of 15 degrees 2-1/2 feet every 10 feet).
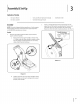
3 AssembJy & Set-Up Contents of Carton One Lawn Mower One Lawn Mower One Grass Catcher One Side Discharge Assembly Operator's 2. without Fill up gasoline and oil as instructed section BEFORE operating gasoline or oil in the engine. Insert a carriage bolt found in the manual hole on the handle mounting f Handle Handle 1. Remove any packing material upper and lower handles. a. which Pull up and back on upper lifting Wing Nuts (2) the handle up. Figure 3-1 Tighten handle.
3. The rope guide is attached handle. to the right side of the upper See Fig. 3-3. Loosen the wing nut which b. secures the Slip plastic channel of grass bag over hooks on the frame. See Fig. 3-4. All the plastic rope guide. channels except center top of bag attach from outside of frame. F Figure 4. Figure 3-4 3-3 a. Hold blade control against upper b. Pull starter control. rope out of the engine. c. Slip starter rope into rope guide. d. Tighten handle. Release blade c. 2.
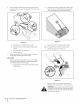
Side DischargeChute Your mower is shipped make sure grass catcher is closed. 1. Adjustments as a mulcher. To convert to side discharge, is off of the unit and rear discharge door CuttingHeight Each wheel has a height adjustment On the side of the mower, 3-6. lift the mulching plug. See Figure height lever to change the cutting of the mower. 1. Depress height adjustment 2. Slide lever to desired height. lever towards position wheel. for a change in cutting See Fig. 3-7.
4 Controls andFeatures Drive Control Recoil Starter Side Discharge Chute Cutting Height Adjustment Levers Figure 4-1 Blade Control Mukh Plug The blade control is attached to the upper Depress and squeeze it against the upper handle of the mower. handle to operate the The mulch collecting plug is used for mulching the grass clippings side discharge unit. Release it to stop engine and blade. chute, some mower of recirculating the clippings purposes.
5 Operation F Starting Engine WARNING: Be sure no one other than the operator is standing near the lawn mower while starting engine or operating mower. Never run engine indoors or in enclosed, poorly ventilated areas. Engine exhaust contains carbon monoxide, an odorless and deadly gas. Keep hands, feet, hair and loose clothing away from any moving parts on engine and lawn mower. Standing behind the mower, depress the blade control handle and hold it against the upper handle. SeeFig. 5-1. 2.
Maintenance & Adjustments Maintenance 2. Lubricate motor General Recommendations Always observe maintenance. The warranty at least once a season with light oil (or are removed safety rules when performing does not cover items that Lubricate the torsion discharge door and side mulch plug periodically oil to prevent spring and pivot points 4. The transmission is pre-lubricated and does not require lubrication. Changing 5.
Engine Care ReplacingRearFlap NOTE: Refer to the Engine Operation and Maintenance in this manual for detailed instructions. Maintain sections oil level. 1. To remove rear flap, lift rear door, and press flap in on either side to remove from hole. See Fig. 6-2. r Service air cleaner every 25 hours under normal conditions. Clean every few hours under extremely dusty conditions. Clean spark plug and reset the gap once a season. Clean engine regularly with a cloth or brush.
7 Service Blade Care 5. Lubricate the engine the blade adapter WARNING: sharpening When removing or replacement, the cutting protect blade for inspect the blade adapter strike a foreign object. Replace when below for blade service. 1. for cracks, especially necessary. part number) Disconnect spark plug boot from spark plug. Turn mower on its side making sure that the air filter and the carburetor are facing up. 2. operating faces the ground position.
4. Press inward ontabontheengine baffle torelease itfrom thebafflebracket. See Fig.7-3. 6. Replace with new belt, making engine pulley while it around 7. the transmission Reattach engine in the previous 8. pulling Turn mower sure belt is firmly pulley. baffle and reassemble blade as described section. back over and make sure belt is seated on the transmission pulley. Tighten screw loosened secure belt tension spring to the transmission. 9.
Troubleshooting Problem Engine Fails to start Cause 1. Remedy Blade control disengaged. 2. Spark plug boot disconnected. 2. Connect wire to spark boot. 3. Fuel tank empty or stale fuel. 3. Fill tank with clean, fresh gasoline. 4. Engine not primed (if equipped with primer). 4. Prime engine as instructed section. in the Operation 5. Faulty spark plug. 5. Clean, adjust gap, or replace. 6. Blocked fuel line. 6. Clean fuel line. Z Engine flooded. Z Waita few mmutes to restart, butdo not prime.
Problem Cause Uneven cut 1. Wheels not positioned Remedy correctly. 1. Place all four wheels in same height (if equipped 2. Dull blade. i : with individual position height adjusters). 2. Sharpen or replace blade.
EngineOperation Fuel Cap \ Air Cleaner Grip Cap Oil Drain Spark Plug Mumer Figure 9=1 Pre-0perationCheck Oil Recommendations NOTE:This engine is shipped engine. Running the engine serious engine damage Before starting without with insufficient engine, is about 20 oz. Use a 4-stroke, or an equivalent motor oil certified 20 Oil mlmlllm Iilmllm high detergent, SG/SF. on the for general, all temperature in your area from m,3o premium U.S.
Check0il Level CheckFuel Level NOTE: Be sure to check the engine on a level surface with the 1. Clean around 2. Fill tank to approximately engine stopped. 1. Remove the oil filler cap and wipe the dipstick Fig. 9-2. clean. See neck to allow fuel fill before removing 1-inch below for fuel expansion. NOTE: Before refueling, cap to fuel. lowest portion of Be careful not to overfill. allow engine to cool 2 minutes. Starting TheEngine _ 1.
1 EngineMaintenance Periodic any maintenance. To prevent accidental ARNING: the Shut offthe disconnect spark plug engine boot. before _ inspection If engine must be tipped to transport of the engine is essential is to be maintained. Regular maintenance will also ensure a long service life.
AirCleanerService Oil Service Check oil level regularly. Paper filters cannot Be sure correct or every 100 operating dusty conditions. oil level is maintained. hours or daily before starting procedure in the Operation engine. Check every five See oil checking be cleaned and must be replaced section. solvents for cleaning thegasoline air cleaner element. A fire WARNING: Never use or low flash point or explosion could result.
SparkPlugService 3_ necessary by bending side electrode. should be set to 0.030 in. plug removed. DODONOT NOT crankforengine WARNING: check spark _ Measure the plug gap with a feeler gauge. Correct as See Fig. 10-4. The gap with with spark spark plug removed. To ensure proper engine operation, properly and free of deposits. 1. gapped the spark plug must be Remove the spark plug boot and use a spark plug wrench Electrode to remove the plug. See Fig. 10-3.
Fuel Filter Service The fuel filter cannot Storage be cleaned year or every 100 operating gasoline. 1. 2. and must be replaced once a hours; more often if run with old Remove all fuel from tank by running from lack of fuel. engine Engines stored between until it stops in fuel system or on essential your engine deteriorates Remove c-clamp from fuel line and remove tank outlet. See Fig. 10-5.
The EZ Start Promise Provisions of Your Limited Warranty In addition to the other terms and conditions of the Limited Warranty applicable to your new mower, MTD LLC ("MTD") hereby warrants that your mower's engine will start on the first or second attempt by an able-bodied adult (subject to the limitations described below) for the duration of the manufacturer's limited warranty applicable to your product.
Model46M9 7 22 67 66 10 \ 30 '\ \ 46 47 35 47 25 57 / 37
Model46M9 Ref No. 1 I Part Number 747-1214 Description Re,]Part Number Description NO, Drive Control 37 954-0637A V-Belt 936-0447 Wave Washer 2 710-0599 TT Screw 1/4-20 x 0.5 38 3 736-0270 Bell Washer.265 39 750-04594 Sleeve Spacer 8.985" Lg. 4 17032A Deflector 40 948-04015A Blade Adapter, 41 942-0741 21" Mulching 42 736-0524B Blade Bell Support x 0.
EngineModel- 5P65MO 21- 20 1 =7 f 14- _\ S_ _ ¸ :_ 4_ 27_ 22
EngineModel - 5P65MO Ref NO. Part Number 1. 951-10337 Fuel Tank 2. 951-10875 Flywheel 3. 951-10335 Rubber 4. 951-10334 Oil Filler Tube Assembly 5. 951-10333 Dipstick Assembly 6. 951-10877 Cylinder Head Complete 7. 951-10878 Short Block Assembly 8. 951-10320 Stop Switch and Brake Assembly 9. 951-10319 Recoil Spring and Pulley Assembly 10. 951-10314 Push Rod Kit 11. 951-10313 Valve Kit 12. 951-10370 Oil Drain Plug and Washer Assembly 13. 951-10367 Ignition 14.
Cub Cadet LLC (Cub Cadet},The Emission (Owner's United States Environment Control System Warranty Defect Warranty Protection Agency (U. S. EPA) Statement Rights and Obligations) The U. S. EPAand CubCadetare pleasedto explainthe emissionscontrolsystemwarrantyon yourmodelyear2005 and latersmalloff-road engine.Newsmalloff-roadenginesmustbe designed,builtand equippedto meetthe stringentanti-smogstandards.
(7)Theengine manufacturer isliable fordamages toother engine components proximately caused byafailure under warranty ofanywarranted part. (8)Throughout theengine's warranty period defined inSubsection (a)(2), CubCadet willmaintain asupply ofwarranted partssufficient tomeet theexpected demand forsuch parts. (9)Anyreplacement partmaybeused intheperformance ofanywarranty maintenance orrepairs andmust beprovided without charge tothe owner. Suchusewillnotreduce thewarranty obligations ofCubCadet.
I NOTES
NOTES 35
MANUFACTURER'S LiMiTED WARRANTY The limited warranty set forth below is given by MTD LLC with respect to new merchandise purchased and used in the United States and/or its territories and possessions, and by MTD Products Limited with respect to new merchandise purchased and used in Canadaand/ or its territories and possessions (either entity respectively, "MTD").