
User`s manual


Lake Shore MTD Series Cryotest System User’s Manual
4-4 Operation
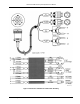
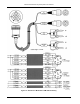
P-MTD-4-3.bmp
Figure 4-3. Typical 50-Pin Connector
4.2 MTD SYSTEM SHUTDOWN
At the completion of the test, the following steps will ensure proper shutdown of the system and avoid
contamination of the DUT by water vapor or other contaminants.
1. Shut off flow of cryogen by closing transfer line flow valve.
CAUTION: Do not over-tighten the flow valve. Over-tightening may damage the valve seat.
2. Disconnect transfer line from MTD cryostat bayonet receptacle. Remove transfer line.
3. Immediately cap MTD bayonet receptacle with the blank flange. Ensure rubber seal is used between
flange surfaces.
4. Slowly depressurize storage dewar before removing withdrawal tube.
NOTE: Follow proper helium handling procedures. Refer to Appendix E – Handling of Liquid
Helium and Nitrogen for further information.
5. Slowly remove withdrawal tube from storage dewar allowing it to warm so that o-ring seal does not
freeze.
6. Wipe all moisture from transfer line withdrawal tube and bayonet coupling.
NOTE: In order to prevent condensation of moisture, do not open the MTD System until all internal
parts are at room temperature. Because the MTD is designed to be thermally efficient, this will
take several hours without assistance.
NOTE: Do not vent and back-fill system with gas for a rapid warm-up.
NOTE: The MTD may be warmed to room temperature more rapidly by setting the temperature
controller to 295
– 305 Kelvin. This warms the second stage only. Therefore, additional warming
time is necessary once the second stage has warmed to ensure that the radiation shield is also
warmed.
NOTE: The Optional Model 1015 Warm-Up Power Supply may be used to rapidly warm the system.
This unit contains two power supplies and sensor monitor circuits. Both the first and second
stages can be warmed quickly and automatically. Power to the first and second stage heaters is
automatically shut off when room temperature is achieved. Typical warm up time using the
Model 1015 is 30 minutes at full power. Refer to Chapter 6 – Options and Accessories.