
Specifications


Fuel System And Carburetor
37
Re-assembly of the carburetor
NOTE: The carburetor used in this manual is a Walbro.
Depending on the application, the engine may
have a different carburetor. All carburetors have a
manufacturer name cast on them. Contact the car-
buretor manufacturer for the proper rebuild proce-
dure.
1. Place the carburetor in a clean area on the work
bench.
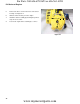
2. Inspect the needle valve seat assembly.
3. If the needle valve seat is damaged, replace the car-
buretor. See Figure 5.25.
4. Install the throttle valve assembly.
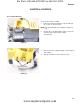
5. Clean the metering orifice\check valve with carbure-
tor cleaner.
6. Install the needle valve, valve lever and spring as one
assembly.
7. Tighten the hold down screw using a #2 phillips
screwdriver.
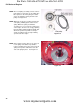
8. Set the needle valve lever as per the carburetor man-
ufacturer’s recommendations using a W-tool.
See Figure 5.27.
9. Install the gasket and diaphragm.
10. Install the cover.
Figure 5.25
Needle valve
seat
Figure 5.26
Orifice\check valve
! CAUTION! CAUTION
Do not insert anything into the ori-
fice to clean it. That will damage the
orifice resulting in the carburetor
being unrepairable. See Figure 5.26.
Figure 5.27
Needle valve lever
For Parts Call 606-678-9623 or 606-561-4983
www.mymowerparts.com