
Specifications


SECTION VII. CORRECTIVE MAINTENANCE
7-1.
7-2.
OVERVIEW. This section
describes corrective
maintenance of the Rosemount PP814T Power
Positioner. If specific cause of a problem is not
known, refer to Section V, Troubleshooting. Spare
parts referred to are available from Rosemount. Refer
to Section VIII of this manual for pat number and
ordering information.
1.
2.
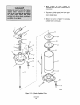
PARTS REPLACEMENT.
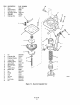
a. pilot
Valve.
Use the following procedure to
replace the pilot valve.
3.
4.
5.
6.
7.
8.
9.
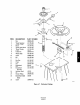
Remove power positioner from service.
Carefully hold upper end of pilot valve stem
(4, Figure 7-1) with a 5/16 inch open end
wrench. Free connecting link (1) from pilot
valve stem by turning lower connecting link
ball socket nut counterclockwise.
Tag and disconnect air supply connector (9)
from elbow (8). Tag and disconnect exhaust
connector (12) from connector (11).
Remove nuts (6) and lock washers (7) that
secure pilot valve (2) to pilot valve manifold
(5). Remove pilot valve body and cork
gasket (3) from pilot valve manifold.
Using a sharp putty knife, prepare gasket
surface of pilot valve manifold (5) and pilot
valve (2)
for new cork gasket by removing
any old gasket material or dirt. Use a clean
shop towel and solvent to clean gasket
surfaces.
Install pilot valve with new cork gasket
(3), securing with nuts (6) and lock
washers (7).
Connect air supply connector (9) to elbow
(8). Connect exhaust connector (12) to
connector (11)
Carefully hold upper end of pilot valve
stem (4). Attach connecting link (1) to
pilot valve stem by turning lower
connecting link ball socket nut clockwise.
Return power positioner to service.