
Specifications


Remove power positioner from service.
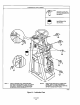
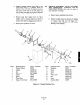
Carefully hold upper end of pilot valve stem
(4, Figure 6-2) with a 506 inch open end
wrench. Free connecting link (1) from pilot valve
stem by turning connecting link lower ball socket
nut counterclockwise.
Disconnect air supply tubing (8) from elbow (7).
Disconnect exhaust connector (11) from tube
connector (10).
Remove nuts (12) and lock washers (13) that
secure pilot valve to threaded studs (15) on pilot
valve manifold (17). Remove pilot valve and cork
gasket (14) from pilot valve manifold.
e. Remove screws (2) and valve cap (3) from pilot
V&S.
f. Remove pilot valve stem (4) from pilot valve.
g. Remove reducing bushing (9) from pilot valve.
h. Thoroughly clean pilot valve body (5), valve cap
(3) and pilot valve stem (4) in commercial dry
cleaning solvent. Allow pilot valve to completely
air dry. Do not use abrasive of any kind on pilot
valve stem. Thoroughly clean reducing bushing
(9) in commercial dry cleaning solvent.
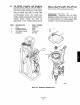
NOTE
pilot valve stem and valve body sleeve are a
matched set. If either is damaged or worn to
a non-serviceable condition, entire pilot
valve must be replaced.
i.
i
k.
1.
m
n.
0.
P.
Inspect pilot valve stem (4) and pilot valve sleeve
(6) for scoring. If any signs of wear or damage
are found, replace pilot valve.
Install pilot valve stem (4) into valve body.
Install reducing bushing (9) in pilot valve body.
Install valve. cap (3) on valve body with screws (2).
Install assembled pilot valve with new cork
gasket (14), securing with nuts (12) and lock
washers (13).
Connect air supply connector (8) to elbow (7).
Conneaexhaustconnector(ll)~blbeconnector(10).
Carefully hold upper end of pilot valve stem (4).
Attach connecting link (1) to pilot valve stem by
turning connecting link lower ball socket nut
clockwise.
Return power positioner to service.