Operator's Manual CRAFTSMAN 4-Cycle Electric Start Capable CULTIVATOR Model No. 316.299372 INCREDI-PULLAMIH™ e SAFETY e ASSEMBLY ¢ OPERATION CAUTION: Before using this product, * MAINTENANCE read this manual and follow all its Safety « PARTS LIST Rules and Operating Instructions. + LIFESPAN, P23 Bears Brands Management Corporation, Hoffman Estates, IL 60179 U.S.A.
TABLE OF CONTENTS Safety . Warranty Know Your Unit Specifications Assembly Rolland Fuel Starting and Stopping Operation Maintenance .. Cleaning and Storage... Speed Start™ Accessory Troubleshooting Repair Protection Agreements... Parts List Service Numbers Back Cover All information, illustrations and specifications in this manual ave based on the latest product information available at the time of printing. We reserve the right to make changes at any time without notice.
© IMPORTANT SAFETY INSTRUCTIONS « READ ALL INSTRUCTIONS BEFORE OPERATING WARNING: When using the unit, all safety lines must be followed. Please read these instructions before operating the unit in order to ensure the safety of the operator and any bystanders. Please keep these instructions for later use. A + Read the instructions carefully. Be familiar with the controls and proper use of the unit, » Do not operate this unit when tired, iil or under the influence of alcohol, drugs or medication.
SYMBOL * SAFETY & INTERNATIONAL SYMBOLS » This operator's mammal describes safely and international symbols and pictographs that may appear on this product. Read the operator's manual for complete safety, assembly, operating and maintenance and repair information. MEANING SYMBOL MEANING = SAFETY ALERT SYMBOL Indicates danger, warning or caution.
WARRANTY CRAFTSMAN TWO YEAR FULL WARRANTY FOR TWO YEARS from the date of purchase, this product is warranted against any defects in material or workmanship. A defective product will receive free repair or replacement if repair is unavailable. For warranty coverage details to obtain free repair or replacement, visit the web site: craftsmanship This warranty covers ONLY defects in material and workmanship.
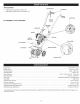
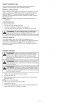
KNOW YOUR UNIT APPLICATIONS On/Off Switch » Cultivating sod and light to medium soil Handlebars. + Cultivating in garden areas, around trees, etc. — 7 2p Off Fill Plug Throttle Control NO ASSEMBLY TOOLS REQUIRED l Handlebar # Knobs / A Spark Plug Muffler Starter Fuel Cap Rope Grip a Primer Bulb Lower Handle Alr Filter Cover SPECIFICATIONS* . Al-Cooled, 4-Cycle Le 2Bec{tBeu ing .. 2,800 3,600 rpm Engine Type. . .. Displacement, . Idle Speed RPM. | Operating APM rpm Valve Clearance 0.003 0.006 in. {0.078 0.
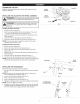
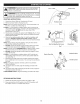
Le ASSEMBLING THE UNIT Begin by carefully unpacking the contents and making aura that bathing is damaged. INSTALLING AND ADJUSTING THE WHEEL ASSEMBLY WARNING: To prevent serious personal injury, the wheel assembly must be installed when operating the unit. WARNING: To avoid injury from the tines, wear heavy gloves and a long sleeve shirt when installing the wheel assembly. levees Pin Wheel Bracket __ Wheel Assembly pd Raise Lower Otter Pin Fig. 1 installing the Wheel Assembly 1.
sll To USING THE RIGHT OIL Use a high-quality SAE 30 weight ofl of AP! (American Petroleum Institute) service class 84, DO NOT use dirty oil. Failure to us ean olf of the correct type can cause premature engine wear and failure, yi ter oi ADDING OIL: INITIAL USE Furman Spout ~~ CAUSE SERIOUS PERSONAL INJURY. Check the ofl level . before each use. The importance of maintaining the proper Fig. 4 oil level cannot be overemphasized. Chang the ofl according to the Maintenance Schedule.
USING THE RIGHT FUEL The use of old fuel is the most common cause of performance problems, Use only fresh, clean unleaded gasoline Definition of Blended Fuels Today's fuels are often a blend of gasoline and oxygenates such as ethanol, methanol! or MTGE (ether). Alcohol-blended fuel absorbs water. As little as 1% water in the fuel can make fuel and ofl separate, forming acids when stored. ALWAYS use fresh fuel (less than 30 days old).
STARTING AND STOPPING outdoor area. Carbon monoxide exhaust fumes can be lethal in a confined area. WARNING: avoid accidentally starting the unit. To avoid serious injury, the operator and the unit must be in a sable position when pulling the starter rope (Fig. 8). ) WARNING: Operate this unit only in a well-ventilated STARTING INSTRUCTIONS 1. Check the oil level. Refer to Checking the Off Level. 2. Fill the fuel tank. Refer to Fueling the Unit.
NOTE: This unit can use a Speed Start™ Accessory! Please refer to the Speed Start™ accessory operator's manual for the proper use of this feature. (items Sold Separately! Hefner to the Speed Start™ Accessory section of this manual for more information about these Speed Start™ accessories.) STARTING INSTRUCTIONS 1. Check the ail level. Refer to Checking the Oif Level. 2. Fill the fuel tank. Refer to Fueling the Unit. NOTE: There is no need to turn the unit on.
OPERATION WARNING: Always wear ave, hearing, hand, foot and body protection to reduce the risk of injury when operating this unit. OPERATING TIPS 1. Move the cultivator fo the work area prior to starting the engine. Refer to Moving the Unit pick-up ar carry the unit while the engine is running. {) CAUTION: To prevent serious personal injury, never 2. Start the unit as described in the Starting instructions. 3. With the tines off the ground, squeeze the throttle control fo increase the engine speed, 4.
MAINTENANCE WARNING: To prevent serious injury, never perform &H maintenance or repairs while the unit is running. Always allow the unit to cool before servicing or repairing the unit. Disconnect the spark plug wire to prevent the unit from starting accidentally. MAINTENANCE SCHEDULE Perform theses required maintenance procedures at the frequency stated in the table. These procedures should also be a part of any seasonal tune-up. NOTE: Some maintenance procedures may require special tools or skills.
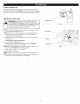
CHECKING THE OIL LEVEL WARNING: OVERFILLING THE CRANKCASE MAY A CAUSE SERIOUS PERSONAL INJURY. Check the oil level before each use. The importance of maintaining the proper oil level cannot be overemphasized, 1. Stop the engine and allow it to cool, 2. Set the unit on a flat, level surface, with the handles touching the ground, so that the engine is level (Fig. 11). NOTE: Failure to keep the engine level may cause the ofl to overfill. 3. Clean the area around the ofl fill plug (Fig.
MAINTAINING THE AIR FILTER WARNING: To avoid serious personal injury, always stop the engine and allow it to cool before cleaning or maintaining the unit. Failure to maintain the alr filter can result in poor performance or can causal permanent damage to the engine. Engine failure dus to improper alr filter maintenance is not covered by the product warranty. Cleaning the Air Filter 1. Open the alr filter cover by unscrewing the cover screw (Fig. 15). 2.
CHECKING THE ROCKER ARM CLEARANCE This adjustment requires disassembly of the engine. if you feel unsure or unqualified to perform this, fake the unit to a Sears or other qualified service dealer. The engine must be cold when checking or adjusting the rocker arm clearance. This task should be performed inside, in a clean, dust free area. 1. Remove the 6 screws from the engine cover with a flat-head screwdriver or T-25 Tory screwdriver (Fig. 18). Remove the engine cover. 2. Disconnect the spark plug wire, 3.
MAINTAINING THE SPARK PLUG 1. Stop the engine and allow it to cool. 2. Remove the 6 screws from the engine cover with a flat-head screwdriver or T-25 Tory screwdriver (Fig. 181. Remove the engine cover, 3. Grasp the spark plug boot firmly and pull it from the spark plug. 4. Clean around the spark plug. Removes the spark plug from the cylinder head with a socket, fuming counterclockwise. 0.025 In, WARNING: Do not sand blast, scrape or clean spark plug {0.635 mm} electrodes.
CLEANING AND STORAGE CLEANING WARNING: To avoid serious personal injury, always stop the engine and allow it to cool before cleaning or maintaining the unit. A Use a small brush to clean the outside of the unit. Do not use strong detergents. Household cleaners that contain aromatic oils such as pine and lemon, and solvents such as kerosene, can damage plastic. Wipe off any remorseful with a soft cloth. 18 STORAGE * Never store a fueled unit whets fumes may reach an open flame or spark.
SPEED START ACCESSORY This unit can be started with an optional Speed Stant™ accessory {terns sold separately). Please contact your local Craftsman retailer, call 1-800-4-MY-HOME® or visit craftsmanship for more information. tem No. Description 3168.85051 316.85982 516.
TROUBLESHOOTING PROBLEM SOLUTION THE ENGINE WILL NOT START | beteprkbonpn flee tee The primer bulb was not pressed enough Press the primer bulb 10 times or until fuel is visible Ean diam dae SE RE The spark plug is fouled Replace the spark plug | The eid eae sia ies in fhe ploselipieien TF Wale Te Can se es pen THE ENGINE WILL NOT IDLE Lot late ay r kdb bet ner = The fuel is old (over 30 days) Drain the fuel tank and add fresh fuel Inge Lo THE ENGINE WILE NOT ACCELERATE The fuel is old {over 30 days} Drain
REPAIR PROTECTION AGREEMENTS Congratulations on making a smart purchase. Your new Craftsman® product is designed and manufactured for years of dependable operation. But like all products, it may require repair from time to time. That's when having a Repair Protection Agreement can save you erroneous and aggravation.
Manual del Operador CRASCITARAN Motor de 4 tiempos Con Posibilidad de Arranque Eléctrico CULTIVADOR Modelo No. 316.299372 * SEGURIDAD PRECAUCIÓN: Antes de utilizar, este : ea E producto lea este manual y siga todas las reglas de seguridad e instrucciones « MANTENIMIENTO de operación. » LISTA DE PIEZAS Seras Brandy Alemanamente Corporativo, Hoffman Estayes, IL 60179 U.S.A. Visite nuestro sitio web: www.craftsman.
TABLA DE CONTENIDO Seguridad Garantía Conozca su unidad Especificaciones | Ensamblaje Aceite y combustible . Tranque y parada Operación Mantenimiento . Limpieza y almacenamiento Accesorio Peed Start™ Localización y solución de problemas Convento de protección de reparación . . Lista de piezas Rimeros de servicio . Toda la información, las ilustraciones y especificaciones que correntie este manual se basan en la información mas reciente del producto, existente en ef momento de la impresión.
« INSTRUCCIONES DE SEGURIDAD IMPORTANTES LEA TODAS LAS INSTRUCCIONES ANTES DE OPERAR LA UNIDAD ADVERTENCIA: Al usar la unidad deben seguirse todas & las normas de seguridad. Lea estas instrucciones antes de operar le unidad a fin de garantizar la seguridad del aperador y de cualquier otra persona presente. Guarde esas instrucciones para poder usarlas mas adelante. + Lea detenidamente las instrucciones, Familiarice con los controles y el uso adecuada de la unidad.
+ Espera a que el motor se enfrié para guardar o transportar la unidad. Cerciórese de asegurar bien la unidad al transportarla. « Guarde fa unidad en un lugar seco, bajo lave o en alto, a funde evitar su uso no autorizado o afiche. Manténgala fuera del alance de los nidios. * No moje ni rocía la unidad eon agua ni con niegan otro liquido. Mantenga los mangos secos, impíos v sin suciedades. Limpie la unidad después de cada uso, consulte las instrucciones de Limpieza y malmarriento.
GARANTÍA GARANTÍA TOTAL POR DOS ANOS CRASCITARAN Este producto se garantiza POR DOS ANOS a partir de la fecha de compra, contra cualquier defecto de materiales o mano de obra, Un producto defectuoso se reparar sin costo alguno © se remplazar si no es posible repararlo. Para conocer los detalles de la cobertura de garantía para Ia reparación o reemplazo gratuitas, visite el sitio web: www.craftsman.com Esta garantía cubre SOLAMENTE defectos de materiales o mane de obra.
CONOZCA SU UNIDAD uses Interruptor de Encendida / Apagado Manubrios * Cultivar tierra herbosa y tierra negrea ligera a mediana.
[SNF TE ENSAMBLE DE LA UNIDAD Desembale con cuidado ef contenido v verifique gue no haya piezas da fiadas, Pasador de Quia de horquilla ia rueda Ensamblaje INSTALACIÓN Y AJUSTE DEL ENSAMBLAJE DE LA RUEDA de Ja rueda a ADVERTENCIA: Para evitar lesiones personales graves, Subir ~~ A el ensamblaje de la ruada debe ser instalado antes de poner Bajar Pasador de en funcionamiento la unidad. chaveta rueda y para evitar lesionarse con los dientes, use guantes resistentes y camisa de mangas largas.
ACEITE Y COMBUSTIBLE USAR EL ACEITE CORRECTO Use un aceite de alta calidad SAE 30 de API (Amaricen Petrolero Instituye) de la categoría de servicio 84. NO use aceite sucio. Sino usa aceite limpio del tipo correcto, puede ocasionar desgaste y fallas prematuras del motor. ANIDAR ACEITE: USO INICIAL PUEDE CAUSA LESIONES PERSONALES GRAVES. Compruebe el nivel de aguaite antes de cada uso. No se puede subestimar la importancia de mantener ef nivel adecuado de aceita.
USAR EL COMBUSTIBLE CORRECTO El uso de un combustible viejo es [a causa mas comino de problemas da funcionamiento. Utilice solamente gasolina fresca, pimpla v sin plomo. Definición de combustibles mezclados Los combustibles actuales son can frecuencia una mezcla de gasolina e hidrocarburos oxigenados como ef etano, metano o TUMBE (éter). El combustible mezclase con alcohol absorbe agua. Un 1% de agua es suficientes para separar la mezcla de aceite y alcohol o formar ácidos al estar guardado.
ARRANQUE Y PARADA ADVERTENCIA: Opere esta unidad solamente en un área exterior bien ventilada. El moriondo de carbone de fos gases de escape puede ser letal en un rea confinada. ADVERTENCIA: Evite arrancar Ia unidad por accidenta. A fin de evitar lesiones graves, el operador y la unidad deben estar sn una posición estable al trae de la cuerda de arengue (Fig. 8). 4 bh INSTRUCCIONES DE ARRANQUE 1. Verifique el nivel de aceite. Consulte la sección Como comprobar el nivel de aceite. 2.
NOTA: En esta unidad se puede usar un accesorio Peed Start™, Para utilizar correctamente este dispositivo, consulte al manual del aperador del accesorio Peed Start™, {Los accesorios se vendan por separado! Para informarse mas sobre los accesorios Peed Start™, vaya a la sección Accesorio Peed Start™ de este manual) INSTRUCCIONES DE ARRAIGUE 1. Verifique el nivel de aceite. Consulte la sección Como comprobar of nivel de aceite. 2. Llene el tanque de combustible, Consulte Abastecer de combustible la unidad.
OPERACIÓN i) ADVERTENCIA: Al operar esta unidad, leve siempre puesta colacionar para los ojos, oses, pies y cuerpo a fin de reducir el riesgo de lesiones, CONSEJOS PARA LA OPERACIÓN 1. Transporta ef cultivador hacia of rea de trabajo antes de atancar ef motor. Consulte Mover Ja unidad. ADVERTENCIA: Para evitar graves lesiones A personales, nunca levante ni transporte la Unidad con ef motor en marcha, 2. Arraigue la unidad siguiendo las instrucciones de arranque. 3.
MANTENIMIENTO ADVERTENCIA: Para evitar lesiones graves, no haga nunca niegan mantenimiento ni reparación con fa unidad funcionando. Siempre deje que fa unidad se enfrié antes de darle mantenimiento o repararla. Desconecte el cable de la bufa para evitar que la unidad arranque por accidente. 4 PLAN DE MANTENIMIENTO Nieve a cabo los procedimientos necesarios de mantenimiento con Ia frecuencia indicada en la tabla. Estos procedimientos deberán también formar parte de cualquier ajuste de temporada.
COMO COMPROBAR EL NIVEL DE ACEITE ADVERTENCIA: LLENAR DEMASIADO EL CÁRTER A) PUEDE CAUSAR LESIONES PERSONALES GRAVES. Compruebe el nivel de aguaite antes de cada uso. No se puede subestimar la importancia de mantener ef nivel adecuado de aceite. 1. Detenga el motor y déselo enfriar 2. Coligue la unidad sobre una superficie plana con las manijas tocando el suelo de manera que el motor quede nivelado (Fig. 11). NOTA: No mantener sl motor nivelado pueda causar que el aceite se derrame. 3.
MANTENIMIENTO DEL FILTRO DE AIRE ADVERTENCIA: Para evitar lesiones personales graves, apague siempre el motor y deje que se enfrié antes de limpiar o dar mantenimiento la unidad. No dar mantenimiento al filtro de aire correctamente puede hacer que el motor funcione mal o da fiarlo para siempre. La falta del motor debida al mantenimiento inadecuado del filtro no esta cubierta por ja garantía del producto. Limpiarnos ef filtre de aire 1.
COMA COMPROBAR LA HOLGURA DEL BALANCÍN Para hacer este ajuste es necesario desarmar el motor. Si usted no asta seguro o no se considera calificado para realizar esto, Leve la unidad a Seras 0 a otro centro de servicio calificado. El motor tinge que estar frió cuando verifique o ajuste la holgura del balancín. Esta tarea debe realizarse en interiores, en un rea impla vy libre de polvo. 1. Quite los 6 dormitorios de la tapa del motor con un destornillador plano 0 un destornillador Toro A-25 Fig. 18).
MANTENIMIENTO DE LA BUJÍA 1. Detenga el motor y déjelo enfrían 2. Quite los 8 omniscios de la tapa del motor con un destornillador plena © un destornillador Toro A-25 (Fig. 18). Quite fa cubierta del motor 3. Agarre firmemente la pipa (capucha) vy sáquela de la bujía. 4, Limpie alrededor dg la bujía. Saque la bujía de la culata giran dela en sentido contrario a la agujas del reloj con una llave de bujía de 5/8 de pulgada. 4.025 guipadas {) ADVERTENCIA: No sople, raspe ni limpie los electrodos {0.
LIMPIEZA Y ALMACENAMIENTO LIMPIEZA graves, apague siempre ef motor y deje que se enfrié antes de Limpiar o dar mantenimiento a fa unidad. {) ADVERTENCIA: Para evitar lesiones personales Use un cepillo pequeñito para limpiar la unidad por fuera. No utilice detergentes fueres. Los limpiadores caseros que contienen aceites esenciales, por jimplo. de pune v limen, y los solventes como el queroseno, pueden defiar el plastia. Seque la humedad con un pafio suave.
filatelia NT alcoholato loboso sie lo Nu) sii Pide la Felicitaciones por haber hecho una compra inteligente. Su nuevo producto Craftsman® fue diseñado y fabricado con vistas a una operación contable por afinos. Pero como todos los productos, es posible que sea necesario repararlo alguna vez. Ahi es cuando tener un Convenio de Protección de Reparación puede ahorrarle dinero y problemas.
REE REPLACEMENT PARTS MODEL 316.299372 ELECTRIC START CAPABLE 4-CYCLE CULTIVATOR tem Fart No.
LGBT REPLACEMENT PARTS MODEL 316.290372 ELECTRIC START CAPABLE 4-CYCLE CULTIVATOR items Part No.
Your Home For troubleshooting, product manuals and expert advice: E @ manageability www.managemylife.com For repair — in your home ~ of all major brand appliances, lawn and garden equipment, or heating and cooling systems, no matter who made it, no matter who sold it! For the replacement parts, accessories and owner's manuals that you need to do-it-yourself. Lo For Sears professional installation of home appliances | and items like garage door openers and water heaters.