Operator's Manual CRAFTSMAN 4-Cycle 20D Cultivator Model No. 316.299371 * SAFETY s ASSEMBLY * OPERATION s MAINTENANCE * PARTS LIST = LIFESPAN, P. 13 CAUTION: Before using this product, read this manual and follow all safety rules and operating instructions. Plug-In Power Start or Power Bit Start Optional! This unit'has a separately sold alternative starting method that many find easier than pulling a rope..
RULES FOR SAFE OPERATION CALIFORNIA PROPOSITION 65 WARNING WARNING A THE ENGINE EXHAUST FROM THIS PRODUCT CONTAINS CHEMICALS KNOWN TO THE STATE OF CALIFORNIA TO CAUSE CANCER, BIRTH DEFECTS OR OTHER REPRODUCTIVE HARM. TABLE OF CONTENTS Safety Rules Warranty Know Your Unit . . Assembly Instructions Off and Fuel Information Starting/Stopping Instructions Operating Instructions... Maintenance and Repair st ructions | Cleaning and Storage Optional Equipment... Troubleshooting Chart Specifications Parts List...
RULES EOR SAFE OPERATION Always hold the unit with both hands when operating, Keep a fim grip on the handier, Keep hands, face, and feet at & distance from all moving parts. Do not touch or fry fo stop the tines while they are rotating, Do not touch the engine or muffler, These parts get extremely hot from operation, They remain hot for a short time after turning off the unit, Do not operate the engine taster than the speed needed for the job. Do rot run the engine at high speed when the unit is not in us.
aia ER hae CRAFTSMAN 2 YEAR FULL WARRANTY FOR 2 YEARS from the date of purchase, this product is warranted against any defects In material or workmanship. Defective product wit receive free repair of free replacement If repair is unavailable.
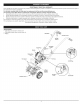
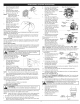
ASSEMBLY INSTRUCTIONS POSITIONING THE HANDLEBARS 1 Loosen the two knobs op the inside of the handlebars (Fig. 1). 2. With the unit upright, swing the handlebars ap into the operating position (Fig. 2). NOTE: Take care not fo pinch the throttle cable or switch wires when positioning the handlebar. 3. Tighten the knobs to secure the handlebars In place NOTE: Do not over-tighten the knobs. 4. Reconnect the spark plug wire to the spark plug.
STARTING/STOPPING INSTRUCTIONS STARTING/STOPPING INSTRUCTIONS WARNING: Operate this unit only in a well-ventilated outdoor area. Carbon monoxide exhaust fumes can be lethal in a confined area, starting position when pulling the starter rope (Fig. 10}. To avoid serious] fi) WARNING: Avoid accidental starting. Make sure to be in the injury, the operator and unit must be in a stable position while starting. NOTE: This unit uses the Incredi-Pull™ starting system.
MAINTENANCE & REPAIR INSTRUCTIONS MAINTENANCE & REPAIR INSTRUCTIONS MAINTENANCE SCHEDULE or paisleys with Nit running. Always services and repair a cool Ln 4) WARNING: To prevent serious injury, never perform maintenance Pertinent hes required maintenance procedures st the frequency stated in the table, These procedures should aide be a part of any seasonal tune-up, 6 the oll level Is not touching the inner most thread on the oil ill Role, acd a small amount of ail to the ol fll hole and recheck (Fig. 17).
MAINTENANCE & REPAIR INSTRUCTIONS Apply enough clean SAE 30 motor off {o lightly coat the fighter (Fig. 21% 5. Squeeze the fair to spread and remove execs ofl (Fig, 22} 6. Replace the filter (Fig. 19) NOTE: Operating the Li nit without the aie fitter, will WOOD the warranty. 7. Albigensian the alr filter cover. Position the sleighs on the lop of the air filler cover ante the tabs at the top of the back plate (Fig. 19) 8.
MAINTENANCE & REPAIR INSTRUCTIONS OPTIONAL ACCESSORY: dirty spark plug. Set the ab gap at G.085 In, (0.635 min} Using 2 feeler gauge (Fig. 28}. 5 Install a comely-gapped spark plug in the cylinder head, Tum the 5/8 in. socket clockwise until snug. 1f using a torus wrench toughie to: 110-120 inedible, Nem) to not over-tighten, SPARK ARREST OR MAINTENANCE 1 Remove the rear engine cover See Rocker Arm Clearance. 2. With a flat blade screwdriver of Tory T-20 bit and a 7-25 bit.
PROBLEM SOLUTION Leon Ea re Therapy fuel dank Fill fuel tank with fuel Primer bulb wasn’t pressed enough Press primer bulb fully and slowly 10 tines hed fuel Drain gas tank and add fresh fuel Fouled spark plug Replace or clean the spark plug Plugged spark arrest or Clean or replace spark arrest or Cold Weather. Start Aver. in the closed position Move Cold Weather Start Lever io.
SPECIFICATIONS es PENGUIN TDR. «woo ett teat et ett ete et eee ee ee eee eee Rena. Al-Co Oi, 4-Cycle DIFFERENTIABLE LoL L.L\ et ete et eee ee ee eee. 288C Opportune RPM 6800 pm Hie SPERM RPM. LL. 2.800 3.800 pm Ignition Type... Electronic Ignition Switch . Val clearance. . Rocker Switch in. mm) Spark Plug Gap. 0.025 inch (0.835 my Spark Plug. Bi Bi , Champion RDZ4H or equivalent plug Lubrication eee eee Cu. SALESGIRL Crankiness Of Capacity. 3.04 0z (80 rly Fuse | Unleaded Carburetor .
Manual del Operador LID) 4 Ciclos CULTIVADOR Modelo No. 316.299371 *» SEGURIDAD * MONTAJE » FUNCIONAMIENTO e MANTENIMIENTO » LISTADO DE PIEZAS PRECAUCIÓN: Lea el manual del operador y siga todas las advertencias e instrucciones de seguridad.
INSTRUCCIONES DE ENSAMBLE COLOCACIÓN DEL MANUBRIO 1 Afloje las dos perillas del lado interior dal manubrio (Fig. 1). 2. Con ia unidad en posición vertical, gris el ubican hacia arriba hasta a posición de operacional Fig, 2). NOTA: Tenga cuidado de ne paralizar ¢l cable dal regular © los cables del interruptor cuando catalogas ef manubrio, 3 Ruste tas perillas para aseglarar el manubrio en su Peritas del manubrio lugar. NOTA: No guste las perillas demasiado. 4. Vuelva a conectar Ia biga de encendido.
INSTRUCCIONES DE OPERACIÓN INSTRUCCIONES DE MANTENIMIENTO Y REPARACIÓN CONSEJOS PARA LA OPERACIÓN §) ADVERTENCIA: Para abitar graves lesiones personales, nunca levante af transporte la unidad con & motor en marcha. 1 Mueva ef cultivador al área de trabajo antes de arrancar el rotor. Puede transportar ¢l cultivador empujándolo sobre las ruedas © previniéndolo del tubo central de la manija, 2. Manque la unidad siguiendo las instrucciones de arranques. 5.
INSTRUCCIONES DE MANTENIMIENTO Y REGIONARIO CAMBIO DEL ACEITE cuando maneje ta Unidad. ) PRECAUCIÓN: Use guantes para abitar sufrir lesiones En un motor nuevo, cablear el aceite después de as 10 primates horas de operación. Cambie el aceite mientras ef motor atina esta caliente, El acata uid con libertad y levara miss impurezas, 1. Retire 6l tapan de aceite 2. Vierta el aceite fuera del orificio de Nacionales de aceite en un recipientes inclinando ka unidad hasta una pesticida vertical (Fig.
INSTRUCCIONES DE MANTENIMIENTO Y REPARACIÓN HUELGO DEL BRAZO OSCILANTE & ADVERTENCIA: Al apagar la unidad, atiesase de que el accesorio de corte se haya detenido antes te apoyar la unidad para provenir graves lesiones personales. Esto requiere desarmar ef motor.
PHL REPLACEMENT PARTS MODEL 316.
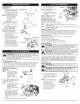
PARTS LIST REPLACEMENT PARTS MODEL 316.209371 4-CYCLE CULTIVATOR lem Part No. Description 791-182575 Grip TEE-08008 Switch Assembly 753-04008 Screw 7653-04186 Weld newt 75808007 Throttle Assembly 791-182882 Upper Handle 791182677 Knob 791-182898 Bolt 753-06008 Lower Handle Assembly 75308012 Bok 11 75804052 Washer 12753-04056 Look Nut 13 753.
it fixed, at your home or ours! Your Home For troubleshooting, product manuals and expert advice: @ manageability www.managemylife.com For repair — in your home ~ of all major brand appliances, lawn and garden equipment, or heating and cooling systems, no matter who made it, no matter who sold it! For the replacement parts, accessories and owner's manuals that you need to do-it-yourself. For Sears professional installation of home appliances and items like garage door openers and water heaters.