® Operator s Manual TABLE 2-Cycle Gas Cultivator Y125 OF CONTENTS Service information ..................................... 1 Rules for Safe Operation ................................. Know Your Unit ........................................ 2 5 Specifications ......................................... Assembly instructions ................................... Oil and Fuel Information ................................. 5 6 7 Starting and Stopping instructions .........................
SPARK ARRESTOR NOTE The purpose of safety symbols is to attract your attention to possible dangers. The safety symbols, and their explanations, deserve your careful attention and understanding. The safety warnings do not by themselves eliminate any danger. The instructions or warnings they give are not substitutes for proper accident prevention measures. i SYMBOL MEANING _ Failure to obey a safety DANGER signal WILL result in ANGER: serious injury Signals or deathantoEXTREME yourself orhazard.
* iMPORTANT SAFETY iNSTRUCTiONS READ ALL iNSTRUCTiONS BEFORE OPERATING This unit has a clutch. The tines remains stationary when the engine is idling. If it does not, have the unit adjusted by an authorized service technician. WARNIN6: When using the unit, you must follow the safety rules. Please read these instructions before operating the unit in order to ensure the safety of the operator and any bystanders. Please keep these instructions for later use.
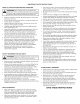
,, SAFETY AND iNTERNATiONAL SYMBOLS ,, This operator's manual describes safety and international symbols and pictographs that may appear on this product. Read the operator's manual for complete safety, assembly, operating, maintenance, and repair information. SYMBOL L SYMBOL ,= SAFETY ALERT SYMBOL Indicates danger, warning or caution. May be used in conjunction with other symbols or pictographs. _ _ib _]l MEANING I I_ .
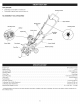
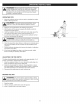
APPLiCATiON • Cultivating sodandlight to medium = soil in garden areas, around trees, etc. Cultivating Throttle Control NO ASSEMBLY TOOLS REQUIRED Upper Handle Starter Rope Grip \ Air Filter Cover Muffler On/Off Control Choke Lever Spark Plug Handlebar Knobs \ Fuel Cap Primer Bulb Tine Guard Lower Handle Gear Box Assembly Tines Engine Type ....................................................................................... Displacement ..................................................
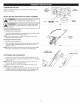
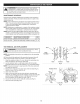
ASSEMBLING THE UNiT Begin by carefully unpacking the contents and making sure that nothing is damaged. Adjust%ent Button t iNSTALLiNG AND ADJUSTING THE WHEEL ASSEMBLY _ assembly must To beprevent installedserious when operating the unit. ARNING: personal injury, the wheel _ gloves and a long sleeve shirt when installing the wheel WARN'N6: To avoid injury from the tines, wear heavy assembly. As_eebl,, l I Wheel Lower _ Raise "_-____ Bracket Fig. 1 Installing l the Wheel Assembly 1. 2.
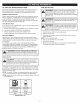
OiL AND FUEL MiXiNG iNSTRUCTiONS FUELING THE UNiT Old and/or improperly mixed fuel are the main reasons for the unit not running properly. Be sure to use fresh, clean unleaded fuel. Follow the instructions carefully for the proper fuel/oil mixture. WARNING: Gasoline is extremely flammable, ignited vapors may explode. Always stop the engine and allow it to cool before filling the fuel tank. Do not smoke while filling the tank. Keep sparks and open flames at a distance from the area.
WARNING: Avoid accidental starting. Make sure you are in the starting position when pulling the starter rope (Fig. 6). To avoid serious injury, the operator and unit must be in a stable position while starting. ThrotUe Control Start/On (I) On/Off Control STARTING iNSTRUCTiONS 1. Mix gasoline with oil. Refer to Oil and Fuel Mixing Instructions. 2. Fill the fuel tank. Refer to Fueling the Unit. NOTE: There is no need to turn the unit on. The On/Off Control is in the ON ( I ) position at all times (Fig.
WARNING: Dress properly to reduce the risk of injury when operating this unit. Do not wear loose clothing or jewelry. Wear eye and ear/hearing protection. Wear heavy long pants, boots and gloves. Do not wear short pants, sandals or operate barefoot. OPERATING TiPS 1. _h_ Move the cultivator to the work area prior to starting the engine. Refer to Moving the Unit. pick-up or carry unit while engine isinjury, running. AUTION: To the prevent seriousthepersonal never ] 2.
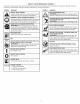
WARNING" To prevent serious injury, never perform maintenance or repairs with unit running. Always service and repair a cool unit. Disconnect the spark plug wire to ensure that the unit cannot start. MAINTENANCE SCHEDULE Perform these required maintenance procedures at the frequency stated in the table. These procedures should also be a part of any seasonal tune-up. NOTE: Some maintenance procedures may require special tools or skills.
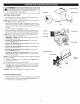
AiR FILTER MAINTENANCE Air Filter Cover Screen Cleaning the Air Filter Failure to maintain your air filter properly can result in poor performance or can cause permanent damage to your engine. 1. Open the air filter cover by unscrewing the cover screw (Fig. 10). 2. Remove the air filter and the screen that sits behind it (Fig. 10). 3. Wash the filter in detergent and water. Rinse the filter thoroughly and allow it to dry. Air Filter 4. Apply enough clean SAE 30 motor oil to lightly coat the filter. 5.
REPLACING THE SPARK PLUG f 1. Stop the engine and allow it to cool. Grasp the spark plug wire firmly and pull the cap from the spark plug. 2. Clean dirt from around the spark plug. Remove the spark plug from the cylinder head by turning a 5/8 in.socket counterclockwise. _ electrodes. in the engineblast, couldscrape damage the cylinder. ARNING: GritDo not sand or clean J 3. inspect the spark plug.
your unit off andToallow cool before youinjury, clean always or service WARNING: avoidit to serious personal turnit. J CLEANING o Use a small brush to clean off the outside of the unit and to keep the air vents free of obstructions. o Do not use strong detergents or petroleum based cleaners, like kerosene. Some household cleaners contain aromatic oils such as pine and lemon that can damage the plastic housings or handles. Wipe off any moisture with a soft cloth.
i CAUSE ACTION Empty fueltank Fillfueltankwithproperly mixed fuel Engine isflooded Place chokeleverintoposition 3,squeeze thethrottletrigger and pullthestarterrope Fouled sparkplug Replace orcleanthesparkplug Thefuelisold(over30days)and/orimproperly mixed Drainthefueltankandaddfresh,properly mixedfuel !_i@ !!!!!!!!!!!!!!!!!!!!!!!!!!!!!!!!!!!!!!!!!!!!!!!!!!!!!!!!!!!!!!!!!!!!!!!!!!!!!!!!Li!!! _ _ _ Dirty air filter Clean or replace the air filter Fouled spark plug Replace or clean the spark plu
MANUFACTURER'S LiMiTED WARRANTY FOR: The limited warranty set forth below is given by MTD LLC (MTD) with respect to new merchandise purchased and used in the United States, its possessions and territories. MTD warrants this product against defects in material and workmanship for a period of two (2) years commencing on the date of original purchase and will, at its option, repair or replace, free of charge, any part found to be defective in material or workmanship.
Manuel de L'utilisateur TABLE Cultivateur de Jardin & 2-temps Y125 DES MATII_RES Service technique ..................................... Consignes de securit6 .................................. 17 18 Familiarisez-vous avec votre appareil ...................... Caracteristiques ...................................... instructions de montage ................................ Informations sur I'huile et le carburant ..................... 21 21 22 23 instructions de demarrage et d'arr_t ..................
PARE-ETINCELLES Les symboles de securit6 attirent votre attention sur des dangers potentiels. Ces symboles et leurs details explicatifs meritent que vous les lisiez et compreniez bien. Les avertissements de securit6 ne peuvent eviter les dangers de par eux-m_mes. Les consignes ou mises en garde qu'ils donnent ne remplacent pas des mesures preventives appropriees contre les accidents.
• IMPORTANTES LIRE TOUTES LES iNSTRUCTiONS CONSIGNES DE S¢:CURIT¢: • AVANT UTILISATION PENDANT L'UTILISATION DE L'APPAREIL I'1 Portez des lunettes de s6curite conformes aux normes ANSi Z87.1-1989 ainsi que des prot_ge-oreilles durant I'utilisation de I'appareil. Portez un masque facial ou antipoussieres si vous travaillez darts un lieu poussiereux. Portez des pantalons epais et longs, des bottes, des gants et une chemise & manches Iongues.
AUTRES AVERTISSEMENTS ,i, DE SC:CURIT¢: Ne trempez et n'arrosez jamais I'appareil avec de I'eau ou tout autre liquide. Gardez les poignees s_ches, propres et exemptes de debris. Nettoyez apr_s chaque usage. Voir les sections Nettoyage et Entreposage. Conservez ces instructions. Consultez-les souvent et servez-vous en pour instruire d'autres usagers. Si vous pr6tez I'appareil a quelqu'un, pr_tez-lui egalement ces instructions.
USAGE • Cetappareil sert&travailler lesolavantdelegazonner ainsique dessols&texturelegere oumoyenne. IIpeutaussi_treutilisepourcultiver danslesjardins, autourdes arbres, etc. Manette desgaz AUCUN OUTIL NECESSAIRE Poign_e sup_rieure Poign_e de la corde de d_marrage Couvercle du fiitre _ air Levier Commande Marche/Arr_t _, d'_trangJement BougJe poign_e Boutons de _ Bouchon du carburant I.
MONTAGE DE L'APPAREIL Deballez soigneusement endommag& le contenu et assurez-vous Bouton de ,,_^ ,4^ la hauteur que rien n'est , DRsposRt# d assemblage des roues iNSTALLATiON ET REGLAGE DU DISPOSITIF D'ASSEMBLAGE DES ROUES / _ dispositif d'assemblage des roues dolt _tre installe avant de VERTISSEMENT : Afin d'eviter toute blessure grave, le faire fonctionner I'appareil.
Mi_LANGE D'HUILE ET DE CARBURANT En gen6ral, si I'appareil ne fonctionne pas correctement, c'est que le carburant est vieux ou mal m61ange. Prenez soin d'utiliser de I'essence sans plomb fraiche et propre. Suivez & la lettre les instructions de melange de carburant et d'huile. D6finition des carburants m61ang6s Les carburants d'aujourd'hui sont souvent un melange d'essence et d'oxygen6s comme I'ethanol, le methanol ou I'ether MTBE. Un carburant m61ange & I'alcool absorbe I'eau.
AVERTISSEMENT : evitez tout demarrage accidentel. Tenez-vous en position de demarrage Iorsque vous tirez sur la corde de demarrage (Fig. 6). L'operateur et I'appareil doivent tous deux 6tre en position stable pour eviter des blessures graves. iNSTRUCTiONS Manette D6marrage des gaz Cornrnande Marche/Arr6t (I) DE DC:MARRAGE 1. Melanger I'essence et I'huile. Consulter les Instructions de melange de I'huile et de I'essence. 2. Remplir le reservoir de carburant.
AVERTISSEMENT : Portez des v_tements appropries pour diminuer les risques de blessures durant I'utilisation de I'appareil. Ne portez pas de v_tements amples ni de bijoux. Portez des lunettes de securit6 et des prot_georeilles. Portez des pantalons epais et longs, des bottes et des gants. Ne marchez pas pieds nus et evitez les pantalons courts et les sandales. CONSEILS D'UTIUSATION 1. Deplacez le cultivateur vers le lieu de travail avant de demarrer le moteur.
AVERTISSENIENT : pour eviter tout accident, n'effectuez jamais I'entretien ou des reparations quand I'appareil fonctionne. Effectuez-les toujours Iorsqu'il est froid. Debranchez le c&ble de la bougie pour prevenir la raise en route. PROGRAMME D'ENTRETIEN L'entretien doit respecter la frequence indiquee dans le tableau cidessous. II doit egalement faire pattie de toute raise au point saisonniere. REMARQUE : certaines procedures d'entretien necessitent des competences ou des outils particuliers.
ENTRETIEN DU FILTRE A AiR Couvre Nettoyage du filtre _ air du filtre & air Tout manquement & I'entretien du filtre & air peut entra_ner une baisse de performances ou causer des d6g&ts permanents a votre moteur. 1. Ouvrez le couvercle du filtre & air en desserrant la vis du couvercle (Fig. 10). 2. Retirez le filtre & air et I'ecran derriere lui (Fig. 10). 3. Lavez le filtre avec du detergent et de I'eau. Rincez-le soigneusement et laissez-le s6cher. 4.
REMPLACEMENT DE LA BOUGIE f 1. Arr_tez le moteur et laissez-le refroidir. Saisissez fermement le c&ble de bougie et retirez le capuchon de celle-ci. 2. Nettoyez le pourtour de la bougie. Retirez la bougie de la culasse en tournant la douille de 5/8 po _ gauche. [_J nettoyer les electrodes car de la salete darts le moteur ISE EN GARDE le : evitez de sabler, gratter ou pourrait endommager cylindre. J 3. Verifier la bougie d'allumage.
eteignez toujours la d6sherbeuse et laissez-la refroidir AVERTISSEMENT pour eviter des blessures graves, avant tout nettoyage ou : entretien. J N ETTOYAG E o Nettoyez les events ou I'exterieur de I'appareil avec une petite brosse. o N'employez pas de detergents concentres ou de nettoyants base de petrole tel le k6ros_ne. Certains nettoyants menagers contenant des huiles aromatiques tel que le pin et le citron peuvent endommager les boitiers ou poignees en plastique.
CAUSE SOLUTION Reservoir de carburant vide Remplissez-le de carburant bien melang6 Moteur noye Placez le levier de I'etrangleur en position 3, appuyez sur la manette des gaz et tirez le cordon du demarreur.
GARANTIE LIMITEE DUFABRICANT POUR: La garantie limitee enonc6e ci-apr_s est accordee par MTD LLC et concerne les marchandises neuves achetees et utilisees aux F:tats-Unis, ses possessions et territoires. MTD LLC garantit ce produit contre tout vice de matiere ou de fagon pendant une periode de deux (2) ans & compter de la date d'achat initiale et elle se reserve le choix de reparer ou de remplacer, & titre gratuit, toute piece presentant un vice de matiere ou de fagon.
ual del Operad INDICE Cutivador de 2 Cicios a Gasolina Y125 DE CONTENIDOS Llamadas a apoyo al cliente ............................. Normas para una operaci6n segura ....................... Conozca su unidad .................................... 33 34 37 Especificaciones ...................................... Instrucciones de ensamble .............................. 37 38 Informaci6n del aceite y del combustible ................... Instrucciones de arranque y apagado ......................
PARACHISPAS Los simbolos de seguridad se utilizan para Ilamar su atenci6n sobre posibles peligros. Los simbolos de seguridad y sus explicaciones merecen toda su atenci6n y comprensi6n. Los simbolos de seguridad no eliminan ningQn peligro por si mismos. Las instrucciones o advertencias que ofrecen no substituyen las medidas adecuadas de prevenci6n de accidentes. i SIMBOLO _ _ NOTA: Para los usuarios en tierras forestales de los EE.UU. yen los estados de California, Maine, Oregon y Washington.
• IMPORTANTE INFORMACION LEA TODAS LAS INSTRUCCIONES OPERACI()N ANTEST DE LA Use lentes o gafas de protecci6n que cumplan con las normas ANSi Z87.1-1989, y protecci6n para sus oidos/audici6n mientras opere esta unidad. Use siempre una mascara facial o para protegerse contra el polvo si la operaci6n levanta polvo. Use pantalones largos y gruesos, guantes y camisa de manga larga. No use pantalones cortos, sandalias ni trabaje descalzo.
OTRAS ADVERTENCIAS • DE SEGURIDAD Nunca moje ni rocie la unidad con agua ni con ningQn otro liquido. Mantenga las manijas secas, limpias y sin residuos. Limpie la unidad luego de cada uso, lea las instrucciones de Limpieza y Almacenamiento. Guarde estas instrucciones. ConsQItelas con frecuencia y utilicelas para ensedar a otros usuarios. Si le presta esta unidad a alguien, prestele tambien estas instrucciones.
APLICACION • Use esta unidad para cultivar tierra herbosa y tierra negra ligera a mediana. Control del regulador Tambien se utiliza para cultivar Areas de jardines, alrededor de arboles, etc. NO SE REQUIERE DE HERRAMIENTAS ENSAMBLAJE PARA EL -- Manija de la cuerda de arranque Cubierta del filtro de aire Silenciador Bujfa de encendido Control de encendido _ Palanca del obturador Manija superior y apagado \ \ Perillas del manubrio Tapa del combustible Bombilla del cebador Protector de dient
ENSAMBLE DELA UNIDAD Bot6n de ajuste de altura Desembale con cuidado el contenido y verifique que no haya piezas da_adas. _--_-_,_ Ensamblaje de la rueda INSTALACI(_N Y AJUSTE DEL ENSAMBLAJE DE LA RUEDA Gu{a de _ el ensamblaje de la rueda debe set instalado antes de poner evitar lesiones personales graves, j enDVERTENCIA: funcionamiento la Para unidad. Bajar _ Subir "_-____ la rueda Fig.
INSTRUCCIONES COMBUSTIBLE PARA MEZCLAR EL ACEITE Y EL El combustible viejo o mal mezclado son los motivos principales del mal funcionamiento de la unidad. AsegQrese de usar combustible nuevo, limpio y sin plomo. Siga las instrucciones en detalle para mezclar correctamente el aceite y el combustible. Definici6n de los combustibles Gasolina sin plomo* de mezcla 1 gal6n EE. UU.
ADVERTENClA: Evite los arranques accidentales. Col6quese en posici6n de inicio cuando tire de la cuerda de arranque (Fig. 6). El operador y la unidad deben estar en una posici6n estable al arrancar la unidad para evitar graves lesiones personales. INSTRUCCIONES Control Control de encendido y apagado Arranque (I} DE ARRANQUE 1. Mezcle la gasolina con el aceite. Consulte Instrucciones para mezclar el aceite y el combustible. 2. Llene el tanque de combustible.
ADVERTENCIA: Vista en forma adecuada para reducir el riesgo de lesiones cuando opere esta unidad. No use ropa holgada ni alhajas. Use protecci6n ocular y auditiva. Use pantalones largos y gruesos, botas y guantes. No use pantalones cortos, sandalias ni trabaje descalzo. CONSEJOS PARA LA OPERACION 1. Transporte el cultivador hacia el b,rea de trabajo antes de arrancar el motor. Consulte Mover la unidad.
ADVERTENClA: Nunca realice manteni-miento ni reparaciones con la unidad funcionando. Realice siempre el mantenimiento y las reparaciones con la unidad fria. Desconecte el cable de la bujia de encendido para cerciorarse de que la unidad no arrancar& PROGRAMA DE MANTENIMIENTO Estos procedimientos requeridos para el mantenimiento deben ser realizados con la frecuencia indicada en la tabla. Deben set incluidos como parte de toda puesta a punto de cada temporada.
MANTENIMIENTO Nettoyage DEL FILTRO DE AIRE Cubierta del filtro de aire Pantalla du Filtre a Aire No mantener debidamente su filtro de aire puede resultar en funcionamiento inadecuado o puede causar daSo permanente a su motor. 1. Abra la tapa del filtro de aire desenroscando el tornillo correspondiente (Fig. 10). 2. Saque el filtro de aire y la pantalla que esta detras del mismo (Fig. 10). 3. Lave el filtro con detergente y agua. Enjuague bien el filtro y dejelo secar.
CAMBIO DE LA BUJIA DE ENCENDIDO f 1. Apague el motor y espere que se enfrie. Tome el alambre de la bujia con firmeza y saquelo de la bujia de encendido. 2. Limpie alrededor de la bujia de encendido. Saque la bujia de encendido de la cabeza del cilindro girando una Ilave de casquillo de 16 mm (5/8 de pulgada) en sentido antihorario. _ 3. raspe ni limpie los electrodos. El motor podria daSarse si PRECAUClON: limpie con de arena, ni penetran pequeSas No particulas en elchorro cilindro.
apague siempre su unidad y espere que se enfrie antes de I Para evitar graves lesiones personalesl i limpiarlo o realizar cualquier tipo de mantenimiento. U _ADVERTENCIA: LIMPIEZA o o Use un cepillo pequedo para limpiar la parte exterior de la unidad y para mantener los respiraderos libres de obstrucciones. No use detergentes fuertes ni limpiadores derivados del petr61eo como queroseno.
CAUSA ACCION Eltanque decombustible estavacio Lleneeltanque concombustible bienmezclado Elmotorestainundado Coloque lapalanca delobturador enlaposici6n 3,oprimaelgatillo delregulador y tiredelacuerda dearranque.
GARANTJA LIMITADA DEL FABRICANTE PARA: MTD LLC concede la garantia limitada establecida debajo para mercancias nuevas que sean compradas y usadas en los Estados Unidos, sus posesiones y territorios. MTD LLC garantiza este producto contra defectos en el material y la mano de obra durante un periodo de dos (2) a_os, a partir de la fecha de compra original y a su entera discreci6n, arreglara o substituira sin costo alguno cualquier pieza cuyo material o mano de obra se considere defectuoso.