
Instruction manual


MTD 4000 Instruction Manual — Rev.M_11/19/14
25
Section 6—Operating Instructions
6.1 General Operating Instructions
Before you start:
a) Review precautions and contraindications in Section 3.
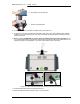
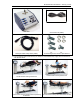
b) Verify connection of the line cord to a grounded wall receptacle and the MTD 4000.
c) Make sure the patient safety switch is attached and handed to the patient.
d) Note: MTD 4000 will display E-4 if patient safety switch is not attached.
e) Note: Descriptions of the symbols used on controls are in Section 2.
f) Note: Detailed descriptions of controls and connections are in Section 4.
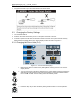
1. Turn the power on.
2. The automatic startup test will run for 1~2 seconds.
3. After test completion, the user can proceed with normal parameter setting.
6.2 Setting up the Continuous Mode
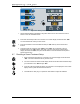
Figure 6.1—Continuous Mode Display
1. Press the output mode button to set the MTD 4000 to the continuous mode. The LED next to
should be lit.
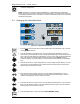
2. Press the set button to set traction force. The “Hold” display will start flashing. Turn the
control knob to set the desired value. Press the set button again to save the Hold value.
NOTE: When an indicator is flashing, no key press within 10 seconds will cause the flashing
to automatically stop.
3. Press the time button to set the treatment time. The timer display will start flashing. Turn the
control knob to set the desired time in minutes. Press timer button again to save the time.
Flashing stops once the time is saved.
4. Press the speed button to set traction speed (FAST/NORMAL/SLO
W
).
5. Press the start button. All parameter settings are confirmed and the treatment starts.