
Manual
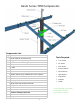
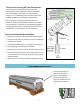
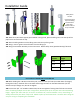

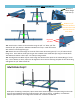
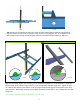
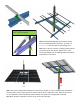
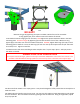

Table Of Contents

6
113 A
114 A
113 C
Notches in
I-beam ange
must face up.
113 B
Alignment
Set Bolts
113: Install center I-beams to the 3x5 tubes using the 3/4" x 2” bolts, 3/4” at
washers & 3/4” split washers. DO NOT TIGHTEN at this step. Install all I-beams
with notches in the ange facing up.
114: Aach the two I-beam wings on the ends of the center beam using the 1/2” x 1 1/4” bolts and 1/2”
ange nuts. There will be 4 bolts per wing on the standard series and 8 bolts per wing on the HD Series.
The XHD Series ulizes 4 of the 3/4” x 2” bolts per wing instead.
115: The Alignment Set Bolts may be used to align the I-Beam Center piece to the I-Beam Wings, if neces-
sary. Once I-beams are level, make sure all alignment set screws are touching the plate of the I-Beam wing
and ghten the 1/2” bolts to 45 lbs.
Use hardware labeled STEP 4 in the Bolt Kit
114 B
115
Addional 1/2”
bolts for HD Series.
Standard Series will
not have holes for
these bolts.
Mul-pole: If installing a mul-pole, splice center beam secons together and splice wings on the ends.
Use the same hardware and torque values listed in 114 and 115 above. In addion, use hardware
labeled “Splice Bolt Kits” and “Alignment Set Bolt Kits” located in the Bolt Kit.
Mul-Pole Only!!