
Manual
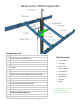
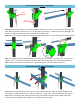
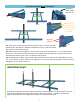
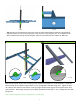
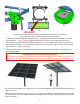

Table Of Contents

5
107 A
108
107 B
109 A
109 B
112
111 A
111 B
111: Aach the 3x5 rectangular tubes to the 4.5” pipe using the 3/4” x 5” bolts, 5” square washers & 3/4”
split washers. Aach tubes to the 2.5” pipe using the 1/2” x 4 1/2” bolts, 1/2” at washers & split washers.
112: Install the remaining 3x5 rectangular tube. Snug up all 4 bolts, but leave loose enough to allow for
some play when installing I-beams. Adjust as necessary to level the mount.
16”
16”
Screw
Adjuster
Plate
Adjuster
Use hardware labeled STEP 2 in the Bolt Kit
Use hardware labeled STEP 3 in the Bolt Kit
109 C
110
109: Center pipes so there is approximately 16” on either side of the sleeve. Slide collars on 4.5” pipe and
ghten 1/2” x 1” square head set bolts to 45 lbs. Hold collar rmly against the sleeve when ghtening.
110: If needed, slide plasc shim between 2.5” pipe and adjuster sleeve to reduce movement.
107: Aach the Screw Adjuster to the tab on the Back Plate with the 1/2” x 1 1/2” Bolt. If using the Manual
Plate Adjuster, aach it with the 1/2” x 1 1/2” Bolt and 1/2” ange nut. Make sure the bolt is snug ght, but
do not over-ghten to allow for some movement of the adjuster tab.
108: Slide the 2.5” pipe through the screw adjuster sleeve & slide the 4.5" pipe through the U Bracket sleeve.