
Manual
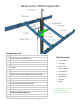
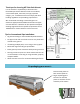
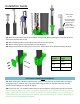
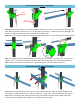
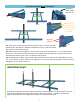
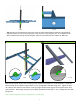
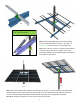
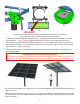

Table Of Contents

A
Pole Mount Side View
Note: Adjuster and Support Pole Omitted for Clarity
NOTE: ONLY ONE SIDE SHOWN.
REPEAT ON OPPOSITE SIDE FOR 2ND
BOLT AND FRONT FOR 3RD BOLT
NOTE: ONLY ONE SIDE SHOWN.
REPEAT ON OTHER SIDE.
TWO BOLTS TOTAL
NOTE: ONLY ONE SIDE SHOWN.
REPEAT ON OTHER SIDE.
TWO BOLTS TOTAL
NOTE: ONLY ONE SIDE SHOWN.
REPEAT ON OTHER SIDE.
TWO BOLTS TOTAL
POLE CAP
DETAIL A
SCALE 1 : 8
15/32" hole
in U-Bracket
High Tilt/High Wind Additional Bolt Detail
SHEET 1 OF 1
3/30/17
TJ
SCALE: 1:16
REV
DWG. NO.
A
SIZE
TITLE:
NAME
DATE
MFG APPR.
ENG APPR.
CHECKED
DRAWN
PROPRIETARY AND CONFIDENTIAL
THE INFORMATION CONTAINED IN THIS
DRAWING IS THE SOLE PROPERTY OF
MT SOLAR LLC. ANY REPRODUCTION
IN PART OR AS A WHOLE WITHOUT THE
WRITTEN PERMISSION OF MT SOLAR LLC
IS PROHIBITED.
SPIN PREVENTION ADDENDUM
Instructions:
This is the final step in the installation, to be done
once array is installed, hoisted into place, and the
set bolts are tightened. Use the drill bit provided
by MT Solar to drill through the existing 15/32" holes
in the U-bracket and through the support pipe on
both sides and front. Thread in the 1/2" x 1" bolt
through the pole cap and support pipe.
Through-bolts are required for the following sizes:
• TOP-12 or larger, 60C & 72C = 2 BOLTS
• TOP-15-TALL-72C = 3 BOLTS
• TOP-20-TALL-60C = 3 BOLTS