
User's Manual
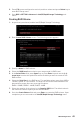
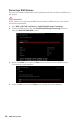

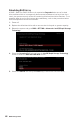
Table Of Contents
- Quick Start
- Specifications
- Package contents
- Block Diagram
- Rear I/O Panel
- Overview of Components
- CPU Socket
- DIMM Slots
- PCI_E1~5: PCIe Expansion Slots
- M2_1~2: M.2 Slots (Key M)
- SATA1~6: SATA 6Gb/s Connectors
- JFP1, JFP2: Front Panel Connectors
- JAUD1: Front Audio Connector
- CPU_PWR1~2, ATX_PWR1: Power Connectors
- JUSBC1: USB 3.2 Gen 2 10Gbps Type-C Connector
- JUSB3: USB 3.2 Gen 1 5Gbps Connector
- JUSB1~2: USB 2.0 Connectors
- JTPM1: TPM Module Connector
- CPU_FAN1, PUMP_FAN1, SYS_FAN1~6: Fan Connectors
- JCI1: Chassis Intrusion Connector
- JCOM1: Serial Port Connector
- JBAT1: Clear CMOS (Reset BIOS) Jumper
- JTBT1: Thunderbolt Add-on Card Connector
- JRTD3: Intel RTD3 Connector
- JRGB1: RGB LED connector
- JRAINBOW1~2: Addressable RGB LED connectors
- JCORSAIR1: CORSAIR Connector
- EZ Debug LED
- LED_SW1: EZ LED Control
- Installing OS, Drivers & Utilities
- UEFI BIOS
- RAID Configuration
- Intel® Optane™ Memory Configuration
- Troubleshooting
- CPU_FAN1, PUMP_FAN1, SYS_FAN1~6: Fan Connectors
- CPU_PWR1~2, ATX_PWR1: Power Connectors
- CPU Socket
- DIMM Slots
- JAUD1: Front Audio Connector
- JBAT1: Clear CMOS (Reset BIOS) Jumper
- JCI1: Chassis Intrusion Connector
- JCOM1: Serial Port Connector
- JCORSAIR1: CORSAIR Connector
- JFP1, JFP2: Front Panel Connectors
- JRAINBOW1~2: Addressable RGB LED connectors
- JRGB1: RGB LED connector
- JRTD3: Intel RTD3 Connector
- JTBT1: Thunderbolt Add-on Card Connector
- JTPM1: TPM Module Connector
- JUSB1~2: USB 2.0 Connectors
- JUSB3: USB 3.2 Gen1 Connector
- JUSBC1: USB 3.2 Gen 2 Type-C Connector
- LED_SW1: EZ LED Control
- M2_1~2: M.2 Slots (Key M)
- PCI_E1~5: PCIe Expansion Slots
- SATA1~6: SATA 6Gb/s Connectors
Installing RAID Driver
New Operating System Installation
The following details the installation of the drivers while installing Windows 10 x64 bit
Editions or newer operating system.
1. During the operating system installation, after selecting the location to install
Windows click on Load driver button to install a third party RAID driver.
2. When prompted, insert the USB flash drive with Intel RAID Drivers and then click
Browse.
▪ To make an Intel RAID Drivers USB flash drive. Insert the MSI Drive Disk into the
optical drive. Copy all the contents in \\Storage\Intel\
3. Navigate to the directory containing the saved Intel RAID drivers, then click OK.
4. Select the (iaStorAC.inf) driver, click Next.
5. You have successfully installed the RAID driver, and Windows setup should
continue.
6. Leave the disk/ USB drive in the computer until the system reboots itself.
Windows setup will need to copy the files after the RAID volume is formatted, and
Windows setup starts copying files.
Installing Intel
®
Rapid Storage Technology Software
1. As previously mentioned, enable Intel(R) Rapid Storage Technology in BIOS.
2. Insert the MSI Drive Disk into the optical drive.
3. Click the Select to choose what happens with this disc pop-up notification, then
select Run DVDSetup.exe to open the installer. If you turn off the AutoPlay feature
from the Windows Control Panel, you can still manually execute the DVDSetup.
exe from the root path of the MSI Drive Disk.
4. Under the Drivers/Software tab, check the Intel RAID Drivers check-box.
5. Click the Install button.
6. When prompt you to restart, click OK button to finish.
7. Restart your computer and enter the Windows operating system.
8. Double-click the Intel
®
Rapid Storage Technology icon to open the Intel
®
Rapid
Storage Technology software.
69
RAID Configuration