
User Manual
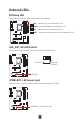
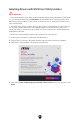
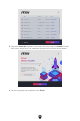
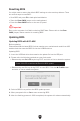
Table Of Contents
- Quick Start
- Specifications
- Special Features
- Package Contents
- Back Panel Connectors
- Overview of Components
- CPU Socket
- DIMM Slots
- PCI_E1~3: PCIe Expansion Slots
- M2_1~4: M.2 Slots (Key M)
- SATA_1~4 & SATA_A1~2: SATA 6Gb/s Connectors
- JAUD1: Front Audio Connector
- JFP1, JFP2: Front Panel Connectors
- CPU_PWR1~2, ATX_PWR1: Power Connectors
- JCI1: Chassis Intrusion Connector
- JUSB1: USB 3.2 Gen 2 Type-C Front Panel Connector
- JUSB2: USB 3.2 Gen 1 Connector
- JUSB3~4: USB 2.0 Connectors
- JTPM1: TPM Module Connector
- JOC_FS1: Safe Boot Jumper
- JDASH1 : Tuning Controller Connector
- CPU_FAN1, PUMP_FAN1, SYS_FAN1~5: Fan Connectors
- JBAT1: Clear CMOS (Reset BIOS) Jumper
- BAT1: CMOS Battery
- JRGB1: RGB LED Connector
- JARGB_V2_1~3: A-RAINBOW V2 (ARGB Gen2) LED Connectors
- Onboard LEDs
- Installing OS, Drivers & MSI Center
- UEFI BIOS

51
Installing Drivers with MSI Driver Utility Installer
Important
Some new network chips have not been natively supported by Windows 10/ Windows
11. It is recommended that the LAN driver be installed before installing drivers with
MSI Driver Utility Installer. Please refer to www.msi.com to install the LAN driver for
your motherboard.
The MSI Driver Utility Installer will only pop up once. If you cancel or close it during
the process, please refer to the Live Update chapter of the MSI Center manual to
install the drivers. You can also go to www.msi.com to search your motherboard and
download the drivers.
MSI Driver Utility Installer needs to be installed over the internet.
1. Start up your computer in Windows 10/ Windows 11.
2. Select Start > Settings > Windows Update, and then select Check for updates.
3. MSI Driver Utility Installer will pop up automatically.
4. Select the I have read and agree to the MSI Terms of Use check box, and then click
Next.