
Installation Guide

Natural Stone Slate Tile Installation Manual
e following procedure for the installation of Natural Stone Slate Tile (Gauged Back) for Flooring.
It may be used over any wood or cement oor that is structurally sound and dry. In new home con-
struction where plywood is used as a sub oor, it is suggested that an underlayment or backer board
needs to be attached to the sub oor to insure rigidity where slate oors will be installed.
SETTING
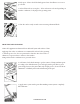
1. Clean area where slate is to be installed. In the case of smooth painted or
varnished oors, it is necessary to sand with a very coarse sand paper to as-
sure a good mastic bond
www.msistone.com
2. Lay out the slate to understand pattern choices. For multi color slates,
blend tile randomly to give proper blend of colors as slate color vary from tile
to tile.
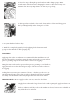
3. Using a notched 1/4” x 1/4”trowel, hold at a 45o angle to be sure a full ridge
is made with the notches. Spread thinset on oor starting at a far corner so
you can back out of the room as you proceed. Spread just enough area so you
can reach over it to place the slate.
Natural cle slates have a thickness variation. Spread a good amount of
thinset on the oor to make up for any thickness variation. Adding or taking
away thinset will ensure that all the tiles are evenly set.
4. Maintain a grout space between the pieces as recommended by the slate
supplier (1/4” or 3/8”) depending on the size of the tiles. To do these accu-
rately, use spacers.
Slate may also be laid without joints, in which case edges are then butted
against one another, only if the
Material is honed or polished, however we recommend 1/16” - 1/8” grout
joint.
M S International, Inc.