
User Manual
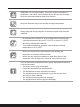
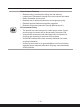


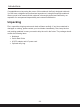
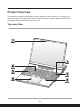
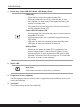

Table Of Contents
- Copyright and Trademarks Notice
- Introductions
- How to Get Started
- Begin to Use the Notebook
- How to Use the Notebook Comfortably
- How to Manage Power Supply
- How to Set Up a Power Plan in Windows OS
- How to Set Up Windows Hello (optional)
- How to Use the Touchpad
- About HDD and SSD
- About M.2 SSD Slot
- How to Connect the Internet in Windows OS
- How to Set Up Bluetooth Connection in Windows OS
- How to Connect External Devices
- How to Use USB Power Share Function (optional)
- Video: How to Use RAID Function (optional)
- Video: How to Use MSI One Touch Install

2-4 2-5
Introductions
1. Power Key/ Power LED/ GPU Mode LED/ Battery Reset
Power Key
• Press this key to turn the notebook power ON.
• While the notebook is turned on, press this key to force
the computer into sleep state. Press again to wake up the
system from sleep state.
• Long press this key and follow the on-screen instruction to
turn the notebook power OFF.
Power LED/ GPU Mode LED
• Glowing white when the notebook power is turned on and in
integrated GPU mode.
• Glowing amber when it is in optionally supported discrete
GPU mode.
• LED goes off when the notebook goes to the sleep state.
• LED goes off when the notebook is turned off.
Battery Reset
• Whenever the system firmware (EC) is upgraded or the
system hangs, please 1) remove the AC power; 2) long
press this key for 20 secs and then the LED goes to blink,
and after 5 more secs the LED would go off; 3) connect the
AC power; 4) power on the notebook.
2. Status LED
Num Lock
Glows when the Num Lock function is activated.
3. Fingerprint Sensor (optional)
Use the fingerprint sensor to set up user’s fingerprints on the notebook, and use it to
unlock the notebook.
4. Touchpad
This is the pointing device of the notebook.