
Installation Owner manual


INSTALLATION INSTRUCTIONS 3
M S D • W W W . M S D P E R F O R M A N C E . C O M • ( 9 1 5 ) 8 5 7 - 5 2 0 0 • F A X ( 9 1 5 ) 8 5 7 - 3 3 4 4
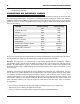
Total Timing: This is the total amount of timing that the engine will achieve. This is the amount that
all of the electronic curve and settings will be based from. This setting also includes any amount of
vacuum advance that you plan to use.
Vacuum Advance: The vacuum advance will advance the timing under part throttle conditions when
the engine is not under a heavy load. This advance is added on to the electronic timing curve as
well. The advance will begin as low as 4-in. of vacuum and will max out at 10-in. of vacuum. There is
a separate chart in Figure 3 that illustrates the vacuum curve selection.
Locked-Out Timing: If you do not want to have a timing advance, set the rotary dials in the Locked-
Out position. This means the timing will not move from the setting you position the distributor in. You
may however, take advantage of a start retard (see below).
Start Retard: When you select Locked-Out timing, the engine may be hard to crank. A start retard
amount can be selected to aid in cranking. This amount can range from 5°, 10°, 15° and 20°. When
the engine is cranking, the timing will be retarded. Once the engine reaches 600 rpm, the timing will
return to the locked-out setting.
Note: The total amount of any timing change that can be achieved is 34° (25° for the electronic
advance with vacuum an additional 9°). This includes the electronic advance as well as the
vacuum advance.
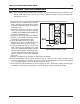
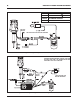
SETTING UP THE DISTRIBUTOR
Rotate the engine to TDC then to 12° - 15° BTDC. With the rotary switches set to "1" and "7" (These
settings will be used to start the engine and adjusted later.) install the distributor with th rotor pointing
to the number 1 spark plug wire and start the engine.
With the engine running and a timing light connected, adjust the timing to the desired Total Timing.
(Example 32° without vacuum advance) Once you've set the total timing, turn the engine off and
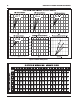
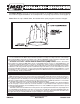
remove the distributor cap. Set the rotary dials to achieve the desired timing curve (Figure 3 and 4).
For example with total timing set at 32° and the rotary dials set to "2" and "9". The engine will idle
at 12°, timing will start to advance at 1,100 rpm and will be fully advanced by 3,500 rpm, plus a 15°
vacuum advance at 10 in-Hg (inches of vacuum).
If your balancer does not have any timing marks, MSD offers timing tape kit PN 8985.