
Installation Owner manual

WARNING: Disconnect the battery during installat ion. When
disconnecting the battery, always remove the
negative cable first and install it last.
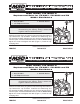
Figure 1 Washer Installation.
MSD Rotor, PN 84673
Replacement Rotor for PN 8351, PN 8353 and PN
84891 Distributors
Parts Included:
1 – Rotor, PN 84673
2 – 5/8” Phillips Head Screws
Mark the location of the plug wires before removing them from the
cap. Remove the cap and rotor. Install the new rotor being sure
the round and square aligning pegs are lined up correctly on the
advance plate. Install the Belleville washers with the dome facing
up on the screws and tighten the rotor (Figure 1). Install the cap
and plug wires.
2 – Belleville Washers
M S D • W W W . M S D P E R F O R M A N C E . C O M • ( 9 1 5 ) 8 5 7 - 5 2 0 0 • F A X ( 9 1 5 ) 8 5 7 - 3 3 4 4
© 2012 Autotronic Controls Corporation
FRM27525 Revised 01/12 Printed in U.S.A.
WARNING: Disconnect the battery during installat ion. When
disconnecting the battery, always remove the
negative cable first and install it last.
Figure 1 Washer Installation.
MSD Rotor, PN 84673
Replacement Rotor for PN 8351, PN 8353 and PN
84891 Distributors
Parts Included:
1 – Rotor, PN 84673
2 – 5/8” Phillips Head Screws
Mark the location of the plug wires before removing them from the
cap. Remove the cap and rotor. Install the new rotor being sure
the round and square aligning pegs are lined up correctly on the
advance plate. Install the Belleville washers with the dome facing
up on the screws and tighten the rotor (Figure 1). Install the cap
and plug wires.
2 – Belleville Washers
M S D • W W W . M S D P E R F O R M A N C E . C O M • ( 9 1 5 ) 8 5 7 - 5 2 0 0 • F A X ( 9 1 5 ) 8 5 7 - 3 3 4 4
© 2012 Autotronic Controls Corporation
FRM27525 Revised 01/12 Printed in U.S.A.