
Installation Manual


INSTALLATION INSTRUCTIONS 7
M S D • W W W . M S D P E R F O R M A N C E . C O M • ( 9 1 5 ) 8 5 7 - 5 2 0 0 • F A X ( 9 1 5 ) 8 5 7 - 3 3 4 4
STARTING AND TUNING TIPS
• Position the rev limiter rotary dial at your desired rpm limit.
• At this point, the distributor should be installed at your desired timing and wired to the coil, and
ground.
• It is recommended that you have a dial-back timing light or degreed balancer. MSD offers a timing
tape that you can apply to your balancer as PN 8985.
• Select a Locked-Out with Start Retard to start the engine (These are Curves Q, R, S or T). This way
you can position the distributor to obtain your ideal total timing before selecting a timing curve.
• If you are going to use a vacuum advance curve, use a 3/16" vacuum line connected to ported
vacuum. T his means a v acuum source that is above the throttle plates. Also, remember to
disconnect and plug the vacuum line when setting the timing curve.
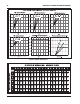
INSTALLING THE TIMING TAPE
1. Locate the top-dead center or 0° mark on the harmonic
balancer or timing wheel.
2. Select the correct timing tape for your application. Make
sure you know the correct size of the harmonic balancer
or timing wheel you’re using. If this is not known, measure
the diameter of the harmonic balancer or timing wheel’s
edge and note the size.
3. Choose the timing tape th at matche s your balancer’s
diameter. Be sure that the mating surface is clean of any
dirt, grease or debris. Locate and note the 0° mark on the
timing tape.
4. Align the 0° mark on the tape with the TDC mark on the
balancer. Make sure that the markings on the tape are
facing you, and place the tape on the surface. Use firm
pressure for proper adhesion. ATC (after top-dead center)
will be to t he left of the stoc k mark, and BTC (before
top-dead center) will always be to the right of the stock
mark.
Figure 9 The Timing Tape Installed.
ZERO
DEGREE
(TDC)