
Installation Manual


2 INSTALLATION INSTRUCTIONS
M S D • W W W . M S D P E R F O R M A N C E . C O M • ( 9 1 5 ) 8 5 7 - 5 2 0 0 • F A X ( 9 1 5 ) 8 5 7 - 3 3 4 4
Electronic Centrifugal Advance: Since this distributor is all electronic, there really is no mechanical
or centrifugal advance. On a standard distributor, this advance would be called centrifugal so it will
be referred to as the electronic centrifugal advance. The chart on page 4 shows all of the different
combinations you can achieve by simply turning the two rotary dials located under the distributor cap.
Total Timing: This is the total amount of timing that the engine will achieve. This is the amount that
all of the electronic curve and settings will be based from. This setting also includes any amount of
vacuum advance that you plan to use.
Vacuum Advance: The vacuum advance will advance the timing under part throttle conditions when
the engine is not under a heavy load. This advance is added on to the electronic timing curve as
well. The advance will begin as low as 4-in. of vacuum and will max out at 10-in. of vacuum. There is
a separate chart in Figure 3 that illustrates the vacuum curve selection.
Locked-Out Timing: If you do not want to have a timing advance, set the rotary dials in the Locked-
Out position. This means the timing will not move from the setting you position the distributor in. You
may however, take advantage of a start retard (see below).
Start Retard: When you select Locked-Out timing, the engine may be hard to crank. A start retard
amount can be selected to aid in cranking. This amount can range from 5°, 10°, 15° and 20°. When
the engine is cranking, the timing will be retarded. Once the engine reaches 600 rpm, the timing will
return to the locked-out setting.
Note: The total amount of any timing change that can be achieved is 34° (25° for the electronic
advance with vacuum an additional 9°). This includes the electronic advance as well as the
vacuum advance.
Note: It is recommended to have a dial-back timing light, timing tape or a fully degreed balancer to
set the timing correctly.
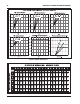
CHOOSING AN ADVANCE CURVE
The function of the advance curve is to match the ignition timing to the burning rate of the fuel with
the speed (rpm) of the engine. The piston is traveling much faster through the combustion stroke at
5,000 rpm compared to 1,000 rpm. Any factor that changes the burning rate of the fuel or the engine
speed can cause a need for an ignition timing change. Figure 2 shows some of the factors that will
affect engine timing.
FACTOR Advance Timing Retard Timing
For For
Cylinder Pressure Low High
Vacuum High Low
Energy of Ignition Low High
Fuel Octane High Low
Mixture (Air/Fuel) Rich Lean
Temperature Cool Hot
Combustion Chamber Shape Open Compact
Spark Plug Location Offset Center
Combustion Turbulence Low High
Load Light Heavy
Figure 2 Ignition Timing Factors.