
Troubleshooting guide

20
sharpening effect without making noise more visible.
The Detail Enhancement and Edge Enhancement methods are additive, so the results of both sharpening methods are combined. An
example of this would be to use general sharpening to increase detail in the entire image. If object edges are over enhanced, then negative
edge-qualied sharpening is applied to reduce the over enhancement of the edges. If general sharpening is applied to a noisy image, the
increase in noise may be objectionable. In that case, positive edge-qualied sharpening should be applied to sharpen object edges, but
not increase the noise level.
If the source content is properly produced, we generally recommend leaving these controls at level 0.
12. Video Smoothing: Allows you to remove the rough edges in an image, such as the staircase appearance of a diagonal line drawn on
the screen (called the “stair stepped effect”). This smoothing technology provided by the VRS ClearView video processor creates
the effect of a high-resolution image without softening the entire image. The video smoothing level can be set between 0 and +4.
The default is level 0, which turns off video smoothing.
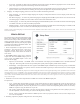
13. Demo Mode (VRS ClearView): Allows you to enable a special split-screen mode for the demonstration of VRS ClearView video
processing technology. It can also be used as an aid for setting picture adjustments for Detail Enhancement, Edge Enhancement,
Video Smoothing and Noise Reduction. It should NOT be used for normal movie watching. The available options are:
• On – The video screen will be split in half. The left side demonstrates the result of the VRS Clear View video processing, and
the right side shows video without the help of VRS ClearView processing.
• Off (default) – Normal viewing mode.
The following picture adjustment control is only available for the HDMI 2 video output:
14. Sharpness: Allows you to set the sharpness level for video output. Sharpness is a video processing function that can control the image
sharpness but at the same time may cause unwanted artifacts. For HDMI 2 output, the sharpness level can be set between 0 and +2,
with the default level being 0. The higher the level, the sharper the video details are. However, too high a sharpness level may cause
white lines or halo-like effects to appear around objects.
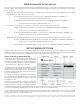
HDMI Options
HDMI Options are a sub-menu of the Video Setup menu. It allows you to congure some video settings that are unique to the HDMI
output. To enter this sub-menu, select “HDMI Options” from the Video Setup menu. To exit this sub-menu, press the RETURN button
or the LEFT arrow key. The following HDMI options are available:
1. Color Space (HDMI 1) – To select the color space for the HDMI 1 output. The available options are:
• Auto (Recommended) – The player checks with the display device to automatically determine what color space to use. If the
display device supports YCbCr 4:4:4, then it will be used to avoid extra color space conversion.
• RGB Video Level – The HDMI output uses RGB color space and normal signal range suitable for video displays.
• RGB PC Level – The HDMI output uses RGB color space and expands the signal range. The expanded signal range is suitable
for personal computer (PC) displays. Some TVs are designed to be used as a PC monitor, and expect signal in expanded RGB
range when the DVI input is selected. For these displays if the video signal uses the normal RGB range, the black-white contrast
will be reduced. You can set the player to use the RGB PC Level output and restore proper contrast.
• YCbCr 4:4:4 – The HDMI output uses YCbCr 4:4:4 color space.
• YCbCr 4:2:2 – The HDMI output uses YCbCr 4:2:2 color space. Generally this is the color space that is closest to the color
space encoded on the discs. (All discs are encoded in YCbCr 4:2:0 color space, and the video decoder decodes it into YCbCr
4:2:2.)
2. Color Space (HDMI 2) – To select the color space for the HDMI 2 output. The available options are the same as those for Color
Space (HDMI 1).
3. Deep Color (HDMI 1) – To select the Deep Color mode for the HDMI 1 output. Deep Color is an OPTION for some TVs or projectors
that feature HDMI v1.3 or higher input. Normally, each pixel of the video image is transmitted using 24-bit data (8-bit per channel
for R, G, B or Y, Cb, Cr). If Deep Color is supported, each pixel of the video image can be transmitted using 30-bit (10-bit per
channel) or 36-bit (12-bit per channel) data. The increased bit depth should result in smoother color transitions and better gradients.
The available options are:
• 36 Bits – Use the 36-bit per pixel Deep Color mode.
• 30 Bits (Dithered) – Use the 30-bit per pixel Deep Color mode with dithering technique.
• 30 Bits – Use the 30-bit per pixel Deep Color mode.
• Off (Dithered) –Do not use Deep Color, but apply the dithering technique.
• Off (default) – Do not use Deep Color.
4. Deep Color (HDMI 2) – To select the Deep Color mode for the HDMI 2 output. The available options are the same as those for
HDMI Deep Color (HDMI 1).