
Service manual
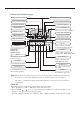
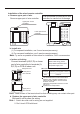

a. Remove upper part of wire
Remove upper part of wire controller
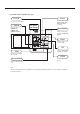
b. Install wire
(1) For exposed installation, use 2 wood screws(accessory).
Note: Try as far as possible a flat surface for installation. Don't use excessive
PCB is mounted on lower part of wire
controller, be careful not to damage
Lower part of wire
controller
Upper part of wire
controller
(2) For recessed installation, use 2 wood screws(accessory).
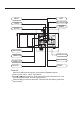
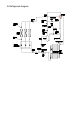
c. Indoor unit wiring
Connect terminals (A,B,C,D) on lower
part of wire controller to terminals (A,
B,C,D) on PCB of indoor unit.
Hint:
When make wiring, please
keepa distance between wires
and power supply cord.
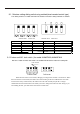
Cord kind
Size
Shield wire (4 core) (refer to Hint 3,4)
0.33mm
2
Wire size
Use shielede wires for telecommunication
between wire controller and indoor unit;
indoor unit and outdoor unit. Ground the
shield on one side.
Otherwise misoperation because of noise
may occur.
Signal wire is self-provided.
Shielded wire
ground
Lower part of
wire controller
A B C D
Upper part of
wire controller
wiring from here
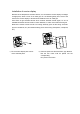
d. Replace the upper part of wire controller
Hint: 1. Switch box and cord for wiring are not supplied.
Be careful not to press the wiring.
2. Don't touch PCB with hand.
Hint: Tread surface of the terminal well so that shielding may not contact other part.
Installation of the wired remote controlller