
Install Manual


Page 2 of 9 507043-04Cmrcool.com
These units are designed for use in residential and
commercial type buildings. Units should be installed
with combinations listed in the Air-Conditioning, Heating
Products. Refer to http://www.ahridirectory.org.
Before installation, inspect the unit for shipping damage.
If damage is found, notify the transportation company
Before installing, modifying, or servicing system, main
electrical disconnect switch must be in the OFF position.
There may be more than 1 disconnect switch. Lock out
and tag switch with a suitable warning label. Electrical
shock can cause personal injury or death.
WARNING
Safety Precautions
Follow all safety codes. Wear safety glasses and work
gloves. Use quenching cloth for brazing operations.
thoroughly and follow all warning or cautions attached to
the unit.
1. Always wear proper personal protection equipment.
2. Always disconnect electrical power before removing
panel or servicing equipment.
3. Keep hands and clothing away from moving parts.
4. Handle refrigerant with caution, refer to proper MSDS
from refrigerant supplier.
5. Use care when lifting, avoid contact with sharp edges.
Installation
Unit Location
NOTE: In some cases noise in the living area has been
traced to gas pulsations from improper installation of
equipment.
1. Locate unit away from windows, patios, decks, etc.
where unit operation sounds may disturb customer.
2. Ensure that vapor and liquid tube diameters are
appropriate to capacity of unit.
3.
unecessary turns and bends.
4. Leave some slack between structure and unit to
absorb vibration.
5. When passing refrigerant tubes through the wall, seal
opening with RTV or other silicon-based caulk.
6. Avoid direct tubing contact with water pipes, duct work,
7. Do not suspend refrigerant tubing from joists and
studs with a rigid wire or strap which comes in direct
contact with tubing.
8. Ensure that tubing insulation is pliable and completely
surrounds suction line.
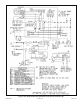
When outdoor unit is connected to factory-approved indoor
unit, outdoor unit contains system refrigerant charge for
operation with indoor unit of the same size when connected
check refrigerant charge using charging information
located on control box cover.
NOTE: Maximum liquid-line size is 3/8 in. O.D. for all
residental applications including long lines.
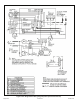
Outdoor Section
Zoning ordinances may govern the minimum distance the
condensing unit can be installed from the property line.
Install on a Solid, Level Mounting Pad
The outdoor section is to be installed on a solid foundation.
This foundation should extend a minimum of 2” (inches)
beyond the sides of the outdoor section. To reduce the
possibility of noise transmission, the foundation slab
should NOT be in contact with or be an integral part of the
building foundation.
If conditions or local codes require the unit be attached to
pad or mounting frame, tie down bolts should be used and
fastened through knockouts provided in unit base pan.
Rooftop Installations
Mount on level platform or frame 6 inches above roof
surface. Place unit above a load-bearing wall and isolate
unit and tubing set from structure. Arrange supporting
members to adequately support unit and minimize
transmission of vibration to building. Ensure roof structure
and anchoring method is adequate for location. Consult
local codes governing rooftop applications.
NOTE: Unit must be level to within ± 1/4 in./ft per
Clearance Requirements
snow, or ice from roof or eaves cannot fall directly on unit.